Calcofluor White Staining: A Simple Method for UV-Induced Fluorescence Visualization of Cellulose Deposits in Cell Walls of Dicot Plant Stem Sections
Abstract
Source: Pradhan M. et al. Histochemical Staining of Arabidopsis thaliana Secondary Cell Wall Elements. J. Vis. Exp. (2014)
In this video, we describe a staining procedure to visualize cellulose deposition within cell walls of Arabidopsis thaliana, a dicot plant, using calcofluor white, which specifically binds to β-linked glucans, exhibiting fluorescence under UV light.
Protocol
1. Stem Embedding
- Make a 7% agarose solution in water (7 g of electrophoresis-grade agarose in 100 ml distilled water). Dissolve the agarose by autoclaving for 20 min or by microwaving for 20 min at lowest intensity (e.g., 10% intensity of a 1,250 watt microwave).
- Prepare a homemade mold for embedding the stems using plastic vials.
- Using a razor blade, cut off the conical bottom of a 2 ml screw-cap microcentrifuge tube (Part A). With a syringe needle, puncture a hole in the tube cap slightly larger than the diameter of the stem to be embedded. Next, cut 0.5 cm off the bottom of a 0.6 ml microcentrifuge tube (Part B).
- Add the cut-off 0.5 cm portion of the 0.6 ml microcentrifuge tube into the precut 2 ml microcentrifuge tube. Seal the two parts using Parafilm (Figure 1).
NOTE: The bottom of the tube is cut to facilitate the removal of the embedded sample after the agarose has solidified. The hole in the cap will aid in holding the stem steady when the stem is embedded in agarose. The mold will serve to hold the agarose and hold the stem straight when embedding. The Parafilm will hold the two parts, A and B, until the agarose is set and the stem is embedded. - Using a razor blade, cut a stem section from the area of interest, (e.g. middle of the first stem internode).
NOTE: Ideally, the stem should be cut just before embedding to avoid destruction by dehydration. Alternatively, the stem can be temporarily stored in a plate containing a filter paper wetted with water. This plate can be placed on ice until ready to be embedded to prevent tissue dehydration and deformation. Storing the stem for periods longer than 30 min without high moisture will cause the stem to dry out.
- Melt the agarose in the microwave at low intensity.
CAUTION: The bottle containing agarose may be hot. Use a mitt to pick up the bottle. Let the melted agarose stand at room temperature (between 20 °C and 25 °C) until it cools to about 50 °C. - Slowly pipette 5 ml of the agarose into the premade plastic mold to fill the vial.
NOTE: Make sure there are no air bubbles in the molds. Air bubbles will cause gaps in the agarose mold and will not completely cover the stem sample, which will eventually lead to uneven cutting of the sample sections.- Let the agarose cool down for 30 to 60 sec to become semisolid. Test with a small toothpick, making sure that it can penetrate and stand up, but not float, in the agarose.
NOTE: If the stem is placed when the agarose is still hot it will damage the sample by shriveling the stem, destroying the cell morphology. - Place the stem in this agarose-filled vial. Make sure that the stem stays straight. Place the perforated cap in such a way that the tip of the stem is held by the cap. Do not turn the screw-on cap. Sometime more than one stem (of a single kind) can be embedded in a single vial; but in that particular case, do not use the cap.
NOTE: If the screw-on cap is turned, the stem will get twisted.
- Let the agarose cool down for 30 to 60 sec to become semisolid. Test with a small toothpick, making sure that it can penetrate and stand up, but not float, in the agarose.
- Leave the vial at room temperature or at 4 °C for 10-30 min, until it solidifies.
- Remove the mold by gently sliding it out of the tube. Open the Parafilm. Push the bottom of Part B of the mold gently with thumb to release the solidified agarose from Part A onto a glass microscope slide.
- Cut the agarose embedded stem into three approximately equal pieces of 1.2 cm in length. Cut out the part of the stem that was not in the agarose and discard it.
- Store these pieces of agarose with the embedded stems in airtight 2 ml microcentrifuge tubes in a dark box at 4 °C until ready to section. Alternatively, store the tubes at 4 °C for a maximum of one week.
NOTE: Storage is possible, but the experimenter needs to be aware that the embedded stems are still alive and, depending of the experiment, artifacts could potentially be introduced.
- Store these pieces of agarose with the embedded stems in airtight 2 ml microcentrifuge tubes in a dark box at 4 °C until ready to section. Alternatively, store the tubes at 4 °C for a maximum of one week.
2. Stem Sectioning
CAUTION: Read the vibratome manual carefully and follow all safety instructions.
- Make sure the specimen disc is clean and completely dry (free of any solid or liquid). Clean the specimen disc with a razor blade to remove any residual glue from prior experiments and wash with water. Then dry with a paper towel.
NOTE: This will ensure that the adhesive works well and binds to the agarose specimen. If this step is not done properly, it is possible that the specimen may not adhere to the disc and will later cause the specimen to fall off the disc during sectioning.- Use soft paper wipes to remove any moisture from the agarose block containing the specimens.
- Place a small drop of tissue adhesive on the specimen disc. Streak out the adhesive to cover the area in the middle of the plate using the tip of the adhesive bottle. Quickly place the agarose block so that the specimens are either perpendicular to or in parallel with the plate for transversal or longitudinal cross-sections, respectively. Allow the adhesive to fix the sample to the specimen disc at room temperature or at 4 °C for 10-30 min.
NOTE: This is a time-sensitive step.
- Fix the specimen disc in place on the buffer tray or trough. The block/s of agarose with the sections should be in parallel with the razor blade. Fill the buffer tray with distilled water at room temperature until the samples are completely submerged.
- Cut a razor blade in half and then trim the ends with a sturdy scissors so that the blade stays completely flat. Attach one-half of the precut razor blade onto the knife holder.
- Set the angle on the knife holder to 84°, the speed to 0.90 mm/sec (position 8 on the vibratome) and frequency to 50 Hz (position 5 on the vibratome). Cut sections of 100 µm thickness. Use continuous mode.
NOTE: This thickness was selected to assure that the tissue can withstand the various acid and base treatments used in some of the staining protocols. Set the window for sectioning and allow 15-20 min on a continuous mode for the vibratome to section an agarose block of approximately 1.2 cm.
- Set the angle on the knife holder to 84°, the speed to 0.90 mm/sec (position 8 on the vibratome) and frequency to 50 Hz (position 5 on the vibratome). Cut sections of 100 µm thickness. Use continuous mode.
- Collect the sections using a disposable plastic pipette during sectioning in the buffer tray. Alternatively, the sections can be transferred from the buffer tray into a glass beaker and then to a clear Petri plate. Transfer few sections to the 2.0 ml microcentrifuge tubes.
NOTE: The specimens are collected from a Petri plate because it is easier to see the sections on a clear background, and because the buffer tray can be primed for the next specimen. - The sections can be stored in a 50 ml tube or collected and stored in 1.5 to 2 ml microcentrifuge tubes at 4 °C for 30 to 60 min.
NOTE: Storing the sections for longer periods will result in poor image quality.
3. Calcofluor White Staining
- Dissolve 0.02 g of fluorescent brightener 28 (calcofluor white M2R) in 10 ml distilled water to prepare a 0.2% stock solution. The 0.2% solution can be stored for six months in a dark bottle at 4 °C. Prepare a working solution of 0.02% by diluting the 0.2% stock solution 10x with distilled water.
- Transfer stem sections to a 2.0 ml microcentrifuge tube. Add to the tube 1 ml of the 0.02% calcofluor white solution. Gently pipette the 0.02% calcofluor white solution up and down.
NOTE: Be careful not to pipette the sections into the pipette tip as this may damage the sections.- Incubate at room temperature for 5 min and repeat the pipetting. Incubate the section for another 3 min at room temperature.
NOTE: Allow the sections to settle onto the bottom of the tube to make it easier to pipette out the solution without damaging the sections. - Use a 1 ml pipette to draw out 700 µl of 0.02% calcofluor white solution and add 700 µl of distilled water; wait for 5 min to rinse out the calcofluor white solution. Repeat the wash 3-4x. Use a 1 ml pipette with the pipette tip cut in such as way that the sections can be pipetted out easily without damage.
- Gently pipette sections into the tip and onto a microscope slide and cover them with a coverslip. Observe the sections under UV light.
- Incubate at room temperature for 5 min and repeat the pipetting. Incubate the section for another 3 min at room temperature.
Representative Results
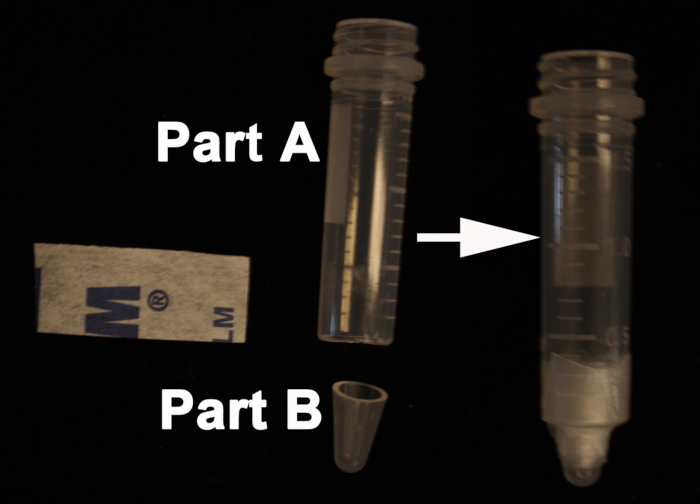
Figure 1. Homemade mold for embedding the stems. On the left side; top of the 2 ml screw-cap microcentrifuge tube (Part A) and the bottom from the 0.6 ml microcentrifuge tube (Part B). On the right side; the Parafilm holding the two parts; A and B to form the final mold.
Disclosures
The authors have nothing to disclose.
Materials
| Agarose | EMD | MERC2125 | CAS Number: 9012-36-6 |
| Fluorescent Brightener 28/ Calcofluor White Stain | Sigma | F3543 | 4,4'-Bis[[4-[bis(2-hydroxyethyl)amino]-6-anilino-1,3,5-triazin-2-yl]amino]stilbene-2,2'-disulphonic acid [CAS Number 4404-43-7] |
| Vibratome | Leica | Leica Vibrating blade microtome VT1000S | http://www.leicabiosystems.com/products/sectioning/vibrating-blade-microtomes/details/product/leica-vt1000-s/ |
| Razor | American Safety razor company | Item # 60-0139-0000 | Stainless Steel Double Edge Blade (Personna Super) |
| Screw Cap Microcentrifuge Tubes (2 ml) | VWR | 16466-044 | |
| Microcentrifuge Tubes (0.6 ml) | Axygen Scientific | MCT-060-C | |
| Mitt | Bel-Art | 380000000 | SCIENCEWARE Hot Hand Protector Mitt |
| Tissue adhesive | Ted Pella Inc | 10033 | Store at 4 °C or 20 °C for 3 months or longer storage |
| Microwave | Panasonic | NN-SD762S | PELCO Pro CA 44 Instant tissue adhesive |
| Micro Cover Glasses, Square, No. 1 | VWR | 48366-067 | 22 x 22 mm (7/8 x 7/8")-Cover glasses are corrosion-resistant and uniformly thick and flat. No. 1 thickness is 0.13 to 0.17 mm. |
| Frosted Micro Slides, 1 mm | VWR | 48312-003 | 75 x 25 mm – 1 mm |
| Parafilm M | Alcan packaging | BRNDPM998 |
