An In Vitro Flow Investigation of the Effect of Stromal Cells on Leukocyte Recruitment
Abstract
Source: Munir, H. et al., Analyzing the Effects of Stromal Cells on the Recruitment of Leukocytes from Flow. J. Vis. Exp. (2015)
The video demonstrates a method for investigating the impact of stromal cells on leukocyte recruitment. In a parallel plate flow chamber model, pro-inflammatory cytokines induce the expression of adhesion receptors by endothelial cells, facilitating neutrophil recruitment and migration. The cross-talk between stromal cells and endothelial cells diminishes neutrophil recruitment to the endothelial cells.
Protocol
All procedures involving sample collection have been performed in accordance with the institute's IRB guidelines.
1. Isolation and Culture of Primary Human Endothelial Cells and Mesenchymal Stem Cells
- Isolation and culture of human umbilical vein endothelial cells (HUVEC):
- Put the umbilical cord on a tray with paper towels and spray it with 70% ethanol. Place in a tissue culture hood. Identify the vein and cannulate at both ends. Place a cable tie around the cannulated end to secure it.
- Wash out venous blood with phosphate-buffered saline (PBS) using a syringe. Fill the syringe with air and pass through the vein to remove and discard the residual PBS.
- Thaw 10 mg/ml collagenase type Ia and dilute 1:10 in PBS (with calcium and magnesium chloride) to a final concentration of 1 mg/ml. Pass collagenase solution into the vein until both cannulae are filled. Close the clamps on the cannulae at both ends.
- Cover the tray with tissue and spray with 70% ethanol. Place the cord into an incubator for 20 min at 37 °C and 5% carbon dioxide (CO2).
- Take the cord out of the incubator and tighten the cable ties. Massage the cord gently for 1 min. Flush out the cell suspension with 10 ml PBS and collect in a 50 ml centrifuge tube.
- Fill the syringe with air and pass through the vein to remove any residual PBS twice, collecting the PBS in a 50 ml centrifuge tube used in step 1.1.5. Centrifuge at 400 x g for 5 min at room temperature (RT).
- Aspirate supernatant and resuspend pellet in 1 ml complete endothelial cell (EC) medium. EC medium consists of M199 supplemented with 35 µg/ml gentamicin sulfate, 10 ng/ml human epidermal growth factor, 1 µg/ml hydrocortisone, 2.5 μg/ml amphotericin B, and 20% fetal calf serum.
- Add 4 ml of EC medium and the EC suspension to a 25 cm2 flask. Change the medium on the following day and then every 2 days.
- ECs exhibits a cobblestone-like morphology (Figure 1Ai). For adhesion assays, ECs are generally seeded when they reach 100% confluence (see Section 1.4).
- Isolation of Wharton's jelly mesenchymal stem cells (WJMSC) from human umbilical cords:
- Isolate Wharton's jelly-derived MSC (WJMSC) from fresh umbilical cords or from cords that have already been used to isolate EC. Cut the umbilical cord into 5 cm long pieces. Cut each piece longitudinally to reveal the blood vessels (2 arteries [white, rigid] and 1 vein [yellow, distended]).
- Using sterile scissors and forceps remove the blood vessels and discard. Cut all the tissue into 2 – 3 mm3 pieces. Using forceps place 2 – 3 mm3 pieces into a 50 ml centrifuge tube.
- Thaw 100 mg/ml stock collagenase type II and dilute 1:100 in 10 ml PBS to a final concentration of 1 mg/ml. Thaw 20,000 U/ml stock hyaluronidase and dilute 1:400 to a final concentration of 50 U/ml in the collagenase solution.
- Add an enzymatic cocktail to the centrifuge tube containing the tissue fragments. Incubate the tissue fragments for 5 hr at 37 °C on a slow rotator.
- Dilute the cell suspension 1:5 in PBS. Place a 100 µm pore filter into a new 50 ml centrifuge tube. Pour the cell suspension onto the 100 µm pore filter.
NOTE: Remaining tissue fragments will be retained on the filter and cells will be collected in the 50ml centrifuge tube. - Discard the filter. Centrifuge the cell suspension at 400 x g for 10 min at RT. Aspirate supernatant and resuspend WJMSC pellet in 12 ml complete WJMSC culture medium (Dulbecco's Modified Eagle Medium, DMEM low glucose, 10% fetal calf serum (FCS) and 100 U/ml penicillin + 100 µg/ml streptomycin mix).
- Seed all cells in a 75 cm2 tissue culture flask. Change the medium after 24 hr with 12 ml complete WJMSC culture medium. Replace medium every 2 – 3 days. Cells should reach 70 – 80% confluence within 2 weeks. Passage when WJMSC reaches 70 – 80% confluence (see Section 1.4).
- Expansion of bone marrow-derived MSC (BMMSC):
- Isolate human bone marrow-derived MSC (BMMSC) as previously described. Add 10 ml pre-warmed mesenchymal stem cell, MSC growth medium (MSCGM) into a 15 ml centrifuge tube.
- Thaw a vial of p2 BMMSC by placing in a 37 °C water bath for 2 min. Add the BMMSC suspension to the centrifuge tube containing MSCGM. Mix well by pipetting.
- Centrifuge at 400 x g for 5 min at RT. Aspirate supernatant completely.
- Resuspend cells in 1 ml MSCGM and count the cells using a hemocytometer or a digital cell counter such as a cellometer.
- Seed cells into 75 cm2 culture flasks at a density of 5,000 – 6,000 cells per cm2 in 12 ml MSCGM. Change the medium after 24 hr with 12 ml MSCGM. Feed cells with 12 ml MSCGM every 2 – 3 days.
- Passage when BMMSC reaches 70 – 80% confluence (see Section 1.4). Cells exhibit a fibroblastic morphology (Figure 1Aii).
- Detachment of EC and MSC:
- Aspirate medium from 25 cm2 culture flasks. Add 2 ml of 0.02% ethylenediaminetetraacetic acid (EDTA) for approximately 2 min. Aspirate EDTA and add 2 ml trypsin (2.5 mg/ml). View under the microscope until the cells become round.
- Tap the flask to detach the cells. Inactivate the trypsin by adding 8 ml culture medium (dependent on cell type; EC medium for HUVEC, DMEM LG for WJMSC, and MSCGM for BMMSC) to the culture flask and transfer suspension to a 15 ml centrifuge tube.
- Centrifuge at 400 x g for 5 min at RT. Aspirate supernatant and resuspend the pellet as described below.
- For passaging of MSC, resuspend the pellet in a 3 ml culture medium. Add 11 ml culture medium into three separate 75 cm2 culture flasks. Add 1 ml cell suspension to each culture flask (1:3 split). Passage WJMSC and BMMSC 3 times (p3) before use in co-culture assays.
- For seeding EC or MSC in adhesion assays – see Sections 2 and 3.
- Freezing MSC:
- At passage 3 detach MSC as described in Section 1.4. Aspirate supernatant and resuspend in 3 ml ice-cold CryoSFM. Pipette 1 ml aliquots of cell suspension into 1.5 ml ice-cold cryovials. Put cryovials in a freezing container.
- Store the container at -80 °C O/N. Transfer to liquid nitrogen. Thaw a vial of MSC (follow steps 1.3.1 – 1.3.6). Resuspend MSC in a 5 ml culture medium (choose the appropriate medium for WJMSC or BMMSC) and seed into a 25 cm2 flask.
2. Establishing Endothelial-Mesenchymal Stem Cell Co-cultures on Filters
- Detach WJ or BMMSC as described in Section 1.4. Resuspend the pellet in 1 ml MSCGM. Perform a cell count cells using a hemocytometer or a cellometer.
- Adjust the volume so that the final concentration is 5 x 10⁵ MSC in 500 µl of MSCGM.
- Using sterile forceps invert 6-well, 0.4 µm PET Transwell filters and place in a sterile box.
- Seed 5 x 10⁵ MSC onto the outer surface of the filters. Incubate filters at 37 °C and 5% CO2 for 1 hr.
- Collect media from the outer surface of the filter. Count the number of non-adherent MSCs in the media. Re-invert filters using sterile forceps and place them in a matching 6-well plate containing 3 ml MSCGM.
- Add 2 ml of MSCGM onto the inner surface of the filter (Figure 1B). Place in an incubator at 37 °C and 5% CO2 for 24 hr. Trypsinize a confluent 25 cm2 flask of EC (Figure 1Ai; as Section 1.4).
- Resuspend EC in 8 ml MSCGM (1 x 25cm2 flask will seed four 6-well filters; ~5 x 10⁵ EC/filter). Aspirate medium from the top and bottom of the porous filters. Add 3 ml fresh MSCGM into the lower chamber (underneath the filter). Add 2 ml EC suspension to the inner surface of each filter. Incubate for 1 hr at 37 °C and 5% CO2.
- Aspirate medium to wash off non-adherent EC and replace with fresh MSCGM. Set up parallel EC mono-culture filters by seeding cells on the inner surface without first seeding MSC. Incubate O/N at 37 °C and 5% CO2.
- Check that the EC monolayer is confluent and contains no gaps. Sub-confluent monolayers cannot be used for adhesion assays (Figure 1B).
- Thaw 1 x 10⁵ U/ml stock tumor necrosis factor-alpha (TNFα) and dilute 1:1,000 in MSCGM to a final concentration of 100 U/ml (equivalent to ~10 ng/ml). Perform a serial dilution by diluting 100 U/ml TNFα by 1:10 in MSCGM to obtain 10 U/ml. Dilute 10 U/ml TNFα by 1:10 in MSCGM to obtain 1 U/ml.
- Treat the upper and lower chambers of the filters with 1, 10, or 100 U/ml TNFα (equivalent to ~10 ng/ml) at 37 °C for 4 hr prior to the assay.
3. Isolation of Leukocytes
- Take venous blood from healthy volunteers and aliquot immediately into EDTA tubes. Invert tubes gently to mix.
- Layer 2.5 ml Histopaque 1077 onto 2.5 ml Histopaque 1119 in a 10 ml round-bottomed tube. Layer 5 ml of whole blood onto the Histopaque gradient. Centrifuge at 800 x g for 40 min at RT.
- Harvest peripheral polymorphonuclear neutrophils (PMN) at the interface of Histopaque 1077 and 1119 (above the erythrocyte layer). Place in a 10 ml round-bottomed tube and makeup to 10 ml with PBSA. Gently invert the tube and centrifuge at 400 x g for 5 min at RT.
- Dilute 7.5% BSA solution 1:50 in 100 ml PBS (with calcium and magnesium chloride) to a final concentration of 0.15% (w/v; PBSA). Aspirate supernatant and resuspend in 10 ml PBSA. Centrifuge at 400 x g for 5 min at RT.
- Resuspend in 1 ml PBSA. Take a 20 µl aliquot of the cell suspension and add to 380 µl PBSA (1:20 dilution). Count cells using a hemocytometer or a cellometer. Dilute to the required concentration (1 x 10⁶/ml for Transwell filters and Ibidi microslide) in PBSA. Maintain neutrophil suspension at RT until the assay.
4. Assembling the Flow System
- Set up the flow system as shown in Figure 1C. Turn on the heater and set to 37 °C. Attach a 20 ml syringe (remove the plunger) and a 5 ml syringe to a 3-way tap. Attach the tap to the Perspex chamber using Micropore tape.
- Measure and cut a long piece of silicon 2/4 mm (thick) tubing that is approximately the distance between the valve and the 3-way tap. Cut an 8 – 10 mm long piece of 1/3 mm (thin) tubing and insert it into one end of the thick tubing. Attach the thick tubing side onto the 3-way tap.
- Connect the thin tubing end to a port of the electronic 3-way microvalve. This is the "wash reservoir". Cut a 6 – 8 mm long piece of thick and thin tubing.
- Insert the thin tubing into one end of the thick tubing. Attach the thick tubing end to a 2 ml syringe (remove the plunger).
- Connect the thin tubing end of the 2 ml syringe to a port on the electronic microvalve to make the "sample reservoir". Connect the valve to the filter flow chamber by measuring and cutting a long piece of thin tubing that is the distance between the microvalve and the center of the microscope stage.
- For the microslide model, attach an 8 – 10 mm piece of thick tubing to the end of the thin tubing. Place an L-shaped connector to the end of the thick tubing. This will connect to the microslide. For the filter model, attach an 8 – 10 mm piece of Portex Blue Line Manometer connecting the tubing to the end of the thin tubing.
- Place the thin tubing end onto the microvalve. This is the common output for the wash and sample reservoirs. Fill reservoirs with PBSA. Prime tubing by flowing PBSA through them to remove any air bubbles.
- Attach the Manometer tubing to a 29 mm (50 ml) glass syringe. Prime the syringe by filling it with 10 ml PBSA. Invert the syringe so that the end connected to the tubing faces upwards and push out all air bubbles. Refill with 5 ml PBSA.
- For the microslide model only, attach a 10 – 12 mm piece of thick tubing to the end of the Manometer tubing leading to the glass syringe. Place an L-shaped connector onto the end of the thick tubing. Place the glass syringe into a syringe pump for infusion/withdrawal.
- Calculate the refill flow rate (Q) required to generate the desired wall shear stress (τw in Pascal, Pa) of 0.1 Pa (Transwell filters) or 0.05 Pa (Ibidi microslides) using the following formulae:
γw = (6. Q) / (w.h2)
τ = n.γ
Where w = internal width and h = internal depth of the flow channel. n = viscosity of the flowing solution; PBSA is n = 0.7 mPa.s. For the parallel plate filter flow chamber, the width (w) is 4 mm and the depth (h) is 0.133 mm. The depth of the chamber can vary slightly due to differences in the thickness of the Parafilm gasket used. For the Ibidi microslide, the width is 3.8 mm and the depth is 0.4 mm.
NOTE: Due to differences in the dimensions of the flow channel, and capture dynamics we use different shear stresses for the microslide model compared to the filter model.
5. Setting Up the Parallel Plate Flow Chamber Incorporating Filters
- Cut a piece of Parafilm (the same size as the glass coverslip) using a metal template. Cut out a 20 x 4 mm slot in the Parafilm (to create the flow channel) using a metal template. Use the gasket to mark the flow channel on the glass coverslip.
- Align the edges of the 6-well filter on the glass coverslip. Ensure that the filter covers the flow channel markings. Carefully cut out the filter using a type 10A scalpel.
- Carefully cover the filter with a Parafilm gasket, ensuring that the flow channel slot is in the middle of the filter (Figure 1D). Use a piece of clean tissue and push out any bubbles.
- Place the coverslip in the recess of the bottom plate of the Perspex flow chamber. Position the top Perspex plate over the top of the gasket and screw the plates together (Figure 1D).
- Turn the 3-way tap to allow the wash buffer (PBSA) to flow through the valve. Connect the Manometer tubing to the inlet port of the top Perspex plate. Run PBSA through the flow channel to allow bubbles to pass through.
- Connect the Manometer tubing from the syringe pump to the outlet port of the Perspex plate. Set the syringe pump to refill and press run. Clean any PBSA that has dripped onto the upper plate of the chamber.
- Place the chamber on the stage of an inverted phase-contrast microscope. Adjust the focus to visualize the EC above the filters (Figure 1B).
6. Perfusion of Leukocytes Over Endothelial Cells
- Put 2 ml of purified neutrophils into the sample reservoir and leave to warm for 2 min. Wash the endothelium with PBSA for 2 min.
- Turn the valve ON to perfuse neutrophils over endothelium. Deliver the neutrophil bolus for 4 min. Turn the valve OFF and perfuse PBSA from the wash reservoir for the remainder of the experiment.
- Ensure that air bubbles do not pass through the flow channel at any point during the assay as this will disrupt the EC monolayer and cause detachment of adherent neutrophils.
7. Recording Neutrophil Capture and Behavior
- Record neutrophil recruitment either during neutrophil flow or post-perfusion.
- Make all digital recordings of at least 5 – 10 fields in the center of the flow channel. Identify the center of the channel by moving the objective to the edge of the channel at the inlet port and identifying the middle of the port.
- For recording during neutrophil flow, take images of a single field every 10 sec for 1 min. Move along the channel and record another field for 1 minute. Repeat for the duration of the bolus.
- For recording post-perfusion, make 10-second recordings of 5 – 10 fields down the center of the flow channel for assessing leukocyte behavior (typically 2 min after the end of the neutrophil bolus). Take images every second within the 10-second interval. This allows sufficient time for capture from flow and the behavior of adherent neutrophils to be analyzed.
- Record a single field containing at least 10 transmigrated neutrophils for 5 min, taking images every 30 sec. This can be used to calculate the velocity of migrated cells (either above or underneath the endothelium).
- Record another series of 10-second fields (typically 9 min post-perfusion). This allows neutrophils time to migrate through the endothelial monolayer.
- Stop the syringe pump and remove the tubing. Disassemble the flow chamber and rinse the sample reservoir and tubing. Repeat for subsequent filters/microslide channels.
8. Analysis of Leukocyte Recruitment and Behavior
- Count the number of neutrophils in each field during the 10-second recordings at the 2-minute time point. All cells must be present in the first-second field in order to be counted. Cells that are partially in the field on 2 sides (e.g., top/right-hand border) of the field of view are included in the counts, as long as they remain in the field for the full 10 sec.
- Calculate the mean number of adherent neutrophils per field. Measure the length and width of the recorded field. Calculate the area of the field. Calculate how many fields there are in 1 mm2. Multiply the mean neutrophil count by the number of fields in 1 mm2.
- Calculate the total number of neutrophils perfused by multiplying the amount of neutrophils perfused (e.g., 2 x 10⁶/ml*Q [e.g., 0.0999 ml/min for parallel plate flow chamber]) by the duration of the bolus (e.g., 4 min).
- Divide the neutrophil count/mm2 by the total number of neutrophils perfused to determine the total number of cells that have adhered (adherent cells/mm2 / 106 perfused).
- Assess whether the adherent neutrophils are rolling, firmly adherent or transmigrated.
- A rolling neutrophil is phase bright and will slowly move along the endothelial monolayer (1 – 10 µm/sec).
- Firmly adherent cells are phase bright and bound to the EC surface, either remaining stationary (i.e., not moving during recording) or have undergone shape change and are migrating over the EC surface (Figure 1Ei).
- A transmigrated neutrophil is phase dark and below the EC layer (Figure 1Eii).
- Calculate the percentage of adherent cells that are rolling, stationary, and transmigrated. Alternatively, neutrophil behavior can be expressed as total cell numbers that exhibit the different behaviors by applying the same formula used to calculate total adhesion (as described in steps 8.6 – 8.7).
- Mark the leading edge of a rolling neutrophil. Mark the leading edge of the same cell at the end of the 10-sec sequence. Draw a line between the 2 points and measure the distance that the cell has traveled.
- Divide this value by the duration of the recording in which the cell is rolling (i.e., 10 sec). Try and select neutrophils that are in the field for the entire 10 sec interval.
- To calculate the velocity of neutrophils migrating over the surface (shaped changed phase bright) or underneath the endothelium (phase dark) use the 5 min recording.
- Draw an outline of migrated cells at the beginning of the sequence and track their movements throughout the sequence. Make note of the X and Y positions of the centroid at each 1 min interval for each cell. Subtract the values of the X and Y positions from the first image of the sequence from the values in the second image. This is based on Pythagoras' theorem.
- Subtract the values from the second image from the third image. Do this for all images in the sequence. Square the X and Y values and add them together.
- Square root the resulting value. Calculate the velocity for each cell by averaging the velocities calculated at each minute interval. Track 10 migrated neutrophils and calculate the mean velocity.
Representative Results
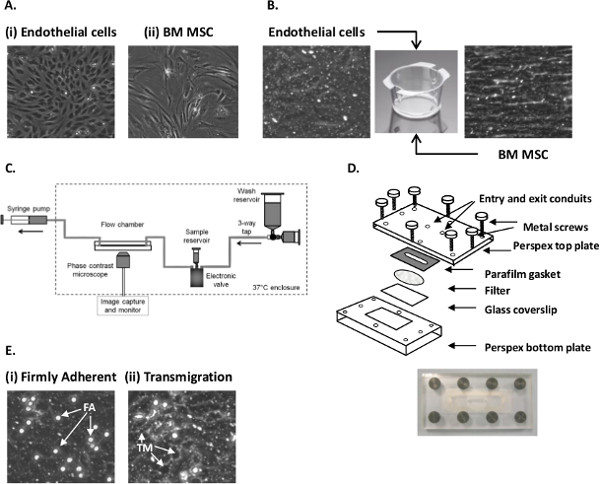
Figure 1. Establishing EC-MSC co-culture and analyzing neutrophil recruitment using a flow-based adhesion assay. (A) Micrograph of (i) primary EC and (ii) passage 3 BMMSC grown on tissue culture flasks. (B) Micrograph of EC and MSC cultured on 6-well Transwell filter inserts. (C) Diagram of the perfusion system used to generate flow. (D) Schematic representation of the parallel plate filter flow chamber. (E) Micrograph of (i) firmly adherent (FA) and (ii) transmigrated (TM) neutrophils following recruitment from flow to EC stimulated with 100 U/ml TNFα.
Disclosures
The authors have nothing to disclose.
Materials
| Collagenase Type Ia | Sigma | C2674 | Dilute in 10ml PBS to get a final concentration of 10mg/ml. Store at -20°C in 1ml aliquots. |
| Dulbecco's PBS | Sigma | D8662 | With calcium and magnesium chloride. Keep sterile and store at room temperature. |
| 1X Medium M199 | Gibco | 31150-022 | Warm in 37 °C water bath before use. |
| Gentamicin sulphate | Sigma | G1397 | Store at 4°C. Add to M199 500ml bottle. |
| Human epidermal growth factor | Sigma | E9644 | Store at -20°C in 10µl aliquots. |
| Fetal calf serum (FCS) | Sigma | F9665 | FCS must be batch tested to ensure the growth and viability of isolated EC. Heat inactivate at 56°C. Store in 10ml aliquots at -20°C. |
| Amphotericin B | Gibco | 15290-026 | Potent and becomes toxic within a week so fresh complete HUVEC medium must be made up every week. Store at -20°C in 1ml aliquots. |
| Hydrocortisone | Sigma | H0135 | Stock is in ethanol. Store at -20°C in 10µl aliquots. |
| Collagenase Type II | Sigma | C6885 | Dilute stock in PBS to a final concentration of 100mg/ml. Store at -20°C in 100µl aliquots. |
| Hyaluronidase | Sigma | H3631 | Dilute stock in PBS to a final concentration of 20,000U/ml. Store at -20°C in 100µl aliquots. |
| 100µm cell strainer for 50ml centifuge tube | Scientific Lab Supplies (SLS) | 352360 | Other commercially available cell strainers (e.g. Greiner bio-one) can also be used. |
| DMEM low glucose | Biosera | LM-D1102/500 | Warm in 37 °C water bath before use. |
| Penicillin/Streptomycin mix | Sigma | P4333 | Store at -20°C in 1ml aliquots. |
| 25cm2 tissue culture flask | SLS | 353109 | |
| 75cm2 tissue culture flask | SLS | 353136 | |
| Bone marrow mesenchymal stem cells vial | Lonza | PT-2501 | Store in liquid nitrogen upon arrival. Cells are at passage 2 upon arrival but are designated passage 0. Exapand to passage 3 and store in liquid nitrogen for later use. |
| Mesenchymal stem cell growth medium (MSCGM) | Lonza | PT-3001 | Warm in 37 °C water bath before use. For Cell Tracker Green staining use medium without FCS. |
| EDTA (0.02%) solution | Sigma | E8008 | Store at 4°C. Warm in 37°C water bath before use. |
| Trypsin solution | Sigma | T4424 | Store at -20°C in 2ml aliquots. Thaw at room temperature and use immediately. |
| Cryovials | Greiner bio-one | 2019-02 | Keep on ice before adding before adding cell suspension. |
| Mr. Frosty Freezing Container | Nalgene | 5100-0001 | Store at room temperature. When adding cryovials with cells store at -80°C for 24h before transfrring cells to liquid nitrogen. |
| Cell tracker green dye | Life technologies | C2925 | Store in 5µl aliquots at -20°C. Dilute in 5ml prewarmed (at 37°C) MSCGM. |
| Cell counting chambers | Nexcelom | SD-100 | Alternatively a haemocytometer can be used. |
| Cellometer auto T4 cell counter | Nexcelom | Auto T4-203-0238 | |
| Tumor necrosis factor α (TNFα) | R&D Systems | 210-TA-100 | Dilute stock in PBS to a final concentration of 100,000U/ml. Store at -80°C in 10µl aliquots. |
| 6-well, 0.4µm PET Transwell filters | SLS | 353090 | |
| K2-EDTA in 10ml tubes | Sarstedt | Store at room temperature. | |
| Histopaque 1119 | Sigma | 11191 | Store at 4°C. Warm to room temperature before use. |
| Histopaque 1077 | Sigma | 10771 | Store at 4°C. Warm to room temperature before use. |
| 10ml round bottomed tube | Appleton Woods | SC211 142 AS | |
| 7.5% BSA Fraction V solution | Life technologies | 15260-037 | Store at 4°C. |
| 20ml Plastipak syringes | BD falcon | 300613 | |
| 5ml Plastipak syringes | BD falcon | 302187 | |
| 2ml Plastipak syringes | BD falcon | 300185 | |
| 3M hypo-allergenic surgical tape 9m x 2.5cm | Micropore | 1530-1 | Use to secure the syringe tap onto the wall of the perspex chamber. |
| Silicon rubber tubing, internal diameter/external diameter (ID/OD) of 1/3mm (thin tubing) | Fisher Scientific | FB68854 | Cut silicon tubing to the appropriate size. All tubing leading directly to the electronic microvalve must be thin. |
| Silicon rubber tubing ID/OD of 2/4mm (thick tubing) | Fisher Scientific | FB68855 | |
| Portex Blue Line Manometer tubing | Smiths | 200/495/200 | Tubing leading to the syringe pump. |
| 3-way stopcock | BOC Ohmeda AB | ||
| Glass 50ml syringe for pump | Popper Micromate | 550962 | Must be primed prior to use by removing any air bubbles. |
| Glass coverslip | Raymond A Lamb | 26x76mm coverslips made to order. Lot number 2440980. | |
| Parafilm gasket | American National Can Company | Cut a 26x76mm piece of parafilm using an aluminium template and cut a 20x4mm slot into it using a scalpel 10a. Gasket thickness is approximately 133µm. | |
| Two perspex parallel plates | Wolfson Applied Technology Laboratory | Specially designed chamber consisting of parallel plates held together by 8 screws. The lower plate has a viewing slot cut out in the middle and a shallow recess milled to allow space for the coverslip, filter and gasket. The upper perspex plate has an inlet and outlet hole positioned over the flow channel. | |
| Electronic 3-way microvalve with min. dead space | Lee Products Ltd. | LFYA1226032H | Electronically connected to a 12 volt DC power supply. |
| Syringe pump for infusion/withdrawal (PHD2000) | Harvard Apparatus | 70-2001 | Set the diameter to 29mm and refill (flow) rate. |
| L-shaped connector | Labhut | LE876 | To attach to the inlet and outlet ports onto the Ibidi microslide channel. |
| Video camera | Qimaging | 01-QIC-F-M-12-C | Connected to a computer which enables digitall videos to be recorded. |
| Image-Pro Plus 7.0 | Media Cybernetics | 41N70000-61592 | For data analysis. Manually tag cells displaying the different behaviors. Track cells for analysis of rolling and migration velocities. |
