A Near-Infrared Photoimmunotherapy Technique to Treat Lung Cancer in a Murine Model

Published: April 30, 2024

Abstract

Source: Yasui, H., et al. Near Infrared Photoimmunotherapy for Mouse Models of Pleural Dissemination. J. Vis. Exp. (2021)

This video demonstrates a near-infrared photoimmunotherapy technique to treat lung cancer in an engineered mouse model exhibiting luciferase-expressing tumor cells. Upon injecting an antibody-photosensitizer conjugate (APC) that binds to specific antigens on the tumor cells, the mouse is exposed to near-infrared radiation, inducing photochemical changes in the APC and leading to necrotic death of the bound tumor cells. The effectiveness of the treatment is monitored by injecting luciferin, a luciferase substrate, and measuring the bioluminescence over time, correlating with tumor growth.

Protocol

All procedures involving animal models have been reviewed by the local institutional animal care committee and the JoVE veterinary review board.

1. Conjugation of IR700 with mAb

  1. Incubate monoclonal antibody (mAb) (1 mg, 6.8 nmol) with IR700 N-Hydroxysuccinimide (NHS) ester (66.8 mg, 34.2 nmol, 5 mmol/L in dimethyl sulfoxide [DMSO]) in 0.1 mol/L Na2HPO4 (pH 8.6) at 15-25 °C for 1 h.
  2. Purify the mixture using a column (e.g., Sephadex). Prepare and wash the column with phosphate-buffered saline (PBS). Then, apply the mixture onto the column and collect the drop, which contains the purified IR700-conjugated antibody. This IR700-conjugated antibody is called the antibody photosensitizer conjugate (APC).
  3. Measure the protein and IR700 concentration in the APC.
    1. Prepare calibration curves for protein and IR700 using a spectrophotometer.
    2. Mix standard albumin concentrations with a protein assay kit following the kit protocol (see Table of Materials, Coomassie Brilliant Blue (CBB) protein staining). Measure the absorbance of albumin at 595 nm wavelength, and plot the protein's calibration curve (a linear approximation formula) using the following equation: y = ax + b (x: concentration, y: absorbance).
    3. Obtain calibration curves for IR700 with absorption at 690 nm using the same procedure. The standard concentration of IR700 is recommended at 0.1-5 µM (0.1954-9.77 µg/mL).
    4. Measure the protein concentration and IR700 concentration in the APC using a calibration curve [x = (y-b)/a (x: concentration, y: absorbance)].
    5. Determine the number of IR700 dyes bound per mAb with the results of the molar concentration.
      NOTE: Determining the optimal conjugation number of IR700 molecules per mAb molecule is important. Generally, approximately three IR700 molecules bound on a single mAb molecule would be effective both in vitro and in vivo. Many IR700 bound per antibody (e.g., six) makes it easier to be trapped in the liver during in vivo experiments. The ratio of antibody bound to IR700 was in the range of 1:2-1:4. The proportion of IR700 was reduced, if necessary.
  4. Perform sodium dodecyl sulfate-polyacrylamide gel electrophoresis (SDS-PAGE) as a confirmation for the formation of an APC. Image the gel at 700 nm using a fluorescent imager, and stain the protein in the gel using a protein staining kit following the kit protocol (see Table of Materials, CBB protein staining).

2. Generation of a pleural dissemination model

  1. Prepare luciferase-expressing target cells and suspend 1.0 × 10⁶ target cells in 100 µL of PBS.
    NOTE: Intrathoracic cancer cells, such as lung cancer and MPM, are suitable target cells. Luciferase-expressing cells were prepared via luciferase gene transfection, and high expression of luciferase was confirmed after > 10 cell passages. Cells were cultured in a medium supplemented with 10% fetal bovine serum, penicillin (100 IU/mL), and streptomycin (100 mg/mL). The number of cells was adjusted according to the tumor growth rate and the time course of treatment (1.0. × 105-6.0 × 10⁶ cells/body weight).
  2. Prepare 8-12-week-old female homozygote athymic nude mice with a preferable body weight of 19-21 g.
  3. Anesthetize mice during the procedure with isoflurane (introduction: 4-5%, maintenance: 2-3%); press the tail with tweezers to confirm no reaction.
  4. Make a stopper with polystyrene foam and attach the stopper to the 30 G needle so that the tip remains at 5 mm to prevent lung injury. Bend the needle tip with clean forceps or press it against a hard object cleaned with 70% EtOH to avoid pneumothorax (Figure 1).
    CAUTION: Be careful not to pierce oneself. Use forceps to bend the needle. Do not hold the stopper when attaching it to the needle. Sticking the stopper before filling the cells into the syringe is safer.
  5. Fill a syringe (1 mL) with target cells and attach a 30G needle with a stopper.
  6. Pierce a needle into the mouse's chest through the intercostal space. Owing to the resistance while hitting against the ribs at that time, the needle tip moved up and down. After passing through the intercostal space, press the syringe against the mouse and inject 100 µL of target cells (Figure 2).
    NOTE: The mouse breaths deeply when the needle correctly enters the chest cavity. With the bending of the needle tip, pneumothorax and inappropriate injection of cells into the lung could be avoided.
    NOTE: Right chest wall puncture is recommended to avoid the risk of cardiac wall puncture.
  7. Roll the mouse 2-3 times to spread the cells throughout the thoracic cavity.
  8. Return the mouse to a clean and warm cage and monitor until ambulatory. After the procedure, the mouse will wake up from anesthesia and behave normally.

3. Measurement of bioluminescence

NOTE: The software used for data acquisition is listed in the Table of Materials.

  1. To confirm the generation of the pleural dissemination model, evaluate the bioluminescence images daily after injecting the cells into the thoracic cavity.
  2. Anesthetize mice (step 2.3), and inject intraperitoneally with D-luciferin (15 mg/mL, 200 µL).
  3. Ten minutes after the injection, set the mouse in the bioluminescence imaging (BLI) measuring equipment. For image acquisition, open the software's Acquisition Control Panel. Select Luminescent, Photograph, and Overlay (Figure 3).
  4. Set exposure time as Auto. Set Binning as small.
  5. Set f/stop as 1 for luminescent and 8 for photograph; f/stop controls the amount of light the charged-coupled device detector receives.
  6. Set the Field of View as C.
  7. Once the mouse sample is ready for imaging, click Acquire for imaging acquisition. Mice with sufficient luciferase activity were selected for further studies.
    NOTE: A suitable pleural dissemination model shows strong luminescence on the diffused site in the chest when viewed from the ventral side. If the BLI images are not diffused in the thorax and only at the injection site, the tumor may be transplanted subcutaneously.
  8. After displaying the image, set the display format to Radiance. Open the Tool Palette panel (Figure 4A).
  9. Select ROI Tools. We recommend using the Circle to range the bioluminescent area on images.
  10. Click Measure ROIs to measure the surface bioluminescent intensity (Figure 4B).
  11. Use Configure Measurement on the left corner of the ROI measurement panel to select the values/information needed. Export this data table as a .csv file (Figure 4C).
  12. Use the values of Total Flux (p/s) as the bioluminescent intensity quantification in the .csv file.

4. Diffuse luminescence imaging tomography (DLIT)

NOTE: The software used for data acquisition is listed in the Table of Materials.

  1. Turn on the X-ray Armed button.
  2. Anesthetize the mice (step 2.3) and inject D-luciferin (15 mg/mL, 200 µL) intraperitoneally into the mice. To shoot DLIT continuously from 3.2 to 3.7, skip this step.
  3. Ten minutes after injection, set the mouse in the BLI equipment.
  4. Open the Acquisition Control Panel of the software. Select Luminescent, Photograph, CT, Standard-One Mouse, and Overlay. Other settings were the same as in 3.4-3.6 (Figure 5A).
  5. Select the Imaging Wizard on the Acquisition Control Panel.
  6. Select Bioluminescence and then DLIT (Figure 5B).
  7. Select Firefly as the wavelength to measure (Figure 5C).
  8. Set the Imaging Subject as Mouse, Exposure parameters as Auto Settings, Field of View as C-13.4 cm, and Subject Height as 1.5 cm (Figure 5D).
  9. Push the X-rays, which will be produced when energized. Acquire.
  10. Open the computed tomography (CT) sequential image data.
  11. Open Surface Topography on the Tool Palette. Select Show (Figure 6A).
  12. Adjust the threshold, as the purple display shows only the body surface (Figure 6B). Then, select the Subject Nude Mouse and click the Generate Surface. Ensure that the mouse's outline is accurately drawn (Figure 6C).
  13. Open the Tool Palette, DLIT 3D Reconstruction Properties tab. Select Tissue Properties as Mouse Tissue and Source Spectrum as Firefly (Figure 6D). Next, open the Analyze tab and confirm the data for each selected wavelength data. Finally, click the Reconstruct button (Figure 6E).
  14. Confirm the presence of BLI in the chest cavity in the configured DLIT image.

5. NIR-PIT for in vivo pleural dissemination model

  1. Measure the light dose of a 690 nm wavelength (NIR) laser with a power meter and adjust the output to 100 mW/cm2.
    NOTE: The laser light is coherent with a precise coil size. As a result, the light energy hardly changes regardless of the distance within 50 cm. If there are many adverse events, such as burns, reduce the output within the 40 mW/cm2 range.
  2. Clean the tail with 70% EtOH and inject APC (100 µg) intravenously via the tail vein 24 h before NIR irradiation. Apply pressure to the injection site to control bleeding.
    NOTE: Adjust the volume of APC to 50-200 µL for injection.
  3. Anesthetize the mice (step 2.3) and lay them on their back. To avoid NIR irradiation to the non-target site, shield other sites with aluminum foil (Figure 7A). Irradiate with NIR light with a laser of 100 J/cm2; if the tumor is disseminated back to the belly, the NIR-light irradiation dose could be divided in multiple directions (Figure 7B).
    NOTE: Adjust the dose at 30-150 J/cm2 depending on the in vitro results and adverse events such as burns.
  4. When the NIR irradiation is complete, and the mouse is awake, return it to the cage.
  5. Observe the BLI and measure the ROI over time (every day) (See 3.2-3.12).
  6. For ex vivo imaging, euthanize mice with carbon dioxide 24 h after the APC injection, immediately before the NIR irradiation.
    1. To observe the inside of the mouse's chest, remove the thorax and cut the ribs and sternum. Capture the fluorescence image (700 nm) alongside the control without APC administration. Then, D-luciferin (150 µg/mL) was applied over the exposed thorax, and the BLI was taken (refer 3.2-3.7).

Representative Results

Figure 1
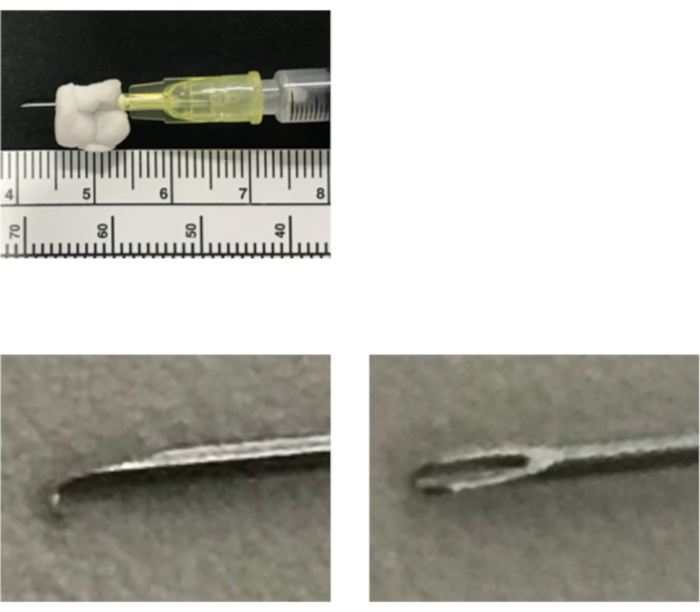
Figure 1: Easy hand-made device for cell transplantation. Attach the stopper made with polystyrene foam to the 30G needle so that the tip remains at 5 mm. The tip of the needle should be bent to avoid pneumothorax.

Figure 2
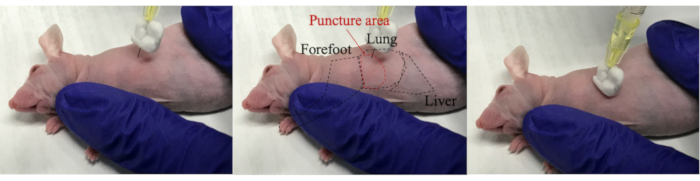
Figure 2: Injection of target cells into the thoracic cavity. Turn the mouse sideways and pierce the needle into the mouse toward the lung. Since the stopper and needle tip are bent, the needle enters the thoracic cavity without sticking to the lungs. Inject target cells while pressing the needle against the mouse.

Figure 3
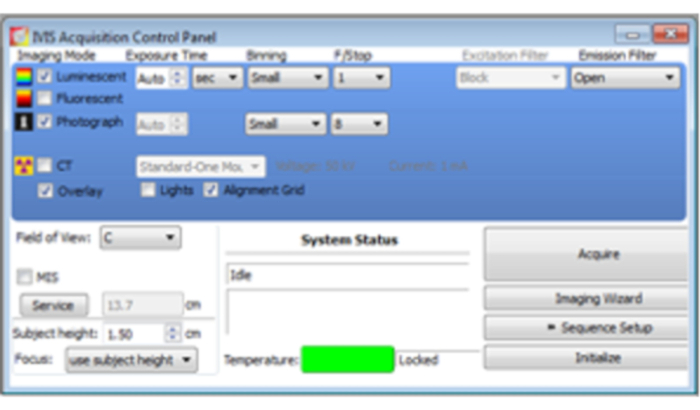
Figure 3: Acquisition Control Panel. Select Luminescent, Photograph, and Overlay. Set Exposure Time as Auto, Binning as Small, f/stop as 1 for luminescent and, 8 for photograph, and Field of View as C. Once the mouse sample is ready for imaging, click Acquire for imaging acquisition.

Figure 4
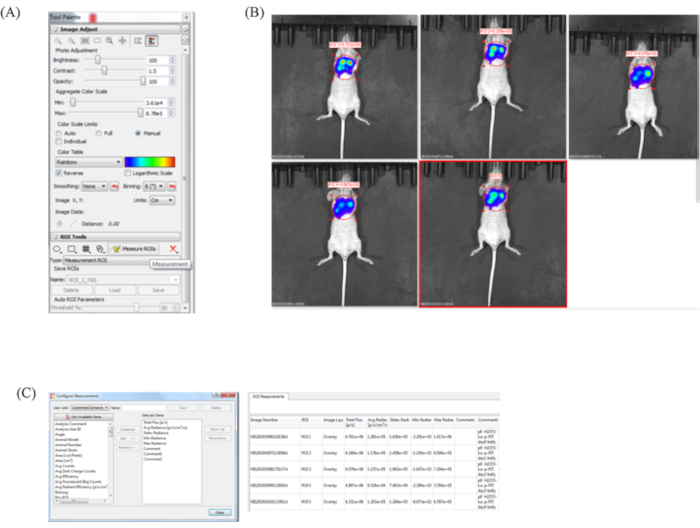
Figure 4: Measurement (BLI). (A) Tool Palette panel. Select ROI Tools. We recommend the Circle to range the bioluminescent area on images. (B) BLI quantification. After selecting the ROI in each image, click Measure ROIs to analyze. (C) Quantification information. Use Configure Measurement on the left corner of the ROI measurements panel to select the values/information needed. Export this data table as a .csv file.

Figure 5
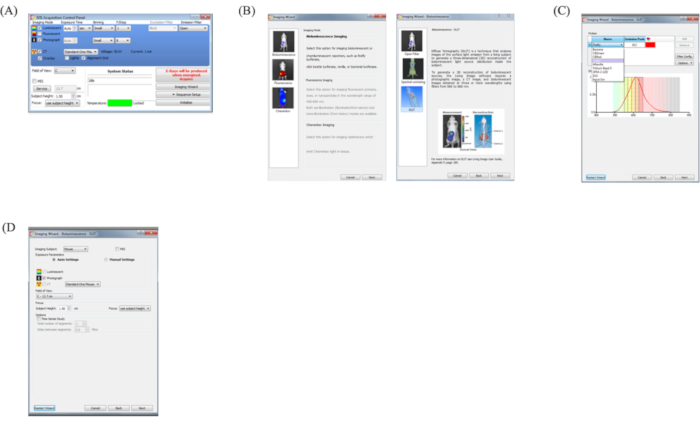
Figure 5: Acquisition of DLIT. (A) Acquisition Control Panel for DLIT. Select Luminescent, Photograph, CT, Standard-One Mouse, and Overlay. Other settings are the same as 3.4-3.6 (Figure 3). (B) Imaging Wizard panel. Select Bioluminescence and DLIT. (C) Select measurement wavelength. Select the wavelength as a firefly. (D) Set the Imaging Subject as Mouse, Exposure Parameters as Auto Settings, Field of View as C-13.4 cm, and Subject Height as 1.5 cm. Then, click the X-rays that will be produced when energized. Acquire.

Figure 6
Figure 6: Reconstruction of DLIT. (A) Tool Palette panel. Open Surface Topography on the Tool Palette. Select Show. (B) Adjusting mouse surface recognition. Adjust the Threshold as the purple display shows only the body surface. Select the subject Nude Mouse, then click the Generate Surface. Make sure that the outline of the mouse is accurately drawn. (C) Tool Palette. Open the DLIT 3D reconstruction Properties tab, select Tissue Properties as Mouse Tissue and Source Spectrum as Firefly. (D) Open the Analyze tab and choose the data for each wavelength data. (E) Click the Reconstruct button.

Figure 7
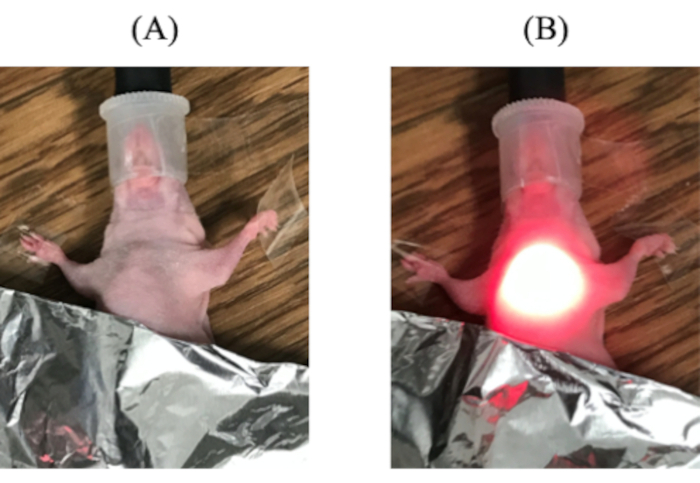
Figure 7: NIR irradiation. (A) Shield its belly with aluminum foil to prevent NIR irradiation to the belly. (B) Irradiate NIR light using a laser where BLI is strong; in some cases, the NIR laser is divided in multiple directions.

Offenlegungen

The authors have nothing to disclose.

Materials

0.25w/v% Trypsin-1mmol/l EDTA 4Na Solution with Phenol Red Wako 209-016941 for cell culture
1mL syringe TERUMO SS-01T for mice experiment
30G needle Nipro 1907613 for mice experiment
BALB/cSlc-nu/nu Japan SLC
Collidal Blue Staining Kit Invitrogen LC6025 use for gel protein staining
Coomassie (bradford) Plus protein assay Thermo Fisher Scientific Inc (Waltham, MA, USA) PI-23200 for measuring the APC concentration
Dimethyl sulfoxide (DMSO) Wako 043-07216 use for conjugation of IR700
D-Luciferin (potassium salt) Cayman Chemical 14681 for bioluminescence imaging and DLIT
GraphPad Prism7 GraphPad software for statistical analysis
Image Studio Li-Cor Biosciences for analyzing 700 nm fluorescent image
IRDye 700DX Ester Infrared Dye LI-COR Bioscience (Lincoln, NE, USA) 929-70011
Isoflurane Wako 095-06573 for mice anesthesia
IVIS Spectrum CT PerkinElmer for capturing bioluminescent image and DLIT
Living Image PerkinElmer for analyzing bioluminescent image and DLIT
Na2HPO4 SIGMA-ALDRICH (St. Louis, MO, USA) S9763 use for conjugation of IR700
NIR Laser Changchun New Industries Optoelectronics Technology MRL-III-690R for NIR irradiation
Novex WedgeWell 4 to 20%, Tris-Glycine, 1.0 mm, Mini Protein Gel, 12 well Invitrogen XP04202BOX use for SDS-PAGE
NuPAGE LDS Sample Buffer (x4) Invitrogen NP0007 use for SDS-PAGE
Optical power meter Thorlabs (Newton, NJ, USA) PM100 for measuring the output of the NIR laser
PBS(-) Wako 166-23555
Pearl Trilogy imaging system Li-Cor Biosciences for capturing 700 nm fluorecent image
Penicilin-Streptomycin Solution (x100) Wako 168-23191 for cell culture
Puromycin Dihydrochloride ThermoFisher A1113803 for luciferase transfection
RediFect Red-Fluc-Puromycin Lentiviral Prticles PerkinElmer CLS960002 for luciferase transfection
RPMI-1640 with L-glutamine and Phenol Red Wako 189-02025 for cell culture
Sephadex G25 column (PD-10) GE Healthcare (Piscataway, NJ, USA) 17-0851-01 use for conjugation of IR700
UV-1900i Shimadzu for measuring the APC concentration

Tags

check_url/de/22225?article_type=t

Play Video

Diesen Artikel zitieren
A Near-Infrared Photoimmunotherapy Technique to Treat Lung Cancer in a Murine Model. J. Vis. Exp. (Pending Publication), e22225, doi: (2024).

View Video