Abstract
Source: Davidson, H. W., et al. High-Efficiency Generation of Antigen-Specific Primary Mouse Cytotoxic T Cells for Functional Testing in an Autoimmune Diabetes Model. J. Vis. Exp. (2019).
This video demonstrates a technique for generating antigen-specific chimeric antigen receptor (CAR) T cells through retroviral transduction. Activated murine CD8+ T cells are added to a microwell plate coated with recombinant fibronectin fragments. Retroviral vectors containing transgenic RNA encoding an antigen-specific chimeric antigen receptor (CAR) are then introduced, and the plate is centrifuged to facilitate transduction. After incubation, the transduced cells express antigen-specific CARs on their surface.
Protocol
1. Generation and validation of single chain Fab antibody (scFab)-CARs.
NOTE: CARs typically contain 3 critical domains—an antigen-targeting domain, a spacer/transmembrane domain, and a cytoplasmic signaling domain. The precise design of each CAR depends on the intended target, and so, apart from the key features of the construct relevant to the generation of the retrovirus, will not be described in detail in this protocol. The overall design of the CARs used for the studies described below is shown in Figure 1. In brief, the targeting domain comprises the entire light chain and variable and CH1 domain of the heavy chain from the parent monoclonal antibody linked by a semi-rigid linker. The spacer/transmembrane domain is from mouse CD28, and the signaling domain is a fusion containing elements from mouse CD28, CD137 (4-1BB), and CD247 (CD3ζ). These elements are assembled by standard molecular biology procedures such as splice overlap polymerase chain reaction (PCR), or the synthesis of an appropriate "gene block". Details of the generation of the mAB287 CAR are contained in Zhang et al. The cDNA sequences can be obtained from the authors upon request.
- Assembling the CAR construct
- Synthesize the targeting single chain Fab antibody (scFab) and combined spacer/signaling domains separately, and use a "3 point" ligation technique to assemble the final construct (Figure 1).
NOTE: The key requirement for the CAR insert is that it should contain flanking restriction endonuclease sites allowing ligation into the retroviral expression vector pMSCV-IRES-GFP II (pMIG II), or a related derivative are also appropriate.
- Synthesize the targeting single chain Fab antibody (scFab) and combined spacer/signaling domains separately, and use a "3 point" ligation technique to assemble the final construct (Figure 1).
- Validation of CAR surface expression
- Transduce the hybridoma cells using pMIG II derived retroviral particles generated by a standard protocol (e.g., Holst et al.).
- Run flow cytometry analysis to detect the expression of GFP from the CAR vector.
- Stain surface expression of the CAR of the transduced hybridomas using labeled antibodies against the mouse κ chain (e.g., clone RMK-45).
- Validation of CAR specificity
- Stimulate the transduced hybridoma cells with appropriate plate-bound or cellular antigens. After overnight co-culture collect supernatants and secreted cytokines, and assayed by enzyme-linked immunosorbent assay (ELISA).
NOTE: Ideally, each CAR should be independently validated before being used for transduction. At this step, the experiment may be paused and restarted later.
- Stimulate the transduced hybridoma cells with appropriate plate-bound or cellular antigens. After overnight co-culture collect supernatants and secreted cytokines, and assayed by enzyme-linked immunosorbent assay (ELISA).
2. Transfection of viral producer cells (day – 4 to day 3)
NOTE: Retrovirus is produced using Phoenix-ECO cells (see the Table of Materials). Use appropriate precautions for the generation of potentially infectious agents (preferably including a designated Biosafety level 2 (BSL-2) cabinet and separate incubator for culturing transfected/transduced cells).
- Thawing Phoenix cells (Day -4)
- Thaw 2 x 10⁶ Phoenix-Eco cells. Scale up the number of Phoenix cells if multiple transductions are planned.
- Plate them in a 10 cm tissue culture dish with 10 mL of medium (Dulbecco's modified Eagle medium (DMEM) containing 10% fetal calf serum (FCS)).
- Passage Phoenix cells (Day -3)
- Remove medium, and wash with 5 mL of Dulbecco's phosphate-buffered saline (DPBS).
- Add 3 mL of 0.25% trypsin and incubate at 37 °C under 10% CO2 atmosphere for 3 min.
- Harvest the cells then pellet by centrifugation for 3 min at 200 x g. Re-plate cells with 10 mL fresh medium and incubate at 37 °C.
- Irradiation of Phoenix cells (Day -1 afternoon)
- To minimize further cell division, collect Phoenix cells as described in step 2.2, resuspend in 5 mL of medium, and gamma irradiate cells on ice (1000 rad).
NOTE: Caution should be used for radiation work to avoid personnel exposure. - Centrifuge the irradiated cells, resuspend in fresh medium, plate at 2 x 10⁶ cells (in 10 mL of medium)/plate/CAR, and incubate.
- To minimize further cell division, collect Phoenix cells as described in step 2.2, resuspend in 5 mL of medium, and gamma irradiate cells on ice (1000 rad).
- Transfection (Day 0 – morning)
- Aspirate the supernatant from the Phoenix cells, wash with 5 mL of phosphate-buffered saline (PBS), and carefully add 7 mL of reduced serum medium (e.g., Opti-MEM) dropwise to the sidewall of the plate to avoid disturbing the monolayer. Transfer cells back to incubator.
- Take two 14 mL round bottom polypropylene tubes, and add 1.5 mL of reduced serum medium to each. To one tube, add 40 µL of transfection reagent (see the Table of Materials).
- To the other tube, add 15 µg of Ab-CAR-plasmid (generated in step 1) and 5 µg of envelope and packaging plasmid (5 µg pCL-Eco). Incubate tubes at room temperature for 5 min.
- Add the transfection reagent mixture from step 2.4.2 dropwise to the second tube without contacting the tube sides, and mix by pipetting the solution up and down gently 3 times. Incubate at room temperature for at least 20 min.
- Add 3 mL of the mixture dropwise to the Phoenix cells, and place in a tissue culture incubator.
- After 4–5 h add 1 mL of FCS. Culture cells overnight at 37 °C.
- Medium change (Day 1)
- Remove the supernatant containing the plasmid/transfection reagent complexes and dispose of them in accordance with institutional procedures for handling infectious material. Add 4 mL of fresh, pre-warmed culture medium to the cells.
- Harvest virus for Transduction (Day 2)
- Collect the virus-containing medium from the Phoenix cells with a sterile syringe, filter (0.45 µm) to remove residual cell debris, and collect in a new tube.
- Add recombinant human interleukin-2 (rhIL-2) stock to a final concentration of 200 international unit (IU)/mL. Use the virus immediately for transduction (step 5.3). Add 4 mL of fresh medium to the Phoenix cells and place in the incubator.
- Repeat virus collection (Day 3)
- Repeat step 2.6, but discard Phoenix cells as infectious waste instead of adding fresh medium. This supernatant is used in step 5.4.
3. Primary CD8 T cell isolation and activation (day -1 to day 0)
NOTE: Previously, collect CD8 T cells from female nonobese diabetic (NOD) mice at 4–5 weeks, a time point before islet inflammation starts. Handle all the mice following Institutional Animal Care & Use Committee (IACUC) approved protocols. CD8 T cells are enriched from splenocytes using a commercial negative selection kit.
- Coating plates with CD3/CD28 antibodies (Day -1)
- Add 1 mL of a mixture of anti-mouse CD3 and CD28 antibodies (both at 1 µg/mL in PBS) to each well of a 24-well plate, and incubate at 4 °C overnight.
- The next day, wash the plates with 1 mL of sterile PBS 3 times before adding the murine CD8 T cells (step 4.1).
NOTE: The number of wells to be coated will vary for each experiment, depending on the total number of activated CD8 T cells required.
- Collection of splenocytes (Day 0)
- Euthanize two NOD female mice aged 4–5 weeks using CO2 inhalation followed by decapitation. Harvest the spleens and put them onto a cell strainer soaking in 10 mL PBS in a cell culture dish on the ice.
- In a cell culture hood, cut each spleen into 3–5 pieces, press tissues with a sterile plunger of a 3 or 5 mL syringe to force spleen fragments apart and allow cells to pass through the wire mesh.
- Gently remove red blood cells by resuspending splenocytes in 1:4 diluted red cell lysis buffer (1 mL of lysis buffer in 3 mL of PBS for one spleen), and incubating for 5 min at room temperature.
- Then, dilute 10 μL of the cell suspension with trypan blue dye solution for counting cells with a hemocytometer, and pellet the rest of the cells by centrifugation at 350 x g for 7 min.
- Enrichment of CD8 T cells (Day 0)
- Enrich CD8 T cells by negative selection using a mouse CD8 T cell isolation kit, following the manufacturer's instructions.
NOTE: To ensure high purity always round up the cell numbers when calculating the volume of biotinylated-antibody to be added (e.g., use the volume of reagents suggested for 108 cells for a calculated 9.1 x 10⁷ cells). - Suspend cell pellets in 400 µL of buffer and 100 µL of biotin-antibody cocktail per 1 x 10⁸ cells, mix well and incubate for 5 min in the refrigerator (4 °C) to allow antibody binding.
- Add 300 µL of labeling buffer and 200 µL of anti-biotin micro-beads per 1 x 10⁸ cells, mix well and incubate for 10 min at 4 °C.
- While waiting for the micro-bead binding, set up the separation column onto the separator. Wash column by rinsing with 3 mL of labeling buffer.
- Pass 1000 µL of bead/cell mixture through a 40 µm cell strainer before loading onto the separation column to remove cell aggregates. Collect the column flow-through into a pre-chilled 15 mL tube.
- Wash the column as instructed by the manufacturer, collecting all the effluent into the same tube. Determine the cell number (same as step 3.2.4) and collect by centrifugation at 350 x g for 5 min. Wash the cells by resuspending in 2 mL of complete T cell medium (RPMI-1640 containing FCS, 2-mercaptoethanol, rhIL-2 (200 U/mL), mouse Interleukin-7 (mIL-7, 0.5 ng/mL), ITS, 4-(2-hydroxyethyl)-1-piperazineethanesulfonic acid (HEPES) and penicillin-streptomycin) and centrifuging at 350 x g for 5 min.
- Resuspend the cells in pre-warmed (37 °C) complete T cell medium at a concentration of 0.25–0.5 x 10⁶/mL.
- Enrich CD8 T cells by negative selection using a mouse CD8 T cell isolation kit, following the manufacturer's instructions.
4. T cell activation (Day 0 to 2)
- Add 2 mL of the cell suspension (0.25–0.5 x 10⁶/mL) to each coated well of the CD3/CD28 antibody coated 24-well plate from step 3.1.2. Use a swirling motion to dispense the cells evenly.
NOTE: Add the cells using a swirling motion to distribute them evenly and minimize edge effects. If the cells cluster along the edge of the wells, both the transduction rate and cell viability will be decreased. - As a control, plate the same number of CD8 T cells into a single non-coated well of the plate. Incubate the cells at 37 °C using a 10% CO2 gassed incubator for 48 h.
NOTE: After 48 h, activation can be confirmed using a microscope; the activated cells will be larger than the cells that did not encounter anti-CD3/CD28 antibodies.
5. Transduction of activated CD8 T cells (days 1 to 3)
NOTE: This protocol uses a spin-transduction method. A centrifuge with a swing-out rotor and tissue culture plate adaptors that is capable of maintaining an internal temperature of 37 °C is required. To ensure maximum efficiency, on the day of transduction pre-warm the centrifuge to 37 °C before collecting the virus.
- Preparation of human fibronectin fragment coated plates (Day 1 to day 2)
- On day 1, add 0.5 mL of fibronectin (50 µg/mL in PBS) to the wells of a 24-well plate, and incubate overnight at 4 °C.
NOTE: Typically, two fibronectin-coated wells are required per plate of transfected Phoenix cells. - On day 2 remove the fibronectin solution, and replace with 1 mL of 2% bovine serum albumin (BSA) in PBS. Incubate at room temperature for 30 min to "block" non-specific binding sites.
- Wash the treated wells with 1 mL of sterile PBS. After removing the wash solution, the plate is ready for use; or, can be sealed and stored at 4 °C for up to one week.
- On day 1, add 0.5 mL of fibronectin (50 µg/mL in PBS) to the wells of a 24-well plate, and incubate overnight at 4 °C.
- Collection of activated CD8 T cells (Day 2)
- Harvest the activated CD8 T cells, count and calculate cell viability using trypan blue or a suitable automated instrument.
- Collect cells by centrifugation and resuspend at 5 x 10⁶ viable cells/mL for transduction. Maintain a small aliquot of cells in culture in the complete T cell medium in the CO2 incubator to provide a control for subsequent fluorescence activated cell sorting of the transduced cells (step 6).
NOTE: After activation for 48 h, the total number of cells should have increased by approximately 1.5 fold, and have a viability greater than 95%.
- Transduction (Day 2)
- Add 100 µL of activated CD8 cell suspension per well (0.5 x 10⁶ cells) to the fibronectin coated plate. Then add 1.5–2 mL of virus-containing medium (from step 2.6) to each well. Mix using a swirling motion to dispense the cells evenly (Figure 2).
- Place the plate in a zip-lock plastic bag and seal (to provide secondary containment). Centrifuge at 2000 x g for 90 min at 37 °C.
- Remove the plate from the centrifuge. In the biological safety, cabinet carefully remove the plastic bag and ensure that the outside of the plate is not contaminated with any medium.
- Then transfer the plate to the dedicated 37 °C CO2 incubator. After 4 h, remove 1 mL of the medium from each well and replace with 1 mL of pre-warmed complete T cell medium. Replace the plate in the CO2 incubator.
NOTE: Handle all media from the transduced cells as infectious waste.
Representative Results
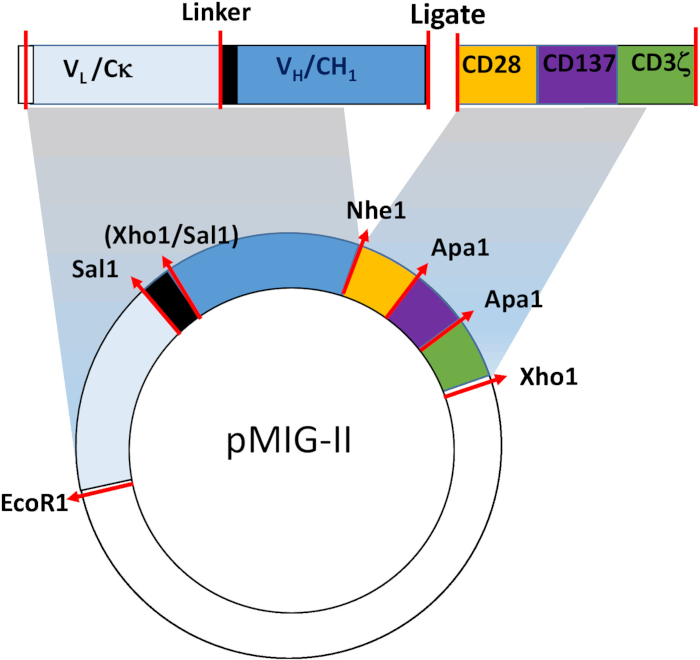
Figure 1: Schematic of the CAR retroviral construct. The CAR comprises a targeting domain derived from the Fab fragment of a suitable mouse monoclonal antibody, and a spacer/ membrane anchor/ signaling domain from mouse CD28, CD137 and CD247. The synthetic cDNA is inserted into the pMIG-II retroviral expression vector. Restriction endonuclease sites used for generating the mAb287-CAR are shown.
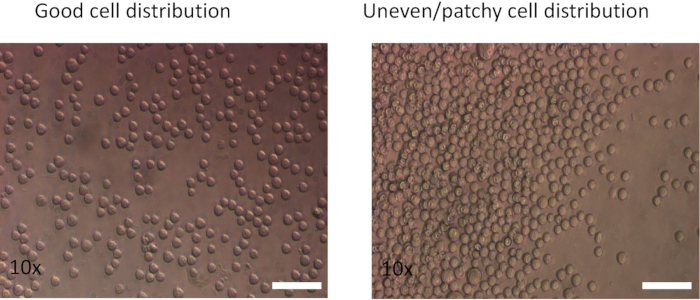
Figure 2: Effect of different plating methods on cell distribution. (Left) Cells pipetted using a swirling motion show an even distribution. (Right) Cells were pipetted directly into the center of the well. Images were captured after spinning at 350 x g for 5 min.
Offenlegungen
The authors have nothing to disclose.
Materials
| 2-Mercaptoethanol (50mM) | Gibco | 21985-023 | 50 uM |
| 5' RACE PCR | Clontech | 634859 | |
| anti-mouse CD28 antibodies | eBioscience | 14-0281-86 | final concentration at 1µg/ml |
| anti-mouse CD3e antibody | eBioscience | 145-2C11 | final concentration at 1µg/ml |
| Biotin Rat Anti-Mouse IFN-γ | BD Biosciences | 554410 | Working concentration at 0.5 µg/ml |
| BSA | Sigma | A7030 | |
| Endo-free Maxi-Prep kit | Qiagen | 12362 | |
| Gentamicin | Gibco | 15750-060 | Final 50 µg/ml. |
| Heat inactivated FCS | Hyclone | SH30087.03 | Final 10% FCS |
| HEPES (100X) | Gibco | 15630-080 | 1X |
| Insulin-Transferrin-Selenium-Ethanolamine (ITS 100x) | ThermoFisher | 51500056 | Final concentraion is 1x |
| Lipofectamine 2000 | Invitrogen | 11668019 | |
| LS Columns | Miltenyi Biotec | 130-042-401 | |
| MACS Separation Buffer | Miltenyi Biotec | 130-091-221 | |
| Mouse CD8a+ T Cell Isolation Kit | Miletenyi Biotec Inc | 130-104-075 | |
| Mouse CD8a+ T Cell Isolation Kit | Miltenyi Biotec | 130-104-075 | |
| Opti-MEM medium | ThermoFisher | 31985070 | |
| Penicillin-Streptomycin (5000U/ml) | ThermoFisher | 15070063 | 50 U/ml |
| Phoenix-ECO cells | ATCC | CRL-3214 | |
| Phosphate-buffered saline (PBS) | Gibco | 10010-023 | |
| pMIG II | Addgene | 52107 | |
| pMSCV-IRES-GFP II | Addgene | 52107 | |
| Red cell lysis buffer | Sigma | R7767 | |
| RetroNectin | Takara | T100A | Working concentration at 50 µg/ml in PBS |
| rhIL-2 (stock concentration 105 IU/ul) | Peprotech | 200-02 | Final concentration at 200 IU/ml |
| rmIL-7 ( stock concentration 50ng/ul) | R&D | 407-ML-005 | Final concentration at 0.5ng/ml |
| RPMI-1640 | Gibco | 11875-093 | |
| Sterile Cell Strainers | Fisher Scientific | 22-363-548 | |
| Tryple | Gibco | 12605-028 |
Tags

.