$$\rightleftharpoonup{xx}$$
$$\longleftharp{xx}$$,
$$\longrightharp{xx}$$,
All procedures involving animal models have been reviewed by the local institutional animal care committee and the JoVE veterinary review board.
1. Mouse Preparation
- Anesthetize the mouse
- Prepare sodium pentobarbital (50 mg/kg) in a syringe.
- Grab the mouse (8-week-old male C57BL/6) with the left hand so that its belly is facing up and its head is lower than its tail. Disinfect the abdominal skin with 75% alcohol.
- Holding the syringe in the right hand, pierce the abdomen white line with the needle slightly to the right side of the skin by 3–5 mm. Ensure that the syringe needle and the skin are at a 45° angle, inject the pentobarbital slowly into the abdominal cavity. After shaving, disinfects around the mouse's incision site 3 times alternately with 75% alcohol and Chlorhexidine solution.
- Check whether the anesthesia was successful by the lack of a righting reflex.
- Inject Rhodamine B isothiocyanate-dextran into the caudal vein.
- Prepare 100 µL of 10 mg/mL Rhodamine B isothiocyanate-dextran in a syringe.
- Wipe the mouse's tail with 75% alcohol.
- Hold the tail with the left hand, hold the syringe in the right hand with the needle parallel to the vein, and inject the 100 µL dye.
- Stop the bleeding with a cotton swab after the injection.
- Soak the mouse's abdominal fur with gauze wetted with sterile water, and shave the mouse's abdomen using a razor, making strokes in the direction of the fur. After shaving, disinfects around the mouse's incision site 3 times alternately with 75% alcohol and Chlorhexidine solution.
- After wiping a heating pad with 75% alcohol, open the heating pad, and place the mouse on its back in the heating pad to maintain its body temperature at 37 °C.
2. Fixing the Mouse Liver with the Body Organ Imaging Frame
NOTE: The commercial organ imaging frame has not been released yet.
- Place a clean suction cup in a fixed position.
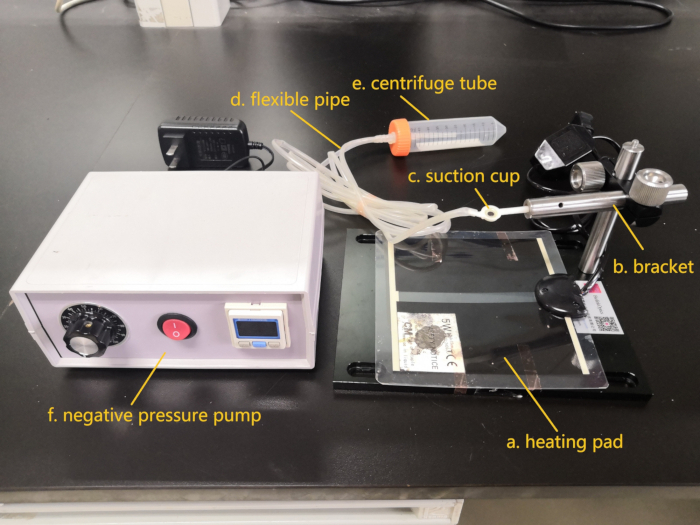
- Install an organ imaging fixture (Figure 1) and wipe the heating pad and suction cup with 75% alcohol.
- Connect the suction cup (5 mm diameter) to the vacuum pump hose and turn on the vacuum pump.
- On a sterile table sterilized with 75% alcohol, disinfects around the mouse's incision site 3 times alternately with 75% alcohol and Chlorhexidine solution, then disinfects around the mouse’s incision site 3 times alternately with 75% alcohol and Chlorhexidine solution, then use surgical scissors to cut 2 cm of skin off the lower sternal border of the mouse and expose the liver.
- Place the mouse together with the heating pad on the holder base.
- Adjust the organ imaging fixture so that the suction cup holds the liver. Then use a negative pressure of 30–35 kPa for suction so that the liver attaches to the suction cup (Figure 2).
3. Adjusting the Multiphoton Laser Scanning Microscope
- Turn on the multiphoton microscope and select the 60x/1.00 W objective.
- Fix the frame and mouse under the objective lens.
- Add a drop of normal saline that can cover the entire lens, which is the center of the suction cup, and adjust the objective lens to just touch the normal saline.
- Double-click on the computer icon to turn on the laser software and turn on the switch. Then press and hold the power button and shutter for 3 s.
- Set the wavelength to 800 nm.
- Start the microscope operating software using the computer.
- For the Acquisition Setting, set Laser 800.