Developing an Engineered Silk-Collagen-Based 3D Model of Polarized Neural Tissue
Abstract
Source: Chwalek, K. et al., Engineered 3D Silk-collagen-based Model of Polarized Neural Tissue. J. Vis. Exp. (2015).
This video showcases the creation of a 3D polarized neural tissue model utilizing silk-collagen scaffolds. It details the process of seeding neuronal cells on porous silk scaffolds, incubating for cell attachment, embedding the scaffold with collagen, and underscores the significance of the supportive collagen matrix in forming a 3D polarized neural tissue model.
Protocol
All procedures involving sample collection have been performed in accordance with the institute's IRB guidelines.
1. Silk Scaffold Preparation
- Preparation of silk solution from Bombyx mori cocoons
- Cut each cocoon into 8 equal pieces using scissors. Use about 11 cocoons for 5 g of fragmented cocoons. (15 min)
- Prepare 2 L of 0.02 M Na2CO3 solution and boil using a hot plate. (15 min)
- Weigh 5 g of fragmented cocoons and boil them in Na2CO3 solution for 30 min. Stir the boiling silk every couple of minutes with a spatula. This step, called de-gumming, purifies silk fibroin from hydrophilic proteins, sericins. (30 min)
- Wring the fibroin out by hand and rinse it in distilled water at least three times to wash out any remaining sericin and chemicals. (5 min)
- Place the wet fibroin on a petri dish and dry the fibroin extract in the flow hood O/N.
- The next day, weigh the dry fibroin mass and place the fibroin in a glass beaker. (15 min)
- To dissolve the fibroin in 9.3 M LiBr solution, calculate the required volume (in ml) of LiBr by multiplying the mass of dry fibroin by 4. Slowly pour LiBr solution over the silk fibroin and use a spatula to immerse all the fibroin fibers. Cover the beaker to prevent evaporation and place it at 60 °C for 4 hr to allow the fibers to dissolve. (15 min)
- Using the syringe, collect the fibroin solution from the beaker and load it into the MWCO 3,500 dialysis cassettes. Perform dialysis against distilled water for 48 hr. Change the water every couple of hours.
- Using the syringe, collect the fibroin solution from the cassettes into 50 ml conical tubes and centrifuge twice at 9,000 rpm (~12,700 x g) at 4 °C for 20 min. After each centrifugation step, pour the supernatant into a fresh tube and discard the pellet. (40 min)
- Measure the concentration of the fibroin by estimating the dry weight. Pour 1 ml of silk solution into a weigh boat. Dry the sample in the oven at 60 °C for 2 hr. Weigh the dry silk fibroin and calculate the concentration of silk fibroin solution by multiplying the obtained weight by 100. The expected concentration of silk solution is 6-9% (w/v).
- Adjust the silk concentration to 6% (w/v) by diluting it in distilled water.
Stopping point: The liquid silk fibroin can be stored at 4 °C for up to one month in a closed container.
- Preparation of porous scaffolds from silk solution.
- Sieve the granular NaCl to separate the 500-600 μm granules, which will be used in later steps. Discard the granules sized below 500 μm and above 600 μm. (15 min)
- Pour 30 ml of 6% silk solution into the polytetrafluoroethylene (PTFE) mold (Figure 1). Gently scatter 60 g of sieved NaCl over the silk. Tap the container to obtain a uniform layer of salt. Incubate 48 hr at RT to polymerize the silk.
- Place the scaffold-containing PTFE mold in the oven at 60 °C for 1 hr to finalize the polymerization and evaporate any remaining liquid.
- Place the contents of the PTFE mold in a beaker containing 2 L of distilled water for 48 hr to leach out the salt. Change the water 2-3 times per day. Remove the sponge scaffolds from the molds when the salt is completely leached out.
Stopping point: The sponges can be stored immersed in water at 4 °C in a closed container to prevent the scaffolds from dehydration. - Cut out the scaffolds with a 5 mm diameter biopsy punch when ready. Pre-cut the scaffolds to reach about 2 mm in height. Punch out the center of the scaffold with the 2 mm diameter biopsy punch (Figure 2A). (1 hr)
- Autoclave the scaffolds immersed in water to sterilize them (wet cycle, 121 °C, 20 min).
Stopping point: The sponges can be stored immersed in water at 4 °C in a closed container to prevent the scaffolds from dehydration. - Before the planned cell seeding, immerse the scaffolds in a sterile 0.1 mg/ml poly-D-lysine (PDL) solution. Incubate for 1 hr at 37 °C.
- Wash the scaffolds 3x with phosphate-buffered saline (PBS) to remove non-bound PDL. (30 min)
2. Isolation of Rat Cortical Neurons
- Dissect cortices from embryonic day 18 (E18) Sprague-Dawley rats after the approved animal protocol is obtained. (2 hr)
- Incubate 10 cortices in 5 ml of 0.25% trypsin with 0.3% DNase I (from bovine pancreas) for 20 min at 37 °C.
- Inactivate the trypsin by adding 1 mg/ml of soybean protein.
- Triturate the cortices using a 10 ml Pasteur pipette by pipetting up and down 20 times until a single cell suspension is generated. Be gentle and avoid air bubble formation. (10 min)
- Centrifuge the cell suspension at 127 x g for 5 min.
- Resuspend the cell pellet in 10 ml of culture medium (Neurobasal medium, 1x B27 supplement, 1x Glutamax, 1% penicillin/streptomycin). Count the cells. The expected cell concentration is about 2×10⁷/ml. (20 min)
3. Construct Assembly and Culture
- Scaffold seeding with cells
- Move the sterile scaffolds and all the required utensils inside a cell culture hood. Place the scaffolds in a 96-well cell culture plate using sterile forceps, allocating one scaffold per well. (10 min)
- Immerse the scaffolds in the cell culture medium to equilibrate them before cell seeding. Incubate for 1 hr at 37 °C. (10 min)
- Aspirate the excess of the medium from the scaffolds.
- Apply 100 µl of cell suspension/scaffold. (10 min)
- Incubate the cells at 37 °C O/N to allow cell attachment to the scaffold.
- The following morning, aspirate the non-attached cells and apply 200 µl/well of fresh culture medium. (10 min)
- Scaffold embedding with collagen matrix. (2 hr)
- Place 10x PBS, water, 1 N NaOH, and rat tail I collagen on ice. Prepare a working solution of collagen as per the manufacturer's instructions. Maintain on ice until the cell-seeded constructs are ready (up to 1 hr).
- Remove the cell-seeded silk constructs from the incubator and aspirate the excess medium.
- Transfer the scaffolds to the empty wells on the well plate using sterile forceps and immerse each scaffold in 100 µl of 3 mg/ml collagen solution. Place the tissue culture plate back in the incubator for 30 min to allow collagen polymerization.
- Apply 100 µl of pre-warmed cell culture medium/well. Culture the constructs for one week, changing the medium every day by replacing only half the volume of the medium.
Representative Results
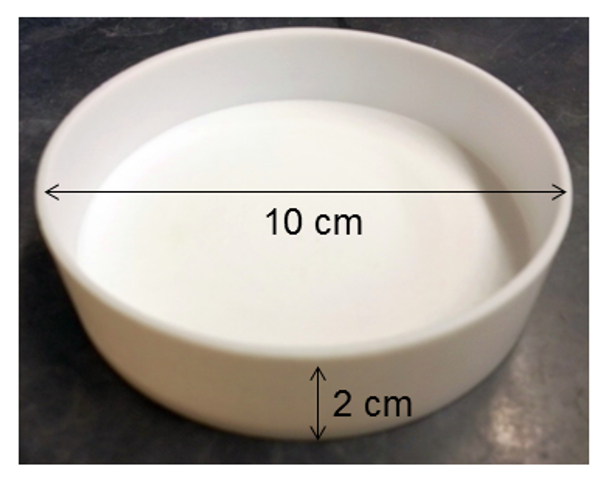
Figure 1. PTFE mold used for silk sponge scaffold preparation. The dimensions: 10 cm diameter, 2 cm height.
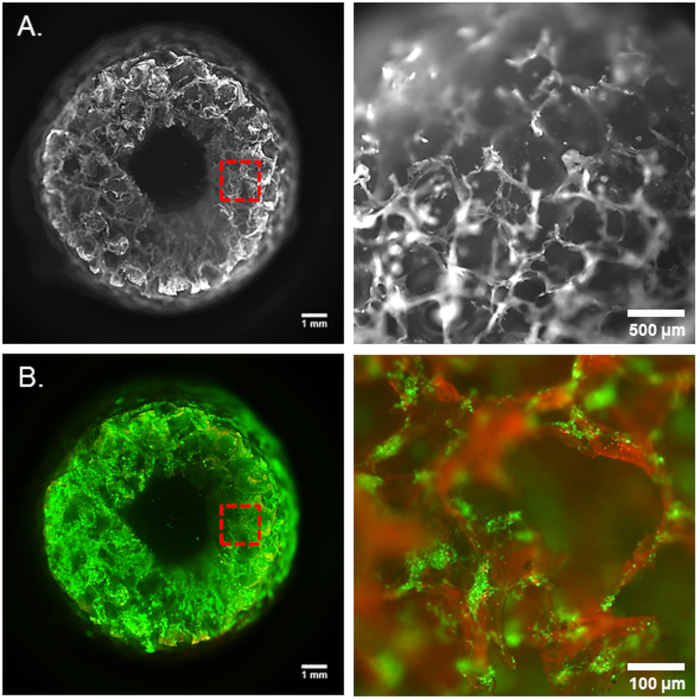
Figure 2. 3D brain-like tissue model. (A) Porous silk sponge scaffold. (B) Live/dead staining of neurons at day 1 upon seeding on silk scaffold before collagen embedding (green-live cells, red-dead cells). Panels on the right side show the magnification of the area captured in red frames.
Divulgaciones
The authors have nothing to disclose.
Materials
| Centrifuge 5804 R | Eppendorf | ||
| poly-D-lysine | Sigma-Aldrich | P6407-5MG | final concentration 10 μg/ml, dissolved in water |
| Neurobasal medium | Gibco | 21103049 | warm up to 37 °C before use |
| B27 supplement 50x | Gibco | 17504-044 | |
| Glutamax | Gibco | 35050-061 | |
| Penicilin Streptomycin | Corning | 30-002-CI | |
| Collagen I, rat tail, 100 mg | Corning | 354236 | final concentration 3 mg/ml |
| NaOH | Sigma-Aldrich | S2770 | corrosive |
| PBS | Sigma-Aldrich | D1283-500ML | |
| Na2CO3 | Sigma-Aldrich | 223530 | |
| LiBr | Sigma-Aldrich | 213225 | |
| MWCO 3500 dialysis cassettes | Thermo Fisher | 66110 | |
| Heating plate | Fisher Scientific | Isotemp | |
| Sieve | Fisher Scientific | No. 270, No. 35, No. 30 | |
| PTFE | mold made in house (Figure 1) 10 cm diameter, 2 cm height | ||
| NaCl | Sigma-Aldrich | 71382 | |
| Biopsy Punch 5 mm | World Precision Instrument | 501909 | |
| Biopsy Punch 2 mm | World Precision Instrument | 501908 | |
| Trypsin | Sigma-Aldrich | T4049-500ML | |
| DNase | Roche | 10104159001 | final concentration 0.3% |
| Soybean protein | Sigma-Aldrich | T6522-100MG | final concentration 1 mg/ml |
