This protocol describes a procedure for creating functional artificial neonatal heart models by utilizing a combination of magnetic resonance imaging, 3D printing, and injection molding. The purpose of these models is for integration into the next generation of neonatal patient simulators and as a tool for physiological and anatomical studies.
Neonatal patient simulators (NPS) are artificial patient surrogates used in the context of medical simulation training. Neonatologists and nursing staff practice clinical interventions such as chest compressions to ensure patient survival in the case of bradycardia or cardiac arrest. The simulators used currently are of low physical fidelity and therefore cannot provide qualitative insight into the procedure of chest compressions. The embedding of an anatomically realistic heart model in future simulators enables the detection of cardiac output generated during chest compressions; this can provide clinicians with an output parameter, which can deepen the understanding of the effect of the compressions in relation to the amount of blood flow generated. Before this monitoring can be achieved, an anatomically realistic heart model must be created containing: two atria, two ventricles, four heart valves, pulmonary veins and arteries, and systemic veins and arteries. This protocol describes the procedure for creating such a functional artificial neonatal heart model by utilizing a combination of magnetic resonance imaging (MRI), 3D printing, and casting in the form of cold injection molding. Using this method with flexible 3D printed inner molds in the injection molding process, an anatomically realistic heart model can be obtained.
Every year millions of neonates are admitted to neonatal intensive care units (NICU). In NICUs, most emergencies relate to problems in the airway, breathing, and circulation (ABC) and require interventions such as chest compressions. NPS offer a valuable teaching and training tool to practice such interventions. For some NPS, embedded sensors can detect whether performance meets the recommended clinical guidelines1 for depth and speed of chest compressions. The adherence to guidelines can be used to calculate and quantify performance, and in this regard, such state of the art NPS can be viewed as a tangible and white box metric for evaluating performance.
Adherence to the recommended guidelines aims at improving patient physiology. For example, chest compressions are delivered with the aim of generating adequate blood flow in the circulatory system. Current high fidelity NPS (e.g., PremieAnne (Laerdal, Stavanger, Norway) and Paul (SIMCharacters, Vienna, Austria)), do not contain any sensors to measure physiological parameters such as blood flow during training as they lack an integrated heart to generate this physiological parameter. Efficacy of chest compressions in current NPS can therefore not be assessed at a physiological level. For NPS to enable physiological assessment of chest compressions, an anatomically realistic artificial heart has to be integrated into the NPS. Furthermore, research2 shows that an increase in physical anatomical fidelity may lead to an increase in functional fidelity of NPS. Integrating a physically high-fidelity organ system would benefit both the functional fidelity of training and enable physiological performance assessment.
A substantial increase in the fidelity of NPS can be achieved through 3D printing. In medicine, 3D imaging and printing are mostly used for surgical preparation and creation of implants3,4,5. For example, in the field of surgical simulation, organs are produced to train surgeons on performing surgical procedures6. The possibilities of 3D printing have not yet been extensively applied in NPS. The combination of 3D imaging and 3D printing opens the possibility for NPS to reach a higher level of physical fidelity. The replication of sophisticated, flexible, neonatal organs such as the heart becomes possible due to the ever-broadening range of techniques and materials used for 3D printing7.
In this paper, we detail a protocol for creating a functional, artificial neonatal heart using a combination of MRI, 3D printing, and cold injection molding. The heart model in this paper includes two atria, two ventricles, four functional valves, and pulmonary and systemic arteries and veins all produced from a single silicone cast. The heart model can be filled with a liquid, equipped with sensors, and used as output parameter generator (i.e., blood pressure or cardiac output during chest compressions, and valve functionality).
All institutional approvals were obtained before patient imaging.
1. Image Acquisition and Segmentation
2. Processing and Mold Printing
3. Cold Injection Molding and Finishing
This study details a method to create an anatomically realistic neonatal heart model combining MRI imaging, 3D printing, and cold injection molding. The ductus arteriosus as well as foramen ovale were not included in the heart model presented in this paper. The method described in this paper can also be applied to other internal organs, such as lungs, and rib cage structures. Rib cage structures require no molds and can be printed directly using flexible materials. In (Figure 7), we depict several of these examples. Using the heart model in conjunction with these other artificial body parts creates a complete thoracic replica to use as a training tool or testing platform for non-invasive as well as invasive clinical interventions.
The challenge of recreating a complete and anatomically realistic model lies with the fact that four chambers, as well as valves, have to be cast as one part. If separate parts were to be cast and at a later stage glued together, less anatomical accuracy will be retained. Furthermore, gluing segments together using silicone material may cause potential ruptures when using the heart model during compressions.
The resolution of 3D printing intricate parts (Figure 1) is essential for the realization of small organic components such as the heart system. Because the detail in these models' chambers and valves determines the functionality of the final model, then with higher resolution of the print, there will be higher resolution of the final product. This is especially the case with the valves being an integrated part of the mold. If these inner mold parts are not printed facing a direct vertical position, the delicate valves will break during the cleaning process which will result in misshaped valves after casting.
Cleaning of the printed parts should be done using a solution of sodium-hydroxide and left to dry for 48 h afterward. Otherwise, the leftover support material will inhibit the silicone from curing, which will result in failed valve casts as well as an extremely tacky exterior of the heart model.
The use of very flexible inner mold materials using 3D printing offers the possibility of creating organic and complex structures to be released from the final cast part (Figure 4). If these inner mold parts were to be printed in solid materials, the heart model part would be destroyed when removing the inner chambers.
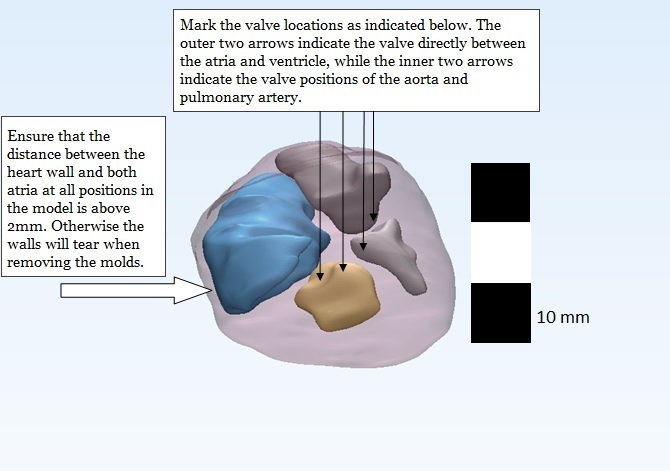
Figure 1: The finished MRI model. The model should contain the following five solids: heart wall, left and right atria, and left and right ventricle. Smoothing these parts is essential for a high-quality print and the subsequently high-detailed cast of the heart model. Notes of the positioning of the heart valves should be used for reference in editing the heart model in CAD software. Also, the space between the atria and heart wall should be a minimum of 2 mm to prevent rupturing of these walls when removing the inner molds.
Figure 2: Adding sockets to fixate the inner mold parts is essential for positioning. Without these, the inner molds will drift, and the valves will be a guaranteed miscast. The attachment of sockets in the negative valve parts also is essential for minimizing the inner mold fixation points, providing the least amount of disturbance to the anatomy of the model.
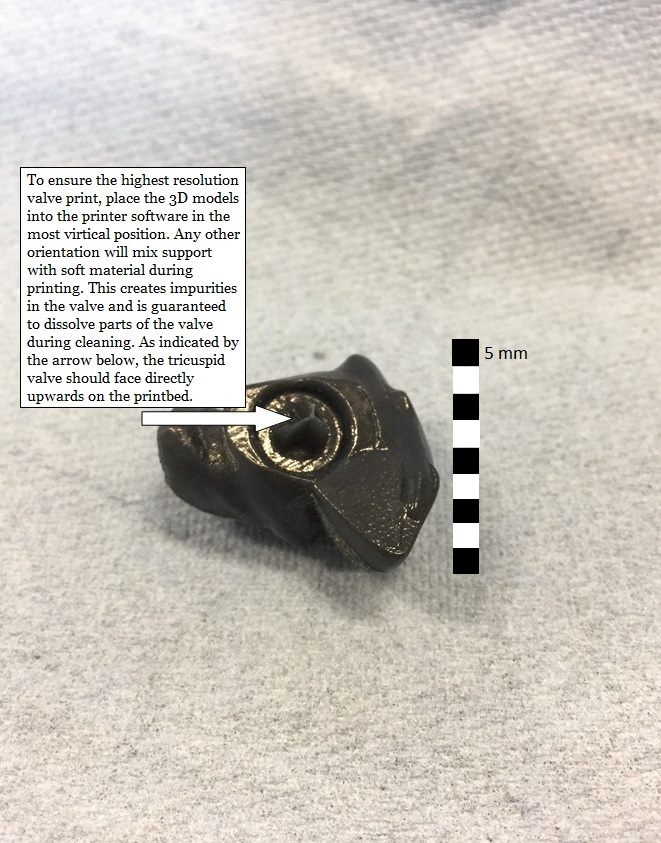
Figure 3: When printing the molds, the heart valve parts should always be printed facing an upward position in the glossy mode to guarantee accurate geometry. This also prevents support material from clogging up the cavities of the valve, which might disrupt the geometry after the cleaning process is complete.
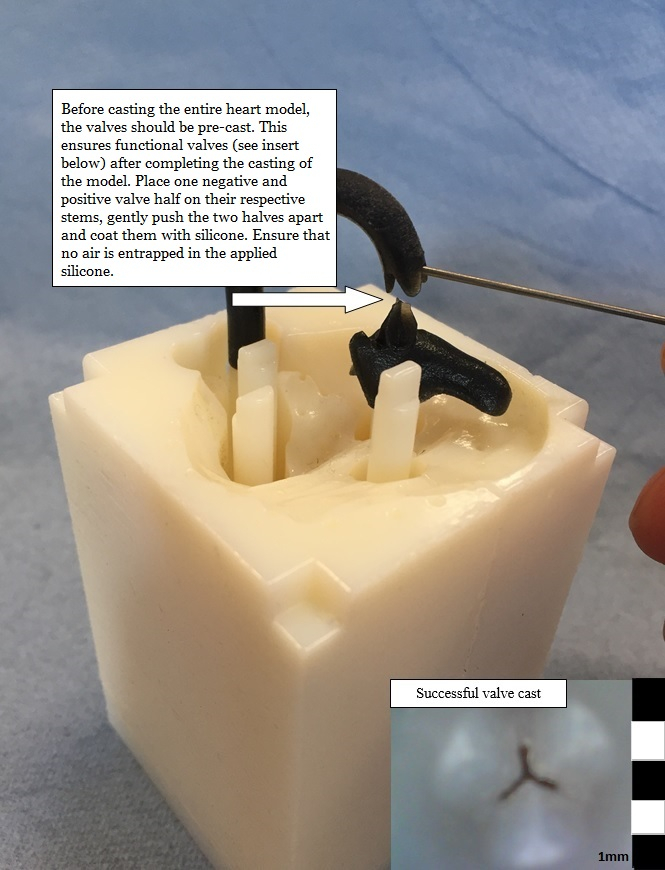
Figure 4: Adding silicone to the valves before cold injection molding the rest of the model is crucial. Assembling the valves and applying silicone for every valve separately is essential to prevent air entrapment, which would render the valve's functionality useless. Due to the extremely narrow channels between the valve halves, as well as the lack of air vents in these locations, it is otherwise impossible for silicone to reach the entirety of all semilunar valves during cold injection molding.
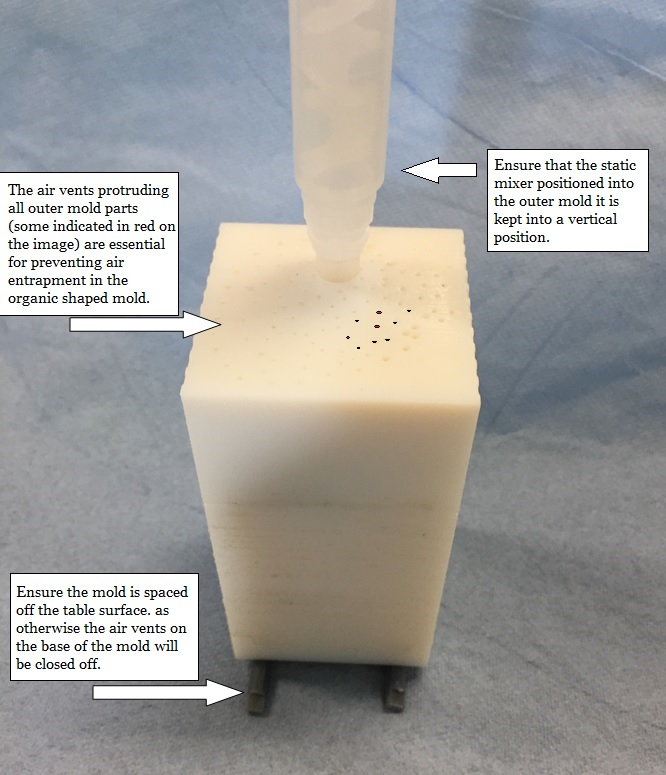
Figure 5: Mount the mold on spacers to ensure the air vents can function during the molding process. While one person holds the mold in place, as well as counts the minutes into the casting process, the second should slowly and steadily inject the silicone into the mold using the ejector gun. The lower the speed at which the silicone is injected into the mold, the less air entrapment will be present in the final heart model.
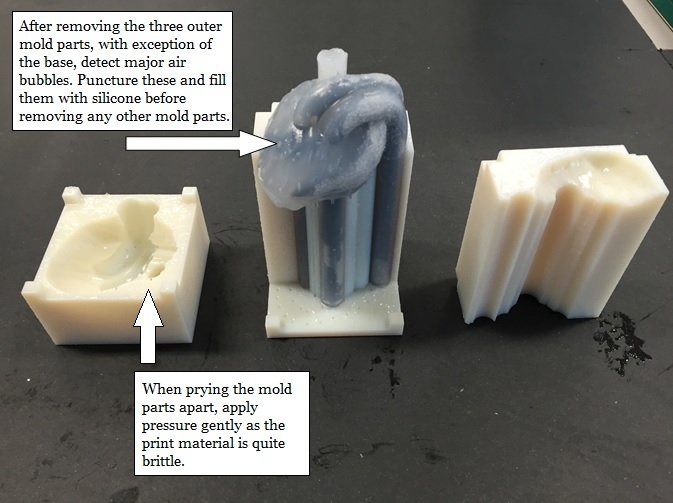
Figure 6: After releasing the top and side parts of the mold, inspect the heart for any air entrapments. These entrapments should be punctured and filled with silicone using a toothpick and left to cure for another 30 min before the final stages of demolding are performed.
Figure 7: The additionally modeled and printed lung mold (following this manuscript's protocol) and rib cage (printed in thermoplastic polyurethane (TPU)). These models enable the replication of a complete neonatal thoracic model for use during training of clinicians in the fields of anatomy, surgery, or to visualize the effects of chest compressions on the neonatal thorax. The organs produced using the method described in this paper have a perfect anatomical fit with each other as they all are based on the same MRI scan.
For the model developed in this study, we identified that injection molding over a 3-min period is required to prevent air entering the cast (Figure 5, Figure 6). To ensure that silicone reaches the narrow spaces of the valves, "pre-casting" or "coating" of the valve areas in the mold is essential. Since the inner molds shaping the heart chambers have to exit the final silicone cast through 5 mm openings, multi-material 3D printing for molds is needed to create a single cast heart model (Figure 4). We lowered the hardness of the parts of the inner mold several times and eventually used the S95 material setting. Harder materials will make the silicone model tear due to sharp edges of the valves rendering the resulting heart model non-functional. Through using multiple silicones with different curing times, the use of quick curing silicone was found to be required due to the otherwise outflow of material during curing through the many air vents in the mold design.
The limitations of the technique described in this manuscript are that the production method is time-consuming, and requires many proprietary materials resulting in a relatively costly production process. Another limitation is access to high-resolution MRI scans necessary for retaining anatomical correctness (Figure 1) during segmentation. Also, the mold design requires significant CAD skill (Figure 2) to construct and implement the neonatal heart valves. One further limitation of using the cardiac models described in this paper is that according to research by Cohrs et al.9, the models will only last for around 3,000 compression cycles before tearing starts to occur, which would require a continuous production of heart models. We, however, estimate that the presented model in this paper will outlast this number as the material used has a higher elongation until break parameter and compression pressures exerted on the model are lower. Although the technique described in this paper aims to produce neonatal manikin simulator parts, very few papers2 support the use of such highly detailed models in simulators yet.
The significance of this method concerning existing methods9 for creating functional 3-dimensional models of the heart is that this method can anatomically mimic human hearts using a single soft material for casting. The investigation of silicone materials mimicking soft tissue10 shows potential to mimic muscle tissues, which could eventually be integrated into the heart model realizing heartbeat. This, in turn, can enable the investigation of cardiac muscle behavior in abnormal circumstances, such as crash testing. Furthermore, for the creation of models with this level of organic complexity, this method provides a replacement to the lost wax modeling method. Where in lost wax molding the inner molds are always lost creating the model, using the method described in this paper, this is not the case. This can result in a decreased cost of creating models of similar complexities.
Essential points for creating a heart model are firstly a precise segmentation of the heart using a high-resolution thoracic MRI. The precise segmentation ensures the heart wall, chambers, and their positioning is captured as accurately as possible, resulting in a detailed 3D print. Secondly, a detailed and exact fitting of the valve parts and exit points during the post-processing procedure needs to be ensured to produce functioning valves after casting. Thirdly, using softer materials in the 3D printing process of the inner molds is mandatory for their later removal without tearing the delicate valves or the rest of the silicone heart model apart. Finally, casting the valves and remaining heart model in two stages is required to guarantee intact semilunar valve parts in the model. When removing the inner molds, a delicate pulling of these parts are required to prevent damaging the valve structures.
The future applications of the heart models produced using this method aim at the integration into neonatal training manikins. This model, combined with the integration of sensors can provide clinicians with cardiac output and blood pressure data due to chest compressions as shown in previous research8. Secondly, it could be used as a potential in vitro cardiovascular testbed for testing novel micro sensors11 on their compliance with moving conditions in a beating heart. Movement, in this case, could be implemented using novel artificial muscle tissues12. Finally, the heart model can be easily adapted to incorporate different congenital anomalies such as patent ductus arteriosus or ventricular septal defects to investigate these anomalies in an in vitro setting. Finally, it also can be used as a surgical training model to practice operation procedures of these anomalies in the neonate.
The authors have nothing to disclose.
This research was performed within the Dutch framework of IMPULS perinatology. The authors would like to thank the Radboud UMCN Museum for Anatomy and Pathology and the Máxima Medical Centre Veldhoven for providing the neonatal MRI scans used for this work. The authors further would like to thank Jasper Sterk, Sanne van der Linden, Frederique de Jongh, Pleun Alkemade, and the D.search lab at the faculty of Industrial Design for their significant contributions to the development of this research. Lastly the authors would like to thank Rohan Joshi for his proof reading of the manuscript.
Ecoflex 5 | Smooth-on | Silicon casting material | |
400ml Static mixers | Smooth-on | Mixing tubes | |
Manual dispensing gun | Smooth-on | Used for injection molding | |
5-56 PTFE spray | CRC | Release agent for the molds | |
Sodium-hydroxide | N/A | This was purchased as caustic soda at the hardware store, in dry, 99% pure form. As it is widely available, there is no company specified | |
VeroWhite | Stratasys | The hard material used in the print | |
TangoBlackPlus | Stratasys | The rubber material used in the print | |
Support Material | Stratasys | The standard support material used by stratasys | |
Magill Forceps | GIMA | Infant size. This is for removing the inner molds | |
Stratasys Connex 350 | Stratasys | If this machine is not owned, another option is to have the parts printed through a third party printing firm such as 3D-hubs to get the parts printed and shipped. | |
Balco Powerblast (Water Jet) | Stratasys | ||
Euro 8-24 Set P (Air Compressor) | iSC | 4007292 | |
Syringe with blunt needle | N/A | A 20ml syringe with a 0.5mm diameter blunt needle. | |
Mimics 17.0 software | Materialise | This software was used to segment the heart model from the MRI. There are sevaral free MRI imaging software tools available such as InVesalius, or Osirix, although they may prove to provide less functionality. | |
Magics 9.0 software | Materialise | This was used to repair and smooth the .stl files generated by mimics. This smoothing can also be done in most other 3D modeling freeware. | |
Solidworks | Software used for editting the heart model. Most other freeware CAD software can be used to perform this stage of processing. |