Mosquito Embryo Microinjection: A Technique to Deliver Exogenous DNA into Embryo Yolk of Anopheles Gambiae to Generate Germline Mutations

Published: April 30, 2023

Abstract

Source: Carballar-Lejarazú, R. et al, Microinjection Method for Anopheles gambiae Embryos. J. Vis. Exp. (2021).

In this video, we demonstrate the delivery of gene drive construct into the embryo of Anopheles gambiae mosquito through embryo microinjection technique. This procedure allows for integration of  delivered DNA construct, through homologous recombination, into the germline cells to generate transformed mosquito population.

Protocol

1.  Embryo microinjection

  1. Use a micro-loader tip to fill the needles with 2 µL of DNA mixture (plasmid DNA at a concentration of  300-400 ng/µL. Insert the needle into the needle holder and connect the automated pressure pump tubing (Figure 1).
  2. Important: Align the needle so that it makes an angle of 15° with the plane of the slide (Figure 1).
  3. Open the needle tip by carefully touching the first egg of Anopheles gambiae mosquito and inject it by inserting the tip of the needle ≤ 10 µm in the posterior pole. A successful injection will lead to a small movement of the cytoplasm within the egg.
  4. Use the microscope coaxial stage controls to move to the next egg to continue injection.
    1. To ensure that the needle tip remains open and has not clogged, press the Inject button before entering another embryo and visualize the small droplet at the opening of the needle.
    2. If the needle gets clogged, press the Clear button to clear the needle and repeat the droplet visualization test. Adjust the pressure as needed if the needle tip opening gets slightly bigger to ensure that the size of the droplet stays small.
    3. Inject ~40-50 eggs with one needle.
      NOTE: Make sure the filter paper stays moist at all times. Keep sufficient back-pressure on the needle to keep it cleared. A needle that cannot be unclogged must be replaced with a new needle. Embryo placement, needle insertion and injection are made easier with microscopes that have coaxial controls for horizontal movement of the stage (Figure 2).
  5. After injections are complete, rinse the eggs off into a glass container lined with filter paper and filled with 50 mL of deionized H2O (Figure 3).
    NOTE: Embryos will start hatching 2 days post-injection and may take as long as 3-5 days. Hatched first instar larvae must be transferred immediately (check 2 times daily) to a clean container with water and food.

Representative Results

Figure 1
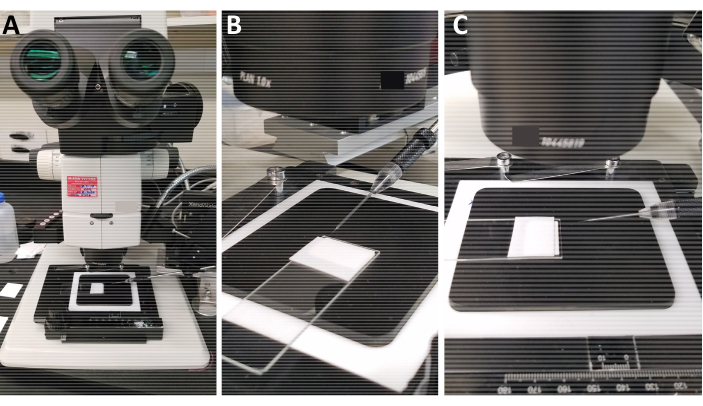
Figure 1: Needle position during the microinjections. A) Wide-angle view of the injection stage. B,C) Position the needle so that the aligned embryos form an angle of 15° with the injection needle. Do not elevate the arm of the microinjection instrument that holds the needle significantly higher than the microscope stage to ensure proper angling between the needle and slide containing the embryos.

Figure 2
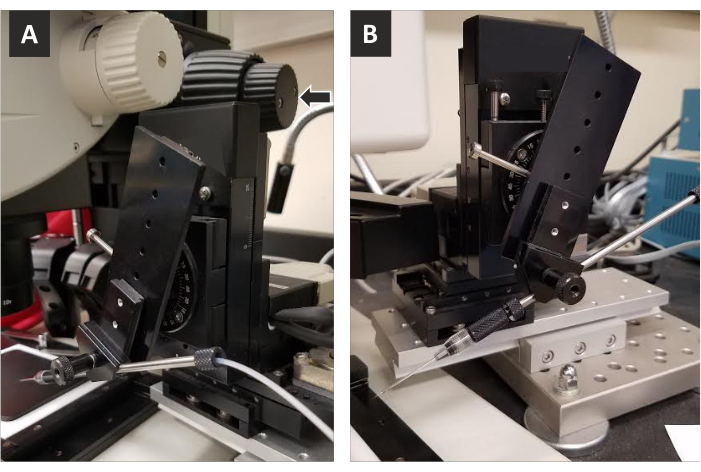
Figure 2: Co-axial controls and needle holder. A) The co-axial controls (arrow) allow for 3-dimensional movement of the needle to ensure precise placement of the needle for each injection. It is important to use co-axial controls to raise the needle vertically when switching slides so that the needle does not collide with the new slide when putting it into place on the stage. Lateral co-axial controls allow for accurate penetration of the needle into the posterior pole. B) Image of needle holder showing angle for injection.

Figure 3
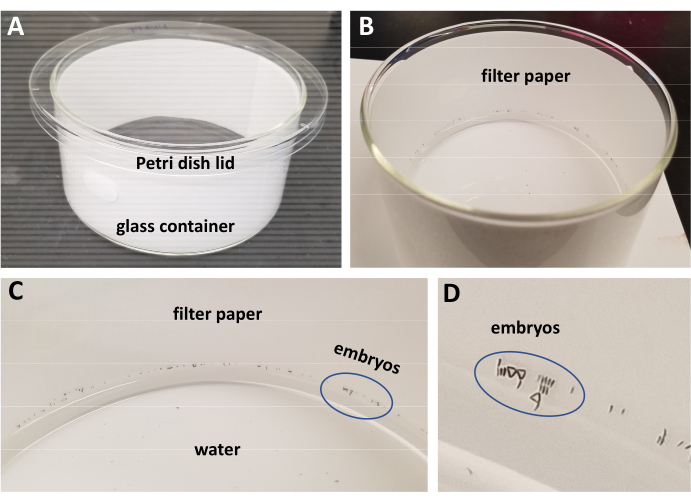
Figure 3: Chamber for egg hatching. A,B) Carefully wash injected embryos into a cylindrical container filled to a quarter depth with double-distilled water and lined with filter paper. C,D) Movement of the container causes the eggs to naturally adhere to the filter paper. Before leaving the container for hatching, ensure any eggs that have adhered higher up the filter paper are gently washed back down to water level. The blue oval marks a number of deposited eggs to show relative size.

Divulgations

The authors have nothing to disclose.

Materials

10x Microinjection Buffer 1 mM NaHPO4 buffer, pH 6.8, 50 mM KCl
Blotting membrane (Zeta-Probe GT Genomic Tested Blotting Membrane) Bio-Rad Neatly and straightly cut into 2×1 cm piece
De-ionized or double-distilled water (ddH20) Mili-Q In a wash bottle
Dissecting microscope Leica Leica MZ12 For embryo alignment
Glass container Pyrex No. 3140 125 x 65
Glass slide Fisher Brand No. 12-549-3 75×26 mm
Microinjector Sutter Instrument XenoWorks Digital Microinjector
Microloader Pipette tips Eppendorf 20 µL microloader epT.I.P.S.
Micromanipulator Sutter Instrument XenoWorks Micromanipulator
Micropipette Rainin 20 µL
Microscope Leica DM 1000 LED or M165 FC For microinjection
Nylon mesh
Paint brush Blick No. 05831-7040 Fine, size 4/0
Petri dish Plastic, (60×15 mm, 90×15 mm)

Tags

Play Video

Citer Cet Article
Mosquito Embryo Microinjection: A Technique to Deliver Exogenous DNA into Embryo Yolk of Anopheles Gambiae to Generate Germline Mutations. J. Vis. Exp. (Pending Publication), e20988, doi: (2023).

View Video