Un abonnement à JoVE est nécessaire pour voir ce contenu.  Connectez-vous ou commencez votre essai gratuit.
Immunohistochemistry and Immunocytochemistry: Tissue Imaging via Light Microscopy
  • 00:01Concepts
  • 03:39Preparation of Cells for Immunocytochemistry
  • 06:20Preparation of Formalin-Fixed Paraffin-Embedded Sections for Staining
  • 08:11Staining
  • 12:11Résultats

Immunohistochimie et immunocytochimie : Imagerie tissulaire par microscopie optique

English

Diviser

Vue d'ensemble

Source : Michael S. Lee1 et Tonya J. Webb1
1 Département de microbiologie et d’immunologie, University of Maryland School of Medicine et Marlene and Stewart Greenebaum Comprehensive Cancer Center, Baltimore, Maryland 21201

L’immunohistochimie (IHC) et l’immunocytochimie (ICC) sont des techniques utilisées pour visualiser l’expression et la localisation d’antigènes spécifiques à l’aide d’anticorps. La première utilisation publiée de l’IHC a été en 1941 quand Albert Coons a utilisé la technique pour visualiser la présence d’antigène pneumococcique dans les sections de tissus de souris infectées par Pneumococcus (1). Le nom, immunohistochimie, est dérivé des racines “immuno-,” en référence aux anticorps, et “histo-,” en référence aux sections de tissu utilisées dans IHC. La racine “cyto-” dans l’immunocytochimie met en évidence la différence clé entre l’ICC et IHC. Alors que le CiSE utilise des sections de tissus entiers, l’ICC utilise des cellules qui ont été isolées des tissus ou cultivées en culture. La différence dans les échantillons utilisés signifie que la préparation des échantillons diffère techniquement entre le CSI et l’ICC, mais sinon les protocoles de l’ICC et du CiSE sont identiques et on constatera que les termes sont fréquemment utilisés de manière interchangeable.

Au CSI et à l’ICC, des anticorps munis d’étiquettes chimiques ou fluorescentes, comme la peroxidase ou la rhodamine, respectivement, sont utilisés pour visualiser la distribution de tout antigène d’intérêt par une liaison spécifique de l’anticorps étiqueté à l’antigène. Dans le cas du CSI, de fines tranches de tissu sont immobilisées sur une glissière pour maintenir la structure du tissu avant d’être tachées, ce qui permet la visualisation d’antigènes dans le contexte de tissus entiers (figure 1). Dans le cas de l’ICC, les cellules sont réparties uniformément sur une diapositive avant d’être tachées, ce qui permet la visualisation de la distribution d’antigènes dans les cellules individuelles, mais pas dans la structure d’un tissu spécifique. En raison des similitudes entre les deux protocoles, ce protocole mettra l’accent sur le CSI afin d’aborder les complexités additionnelles de la préparation des échantillons impliquées dans le CSI.

Figure 1
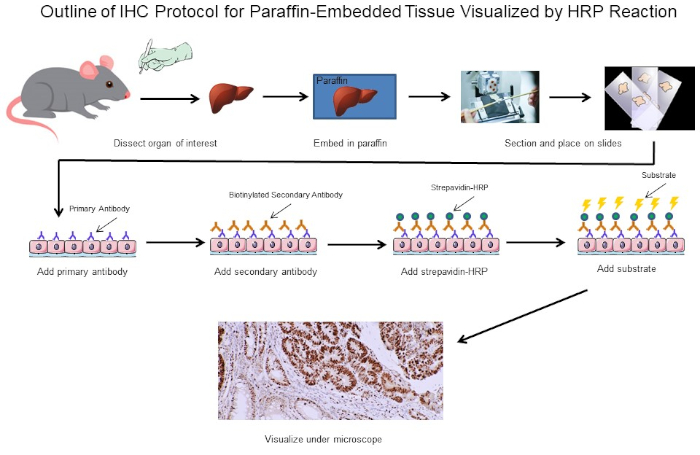
Figure 1 : Aperçu du Protocole du CSI. Contour visuel d’un protocole d’IHC pour le tissu paraffine-incorporé disséqué d’une souris. Ce protocole utilise un anticorps secondaire biotinylated et la strepavidtine-HRP pour visualiser l’emplacement de la liaison d’anticorps. D’autres options, telles que des anticorps étiquetés fluorescents, sont également possibles. Veuillez cliquer ici pour voir une version plus grande de ce chiffre.

La première décision importante lors de l’exécution du CSI est de savoir comment préparer les sections tissulaires afin de maintenir la structure du tissu tout au long du processus de coloration. Les deux principaux choix sont des sections fixées par formaline de tissu incorporé à la paraffine ou des sections fraîches de tissu congelé. Il n’y a pas de réponse simple quant à la méthode à utiliser car elle dépend de l’analyse en aval qui sera effectuée. On pense généralement que la fixation formaline des tissus incorporés à la paraffine est généralement mieux préservée de la morphologie tissulaire pour une imagerie optimale, tandis que la congélation des tissus frais peut préserver la fonction protéique pour les essais ultérieurs à l’extérieur du CSI. En outre, il a été démontré que les sections de tissus congelés frais conviennent mieux à l’analyse de l’expression génique (2). Une troisième considération est de savoir si oui ou non les anticorps pour votre antigène d’intérêt sont adaptés pour les sections de tissus fixes ou congelés, comme certains anticorps ont seulement été optimisés pour un type spécifique de section et peut ne pas fonctionner pour d’autres. Enfin, il faut aussi déterminer combien de temps ils ont besoin pour stocker les sections de tissus, car les échantillons congelés frais doivent être conservés à -80 oC et ne peuvent pas durer au-delà d’un an tandis que les sections fixes peuvent être stockées beaucoup plus longtemps à température ambiante. Ce sont quelques-unes des principales considérations pour déterminer s’il faut utiliser des sections fixées par formaline de tissu incorporé à la paraffine ou des sections fraîches de tissu congelé. En fin de compte, si l’on a assez de tissu, il peut être préférable juste d’avoir quelques-uns des deux.

Dans cette expérience, nous avons entrepris de déterminer si l’expression de cyclin D1 a été augmentée dans les rates agrandies d’un modèle spontané de souris du développement de lymphome. Des échantillons de tissu splénique ont d’abord été isolés de souris de type sauvage, de souris transgéniques qui n’ont pas de lymphome, ou de souris transgéniques qui ont développé spontanément un lymphome. Les échantillons de tissu de rate ont été fixés dans le paraformaldéhyde, incorporés dans le paraffine, sectionné, souillé utilisant un anticorps primaire anti-cyclin d’anticyclin de souris suivi d’un anticorps secondaire d’anti-souris de cheval, et développé utilisant 3,3-diaminobenzidine (DAB). Les sections ont ensuite été contre-tachées dans Harris Hematoxylin Solution, puis les sections ont été imaged à 20X grossissement.

Réactifs

Sections paraffines

  1. 4% Paraformaldéhyde (PFA)
  2. Éthanol (anhydrous dénaturé, grade histologique 100%, 95%, 80%, 75% et 50%). Peut être dilué à partir de 100% de stock à l’aide d’eau double distillée (ddH2O)
  3. Xylène
  4. Lamlede de verre compatible iHC pour s’assurer que la section tissulaire reste attachée tout au long de la procédure. Les lames de verre compatibles IHC ont un revêtement spécialisé et sont facilement disponibles auprès de plusieurs détaillants. Si vous effectuez icc, utilisez une diapositive chambrée. Les glissières chambrées permettent d’ensemencées dans les chambres et placées dans l’incubateur jusqu’à ce que les cellules se fixent à la glissière et atteignent la confluence appropriée, à ce moment-là les chambres peuvent être enlevées et la coloration peut se dérouler de la même manière que le CSI.
  5. pétrole
  6. 0,3 % Peroxyde d’hydrogène (H2O2)/méthanol : Pour préparer, ajouter 1 ml 30 % H2O2 à 99 ml de méthanol. Magasinez à -20oC
  7. Tampon de récupération d’antigène : IHC citrate buffer pH 6.0

Sections fraîches congelées

  1. Composé optimal de température de coupe (OCT)
  2. Fixation optimale : 4 % de PFA ou d’acétone refroidi à -20 oC

Coloration

  1. Tampon de blocage : doit être déterminé par l’utilisateur. Un exemple est le sérum de cheval dilué dans 1X PBS
  2. Anticorps primaires dilués : voir les spécifications du fabricant
  3. Anticorps secondaires biotinylated dilués : voir les spécifications du fabricant
  4. Peroxidase avide-raifort dilué (HRP) : Seulement pour la visualisation de peroxidase. Voir les spécifications du fabricant.
  5. DAB ou un autre substrat compatible
  6. Counterstain (facultatif)
  7. Éthanol (anhydre dénaturée, grade histologique 100% et 95%)
  8. Xylène
  9. Mont Organo/Limonène

Procédure

1. Préparation des cellules pour l’immunocytochimie Cellules de semences d’intérêt sur des toboggans chambrés ou des plaques de couverture chambrées en ajoutant 0,5 ml de suspension cellulaire aux puits d’une plaque de culture de 24 puits.Note: Certaines cellules peuvent avoir besoin de croissance sur les couvertures traitées, comme les couvertures traitées à la polylysine. Les conditions de traitement optimales doivent être déterminées par l’utilisateur en f…

Résultats

IHC and ICC have a vast range of applications. For example, one use of IHC is to examine the expression of oncogenes in spontaneous mouse models of tumor development. In Figure 2, we set out to determine if cyclin D1 expression was increased in enlarged spleens in a spontaneous mouse model of lymphoma development. Splenic tissue samples were fixed in paraformaldehyde, embedded in paraffin, sectioned, stained using an anti-cyclin D1 antibody (diluted 1:200 in blocking buffer), and then the sections were imaged at 20X magnification. Cyclin D1 expressing cells are indicated by the reddish-brown color against the blue tissue background. These results suggest that cyclin D1 expression was increased in enlarged spleens, indicating a correlation between cancer development and cyclin D1 expression in this model.

Figure 2
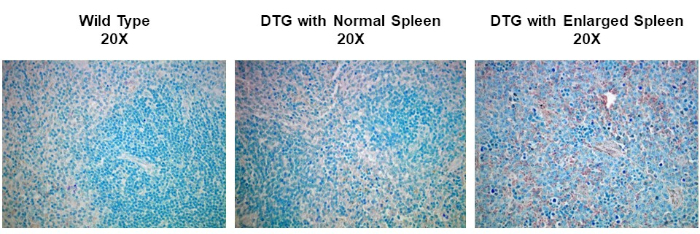
Figure 2: Splenic Cyclin D1 Expression in a Spontaneous Double Transgenic (DTG) Mouse Model of Lymphoma. An image of splenic tissue stained with an anti-Cyclin D1 primary antibody, counterstained with methyl green, and visualized using a biotinylated secondary antibody and ABC reagent activated with DAB substrate. The reddish-brown color represents locations where the antibody has bound indicating the presence of Cyclin D1 expressing tumor cells within the structure of splenic tissue that has been counterstained blue. Please click here to view a larger version of this figure.

Applications and Summary

Immunohistochemistry (IHC) and immunocytochemistry (ICC) are techniques used to visualize the expression and localization of specific antigens using antibodies. Tissues are first cut into thin sections that maintain the tissue morphology and placed on a slide. The antibodies are then added and will bind the antigen of interest and are equipped with a specific tag that allows them to be visualized under a microscope. Thus, through this basic concept, the distribution of antigens in the context of tissue structure can be visualized and studied. However, while the overarching concept is basic, there are multiple different approaches and variations that have been developed that increase both the complexity and usefulness of these techniques. This paper has covered the basic concept of IHC and ICC, the main decisions that need to be considered when using these techniques, and a detailed step-by-step protocol. The images produced by IHC and ICC are generally the final product and can be published as is to highlight obvious differences in amounts or distribution of staining between different conditions.

References

  1. Coons, A. H. Creech, H. J., Jones, N. and Berliner, E. The Demonstration of Pneumococcal Antigen in Tissues by the Use of Fluorescent Antibody, The Journal of Immunology, 45 (3), 159-170 (1942).
  2. Ripoli, F. L., Mohr, A., Hammer, S. C., Willenbrock, S., Hewicker-Trautwein, M., Hennecke, S., Escobar, H. M. and Nolte, I. A comparison of fresh frozen vs. Formalin-fixed, paraffin-embedded specimens of canine mammary tumors via branched-DNA assay. International Journal of Molecular Sciences, 17 (5) (2016).

Transcription

Immunocytochemistry and immunohistochemistry are staining methods for a protein of interest in cultured cells and tissues, respectively. The basic principle of both related techniques involves using specific antibodies tagged with a detection system to identify and visualize the protein and determine its location within the cells and tissues, as well as the relative levels. The process in either experiment begins with sample preparation.

For immunocyctochemistry, which specifically visualizes protein or antigen locations in cells, this involves three steps. The first step is plating, which entails culturing the cells in growth media on a cover slip or slide, typically, in the wells of a culture plate. This is followed by fixation, where a precipitating or crosslinking agent like paraformaldehyde is added to the cells to preserve the structural integrity of the proteins and prevent enzyme activity from degrading them. The last step is permeabilization, which involves adding a detergent to make the cell membranes permeable for the staining.

In the counterpart method, immunohistochemistry, proteins or antigens are visualized in tissues and sample preparation has five steps. First, the whole tissue is subjected to fixation, usually with paraformaldehyde. This is followed by embedding of the tissue in a block of paraffin, and then sectioning of this block using a machine called a microtome to cut the tissue into thin slices which can be placed onto slides. Next, the slides are subjected to deparaffinization, or removal of the paraffin from around the tissue slice. Then, an optional antigen retrieval step can be performed. This can either be done using heat or enzymes to unmask epitopes that were cross-linked during fixation making them available for antibody binding. After the appropriate sample preparation, a target-specific primary antibody is added to the cell or tissue sample. This primary antibody should bind to the protein of interest. Next, a secondary antibody is added, which detects and binds to the primary antibody. This secondary antibody is conjugated to, or can bind to, an enzyme called HRP. When its specific substrate, DAB, is added, HRP converts this to an insoluble, brown precipitate. This brown stain marks the location of the target protein. The slides are also stained with hematoxylin, which labels the nuclei in blue and provides a spatial reference point for determining subcellular localization. After that, mounting media is added to the slide, followed by a cover slip in order to seal and preserve the stained sample. Finally, the slides can be imaged on a light microscope.

In this video, you will observe the sample preparation technique for plated cells and tissue sections, followed by immunostaining of the tissue sections.

First, the cells of interest need to be seated onto coverslips. To do this, working in a tissue culture hood, place individual coverslips into the wells of a 24-well plate. Then, close the sash and turn on the UV light to sterilize the coverslips for at least 15 minutes. Next, turn off the UV light. To lift the cells of interest from a confluent 10-centimeter dish, aspirate the media, wash briefly with PBS, and add trypsin to the cells for 2 minutes. Then, tap the side of the plate to ensure the cells have detached and neutralize the trypsin with media. Next, add 0. 5 mL of the cell suspension into each well, making sure to cover the coverslips. Place the plate into a humidified CO2 incubator and allow the cells to grow at 37 degrees celsius until they are 50-70% confluent.

Once the cells reach the optimal confluency, aspirate the culture medium from each well, and then fix the cells by incubating them in . 5 mL of 4% paraformaldehyde diluted in 1X PBS for 20 minutes at room temperature. After removing the fixative, rinse the cells be adding 1 mL of 1X PBS over each coverslip. Immediately aspirate the PBS, then repeat the rinse 2 more times for a total of 3 washes.

Now, permeablize the cells by adding 0.5 mL of 0.1% Triton X-100 in 1X PBS to each well. Leave the plate at room temperature for 15 minutes. Aspirate off the permeabilization buffer and then rinse the cells by adding 1 mL of 1X PBS into each well. Immediately aspirate off the PBS and repeat the rinse 2 more times for a total of 3 washes. Now that the cells on the coverslips are fixed and permeabilized, proceed to the staining procedure demonstrated for the following immunohistochemistry example with the exception that the incubations should be performed within the wells of the 24-well plate rather than directly on a tissue section slide.

To begin, obtain prepared, formalin-fixed, paraffin-embedded tissue sections. Deparaffinize the slides by placing them into a slide rack and then completely immersing them into 250 mL of 100% xylene. Allow the slides to incubate for 5 minutes in the xylene. Then, remove the slides from the container, wipe them off with a paper towel, and place them into a new xylene bath in a fresh container for a further 5 minutes.

Next, rehydrate the sections in a series of graded ethanol solutions starting with 100% ethanol for 3 minutes. Wipe off the slide rack with a paper towel and transfer the slides to a new container of 100% ethanol for another 3 minutes. Continue this cycle of washing, drying with a paper towel, and transferring the slides to a new bath following the indicated concentrations of ethanol for the specified time. After the final ethanol wash, wipe off the rack with a paper towel and incubate the slides in 100 mL of .3% hydrogen peroxide for 30 minutes at room temperature in order to block any endogenous peroxidase activity. Wash the slides in 250 mL of 1X PBS for 5 minutes. Repeat this wash in a container of fresh 1X PBS for an additional 5 minutes.

Next, perform antigen retrieval by immersing the slides in 250 mL of IHC citrate buffer at pH 6.0 and boiling them for 20 minutes. Then, proceed to the staining protocol.

To begin the staining process for IHC, circle the sections with a hydrophobic pen to identify the minimal area that the buffer needs to cover. Then, use a pipette to place 100 microliters of blocking buffer, which in this experiment is horse serum diluted in 1X PBS, over the section. Incubate the slides for 1 hour at room temperature. Following this, remove the blocking buffer using a pipette.

Next, dilute the primary antibody and blocking buffer at a 1:100 dilution by adding 990 microliters of horse serum diluted in 1X PBS into a 1. 5 mL Eppendorf tube, followed by 10 microliters of the primary antibody. Add 100 microliters of the diluted primary antibody to each section, and incubate the slides for 30 minutes at room temperature. When the timer sounds, drain the primary antibody off each slide, and then wash them in 250 mL of 1X PBS for 5 minutes. Repeat this wash once more using fresh 1X PBS.

While the slides are washing in 1X PBS, dilute the secondary antibody to a 1:200 dilution by adding 995 microliters of blocking buffer to a 1.5 mL tube followed by 5 microliters of the secondary antibody, which in this case is biotinylated horse anti-mouse IGG. Add 100 microliters of the diluted secondary antibody to each section, and then incubate the slides for 30 minutes at room temperature. After 30 minutes, remove the secondary antibody by draining it off the sections, then wash the slides in 250 mL of 1X PBS for 5 minutes. Repeat this wash using fresh 1X PBS.

Now, add 100 microliters of avidin-biotin complex reagent, and incubate the sections in the dark for 30 minutes at room temperature. Next, wash the slides by immersing them in 250 mL of 1X PBS for 5 minutes. Similar to previous wash steps, repeat this wash one more time using fresh 1X PBS. Next, develop the slides by incubating the sections in 100 microliters of DAB for up to 5 minutes. Stop the development by immersing the sections in 250 mL of distilled water for 5 minutes.

Now, slides can be counterstained, if desired. To do this, briefly dip the slides in 250 mL of Harris Hematoxylin Solution. Rinse off the counterstain by washing the slides in 250 mL of distilled water for 5 minutes. Repeat this wash 1 more time using fresh distilled water. Next, dehydrate the sections. To do this, first incubate the slides in 95% ethanol for 5 minutes. Blot the slides on a paper towel, and transfer them to a new container of fresh 95% ethanol for another 5 minutes. Continue the cycle of washing, blotting with a paper towel, and transferring the slides to a new bath, following the indicated solutions for 5 minutes each.

After the final incubation, blot the slides with a paper towel, then add a drop of mounting media, such as Organo-Limonene Mount, to the slides. Now, place a coverslip over the sections, taking care not to trap air bubbles. The slides are now ready to be observed under a microscope for analysis.

To observe the stained sections, use a standard light microscope to visualize the stain, and a digital camera to capture the image. In this particular example of IHC, spleen tissues from wild type and spontaneous, double-transgenic, or DTG mice, are compared for studying Dyclin D1 expression in lymphoma. The tissues were paraffin-embedded, sectioned, and stained with anticyclin D1 antibody, and imaged at 20X magnification. Cyclin D1 expressing cells are indicated by the reddish-brown color against the blue tissue background. Comparing the staining intensities among the images from the various mice, the non-enlarged spleens have relatively low amounts of Cyclin D1 expression irrespective of the mouse genotype. In contrast, the enlarged spleen from the DTG mouse, shows increased reddish-brown staining indicating a correlation between cancer development and Cyclin D1 expression in this mouse model.

Tags

Cite This
JoVE Science Education Database. JoVE Science Education. Immunohistochemistry and Immunocytochemistry: Tissue Imaging via Light Microscopy. JoVE, Cambridge, MA, (2023).