Hydrodynamic Renal Pelvis Injection: A Technique to Directly Deliver DNA into Kidney Cells of Murine Model

Published: April 30, 2023

Abstract

Source: Woodard, L. E. et al. Hydrodynamic Renal Pelvis Injection for Non-viral Expression of Proteins in the Kidney. J. Vis. Exp. (2018)

In this video, we present the protocol for hydrodynamic injection of plasmids into the renal pelvis of the mouse kidney for nucleic acid transfection. This technique allows organ-specific delivery of plasmids by utilizing the principle of high hydrostatic pressure, which forcefully drives the plasmids into the specific site without causing tissue injury.

Protocol

All procedures involving animal models have been reviewed by the local institutional animal care committee and the JoVE veterinary review board.

1. Perform the Hydrodynamic Renal Pelvis Injection Surgery

  1. Select mice carefully for surgery.
    NOTE: Strain-specific differences have not yet been observed but may be possible. Most injections have been on the C57BL/6 or FVB backgrounds. Renal pelvis injections work best in mice that are 6–12 weeks old. In mice greater than 16 weeks, up to a 50% failure rate by luciferase imaging is possible for unclear reasons. The same age-related failure rate has been observed for hydrodynamic tail vein injections to the liver so this may be a general limitation relating to the principle of hydrodynamic injection. Along the same lines, others have shown that hydrodynamic tail vein injection into fibrotic rat liver is not as effective as healthy liver, so it may be possible that in settings of renal fibrosis the renal pelvis hydrodynamic injection will not be as effective, but this has not been tested directly.

2. Prepare Mice and DNA Syringes for Surgery

  1. Anesthetize the mice with ketamine and xylazine.
    1. Put on the correct personal protective equipment required by the animal facility, such as disposable lab apron, surgical face mask, and nitrile gloves.
    2. Working with 2–4 mice at one time, weigh each mouse in a 500 mL plastic beaker on a scale that is accurate to 0.1 g. Calculate the correct amount of 24 mg/mL ketamine and 2 mg/mL xylazine diluted in normal 0.9% saline to administer to each mouse by intraperitoneal injection (see referenced video for more on intraperitoneal injection). Use the formula (50 μL + ((5 μL) x (weight(g))), or alternatively calculate according to another formula after consultation with the local veterinarian team and IACUC.
    3. Inject the mouse by intraperitoneal injection by standard techniques. Place the mouse in a paper bucket until the mouse is immobile.
      NOTE: Mice are ready for surgery when they no longer respond to the toe-pinch test. Give mice that continue to respond to the toe-pinch test 20–30 min after the initial injection 20–60 μL more anesthetic, depending on the strength of the response.
    4. Place the mouse on a water-circulated heat pad covered with a blue pad and place vet ointment in both eyes to prevent corneal desiccation.
  2. Shave the left side of the back of the mouse from shoulder to rump and flank to spine with a shaver designed for pet grooming. Remove loose hair and debris.
  3. Prepare a separate syringe containing 100 μL of diluted DNA for each anesthetized mouse, making sure there are no air bubbles.
    1. Use a sterile 29G x ½" 0.5 mL U-100 insulin syringe with a permanently attached needle without a safety.
      NOTE: The syringe type is of critical importance. This gauge allows for a fast injection. The permanently attached needle prevents the solution from leaking out. The presence of safety will impede access to the renal pelvis. The syringes specified in the Materials Table glide more evenly during injection than other brands tested.
    2. Load the syringe to ~120 μL and pull the plunger down to create a space at the top. Tap with a pen until all air bubbles rise to the top. Holding the needle up, carefully depress the plunger to remove all air until a droplet forms at the tip of the needle. There should not be any visible bubbles present, as these may cause an air embolism that will kill the animal.
    3. Finish depressing the plunger until there is 100 μL in the syringe by emptying excess DNA solution into the original microfuge tube. Carefully label if necessary and place the loaded syringes on a sterile drape to maintain sterility if the facility where work is being performed does not allow recapping of needles.

3. Perform Injection Surgery

  1. Prepare the site for surgery. Place a sterile drape over the heat pad and empty sterile surgical tools onto the sterile drape without touching them. Pick up the mouse and place it in the field of view. Adjust lighting to illuminate the area.
  2. Remove three 3.15% chlorhexidine gluconate and 70% isopropyl alcohol skin antiseptic swabs from the packages and place near the animal.
  3. Change into sterile surgical gloves. Working in a circular motion beginning at the incision site, swab the animal with a new chlorhexidine/alcohol swab three times.
  4. Locate the incision site as shown in Figure 1A. Pinching the skin with tweezers, use scissors to make a cut to the skin layer approximately 1 cm from the spine and below the ribcage. Once the cut site is approximately 1 cm long, make a similar cut site below, in the muscle layer.
    NOTE: Make the incision the right length to allow the kidney to just barely come through the incision and then be kept in place by the incision itself. Too small an incision and the kidney cannot be exposed; too large and the kidney will continually slip back into the abdominal cavity.
  5. Locate the kidney.
    NOTE: It may be visible amongst white adipose tissue. The spleen is also located on the left side of the animal. The color of these organs can be visually differentiated, as the spleen is a dark maroon while the kidney is a dark red-orange. It is not desirable to manipulate the spleen as it can be easily ruptured.
  6. Without touching the kidney, gently expose it from the abdominal cavity by putting steady, gentle pressure on the abdomen with the fingers (Figure 2C). Use closed tweezers to gently push undesired organs back into the abdomen if necessary. Do not use open forceps as this may damage the kidney or other organs.
  7. Once the kidney is out of the abdomen, gently separate it from the surrounding fat just enough to visualize the renal pelvis, a small white dot (Figure 1B). Push excess fat to one side or remove if necessary. Be sure not to remove the adrenal gland, located near the top pole of the kidney, or the kidney capsule.
  8. Using closed forceps to push down on the right side of the kidney so that the renal pelvis remains in view, grasp the loaded insulin syringe with the right hand and hold it parallel to the working surface with the needle pointed at the renal pelvis (Figure 2E). Insert the needle carefully into the renal pelvis of the immobilized kidney as shown in Figure 1B.
  9. Inject the solution quickly within three seconds. About one-third of the kidney may clear and change color to white.
    NOTE: It is common to observe fluid build-up in the kidney capsule following injection as well as the formation of a hematoma. Some damage is necessary to achieve a sufficient level of DNA transfection for detection.
  10. Keep the needle in place for approximately 10 s to prevent backflow of the solution. Then carefully and slowly remove the needle. Return the organ to the abdominal cavity by gently stretching the incision site and using closed forceps.
  11. Suture the muscle layer of the animal with 5-0 absorbable sutures, placing 2–4 independent knots.
  12. Suture the skin layer of the animal with 5-0 or 6-0 non-absorbable nylon sutures, placing 2–4 independent knots.
    NOTE: Surgical tools may be reused after placing in a sterile bead bath and cooled down.

Representative Results

Figure 1
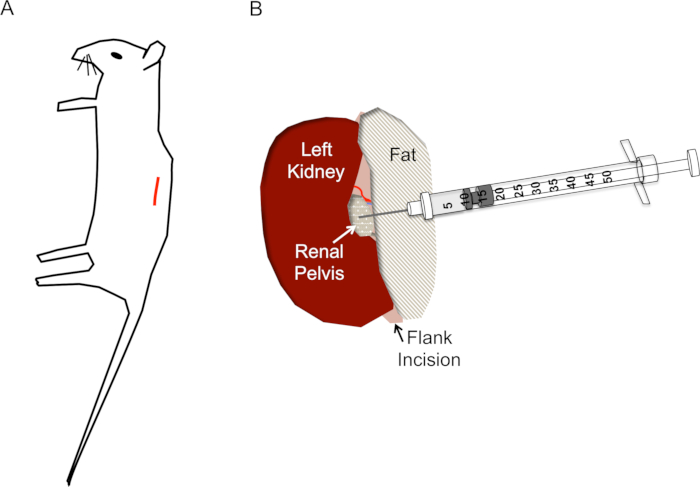
Figure 1. Correct incision site and needle placement for hydrodynamic renal pelvis injections. A) The incision (red line) should be located approximately 1 cm from the spine and approximately 1 cm below the ribcage of the mouse. B) After the kidney is exposed via the flank incision, the renal pelvis should be located as a small yellowish clear/white dot midway down the kidney. The injection should not disturb the renal vein, renal artery, or ureter. The needle of the insulin syringe is inserted directly into the renal pelvis as shown to a depth of approximately 0.5 cm and quickly depressed in 2–3 s.

Figure 2
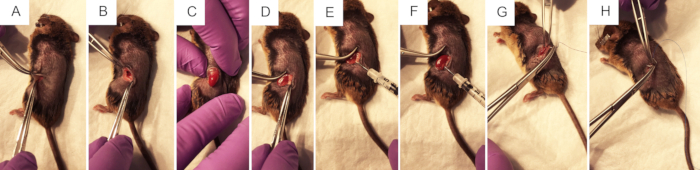
Figure 2. The surgical steps to perform renal pelvis hydrodynamic injection of plasmid DNA. A) Forceps pinch the skin to allow the surgeon to make a ~1 cm flank incision with a scalpel, first through the skin layer, then through the muscle layer. B) Using two pairs of closed forceps to open the surgical wound, the kidney is visualized within the abdomen if possible. C) With gentle pressure on the abdomen, without touching any organs directly, the kidney is exposed through the flank incision. D) Fat is gently dissected from the kidney, disturbing it as little as possible to achieve access to the renal pelvis. E) Pressing on the right side of the left kidney to better visualize the renal pelvis, the syringe is held with the thumb on the depressor and the needle is carefully but firmly placed into the renal pelvis. F) Following the <3 s injection, clearing may be observed in the areas of the kidney that received the bulk of the injection. G) Sterile purple vicryl absorbable sutures are used to make 2–4 independent knots in the muscle layer. H) Sterile blue nylon non-absorbable sutures are used to make 2–4 independent knots in the skin layer.

Divulgazioni

The authors have nothing to disclose.

Materials

AnaSed Xylazine Patterson Veterinary 07-808-1947 Anesthetic – Not controlled substance
BD Insulin Syringe 0.5 mL 29G 1/2 Inch  Cardinal Health  309306 Required syringes
Buprenex  Pharmacist/Veterinarian  Analgesia – Controlled Substance
Extra Fine Micro Dissecting Scissors  Roboz Surgical Instrument  RS-5882  Surgical tool
Gaymar Heat Pump  Paragon Medical  TP-700  Water-circulating heat pump
Germinator 500  Roboz Surgical Instrument  DS-401  To reuse surgical tools during surgery
Graefe Forceps  Roboz Surgical Instrument  RS-5136  Surgical tool
Graefe Tissue Forceps  Roboz Surgical Instrument  RS-5153  Surgical tool
Halsey Needle Holder, 5" Length  Roboz Surgical Instrument  RS-7841  Surgical tool
Heat pads – 15" x 21" – need at least 3  Paragon Medical  TP22G  For use with Gaymar Heat Pump
Ketamine  Pharmacist/Veterinarian  Anesthetic – Controlled Substance
Prevantics Swabs  Thermo Fisher Scientific  23-100-110  For skin surgery prep
Prolene 5-0 sutures Taper 30"  Thermo Fisher Scientific  NC0256891 Non-absorbable sutures for skin
Puralube Brand Opthalmic Ointment  Patterson Veterinary  07-888-2572 To keep eyes moist during surgery
Vicryl 5-0 Sutures J303H  Thermo Fisher Scientific  NC9816710  Absorbable sutures for muscle layer
Wahl Mini Arco Clipper Med-Vet Internationa I 8787-1550 Shaver for skin prep

Tags

check_url/it/20569?article_type=t

Play Video

Citazione di questo articolo
Hydrodynamic Renal Pelvis Injection: A Technique to Directly Deliver DNA into Kidney Cells of Murine Model. J. Vis. Exp. (Pending Publication), e20569, doi: (2023).

View Video