The zebra finch (Taeniopygiaguttata) is a valuable model organism; however, early stages of zebra finch development have not been extensively studied. The protocol describes how to dissect early embryos for developmental and molecular applications.
The zebra finch (Taeniopygiaguttata) has become an increasingly important model organism in many areas of research including toxicology1,2, behavior3, and memory and learning4,5,6. As the only songbird with a sequenced genome, the zebra finch has great potential for use in developmental studies; however, the early stages of zebra finch development have not been well studied. Lack of research in zebra finch development can be attributed to the difficulty of dissecting the small egg and embryo. The following dissection method minimizes embryonic tissue damage, which allows for investigation of morphology and gene expression at all stages of embryonic development. This permits both bright field and fluorescence quality imaging of embryos, use in molecular procedures such as in situ hybridization (ISH), cell proliferation assays, and RNA extraction for quantitative assays such as quantitative real-time PCR (qtRT-PCR). This technique allows investigators to study early stages of development that were previously difficult to access.
The overall goal of this technique is to obtain zebra finch (Taeniopygiaguttata) embryos from the earliest stages of embryogenesis for use in a wide range of developmental studies. Zebra finch have become the predominant songbird model organism and have been used extensively in a variety of fields, including toxicology1,2, behavior3, memory and learning4,5,6, comparative neuroanatomy7,8, and language development9,10. As the only songbird with a sequenced genome, the zebra finch allows molecular and genetic study of the Passeriformes order, which represents over 50% of known bird species11,12,13.
Despite the use of adult and juvenile zebra finch in a diverse array of fields, few studies have been performed on zebra finch embryos, particularly during early stages of development. This can be attributed to the small size of their eggs and embryos, and their newer status as a model organism14,15,16 for studies in which the chicken (Gallus gallusdomesticus) was previously used as a predominant model system17,18,19,20,21. However, as non-vocal learners, chickens are not an appropriate model system for studying the genetic basis of vocal learning, development of vocal learning, heritability, behavior, and the cortical-basal ganglia circuitry involved in motor learning10.
It is important to note that zebra finch embryos are much more delicate and more easily damaged than chick embryos during dissection and molecular procedures. In particular, greater care is required when performing permeabilization steps on zebra finch embryos. Strong detergents and enzymes that would not harm a chick embryo can damage zebra finch embryos. In terms of general care, it is necessary to put zebra finch eggs in small cups before placement in an incubator to prevent them from breaking when rolling during incubation.
Zebra finch are amenable to behavioral studies, easily and prolifically breed year-round in captivity, and are vocal learners. These characteristics allow the use of zebra finch to address the need for a model organism that integrates development, genetics, and behavioral aspects of language. The dissections methods detailed below, combined with a recently developed staging guide specific to zebra finch22, make the zebra finch an increasingly useful standardized developmental model organism. However, obtaining embryos at early stages can be daunting. This protocol allows investigators to easily obtain early stage embryos. Studies investigating the early development and the molecular developmental basis of complex behaviors in zebra finch, or the toxicological effects on development in other small, passerine birds will find this dissection methodology useful.
Ethics Statement: The methods were conducted with domesticated zebra finches from the breeding colony at the College of William and Mary. All procedures followed RSPCA guidelines23 and were approved by the College of William and Mary’s OLAW (Office of Laboratory Animal Welfare) Animal Welfare Assurance (#A3713-01) and had Institutional Animal Care and Use Committee (IACUC) approval (#2013-06-02-8721-dacris).
1. Egg Collection and Incubation
2. Removal of Embryo from Egg
3. Separation of Embryo from Extra-embryonic Tissue
4. EdU Cell Proliferation Assay. Incorporation and Detection of EdU in Zebra Finch Embryos.
5. EdU “Click” Reaction Protocol
The following steps are all performed in glass vials.
The steps diagrammed in Figure 1 indicate the appearance of the embryo while attached to the vitelline membrane (A) and demonstrate the proper method to separate the embryo from the yolk (B). The embryo can be identified by the zone of junction, which is much lighter than the vitelline membrane. The embryo itself is often difficult to distinguish until the yolk is cut away. Once the embryo is dissected from the egg, it can be fixed or flash frozen for future use. If an in situ hybridization is planned for the dissected embryo, it is necessary to remove the vitelline membrane that is adhered to the embryo via the zone of junction. Figure 2 illustrates the improved visibility of the embryo once this membrane is removed (C), and the proper way to peel the vitelline membrane (A, B). After dissection and fixation, whole mount in situ hybridization was performed as seen in Figure 3 (A, A’, B, B’) and Figure 4 (A, A', B, B’) and Figure 5 (A, B, C) to detect differences in orthodenticlehomeobox 2 (Otx2) expression in embryos developmentally exposed to low doses of methylmercury. Figure 5 shows sense probe results, demonstrating lack of background. In Figure 4, despite being dissected from the egg at the same time point, the embryo developmentally exposed to methylmercury (MeHg) progressed to stage 522 (B, B’), while the control embryo developed to stage 622 (A, A’). The group of embryos dissected and shown in Figure 4 were collected from the nest and taken from the incubator at the same times. Although some natural variation is present in development, based on previous dissection data, it is unlikely that temperature fluctuations in the incubator would cause only the 2.4 ppm methylmercury embryos to be developmentally delayed. The differences in stages indicate changes in cell proliferation in embryos developmentally exposed to methylmercury.
Before dissection, EdU was injected into a day 2 egg and allowed to incubate overnight. After dissection and fixation of the stage 1622 embryo, EdU was visualized using “click” chemistry, allowing detection of proliferating cells as seen in Figure 6 (A, B, C). It is important to carefully monitor time points when placing eggs in the incubator and during dissections, as exposure to methylmercury or performing the EdU assay may disrupt developmental progression. The earliest injection was performed on day 0, which was the day of collection as specified in step 1.3. This embryo was dissected approximately 38 hours later (stage 722). The survival rate was found to be approximately 90% (same rate as control embryos) as long as the injection amount was under 478 nl.
This dissection methodology also allows for high quality RNA extraction. After dissecting stage 1622 embryos, an RNA extraction was performed according to manufacturer’s protocol with no optimization required, as seen in Figure 7. The removal of the vitelline membrane was unnecessary for RNA extraction and later qRT-PCR applications.
Note: All embryo figures are oriented so that the anterior and posterior regions are at the top and bottom of the images, respectively.
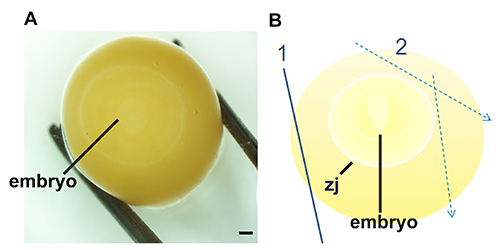
Figure 1. Procedure for locating and dissecting zebra finch embryos, stages 1-1022. Locate embryo by gently rolling the yolk until the faint white disk is apparent (A). Once the embryo is located at the center of the yolk, the yolk is dissected in a stepwise fashion (B) where the first cut relieves pressure of the vitelline membrane (1) and subsequent cuts (2) border the zone of junction (zj) which is adhered to the vitelline membrane. Scale bars represent 1 mm.
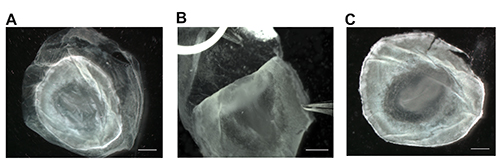
Figure 2. Removal of vitelline membrane and visibility of embryonic structures. Following removal of the embryo from the yolk, place embryo in a Petri dish containing 4% PFA. If an in situ hybridization needs to be performed, visibility of the embryonic structures is essential and can be achieved by removing the vitelline membrane (A). Grip the vitelline membrane with extra fine tipped forceps and gently peel it away from the embryo by handling the embryo directly at the outermost edge, if necessary (B). Vitelline membrane removal increases clarity of embryonic structures, and allows embryos to be imaged or processed with in situ hybridization (C). Scale bars represent 1 mm. Please click here to view a larger version of this figure.
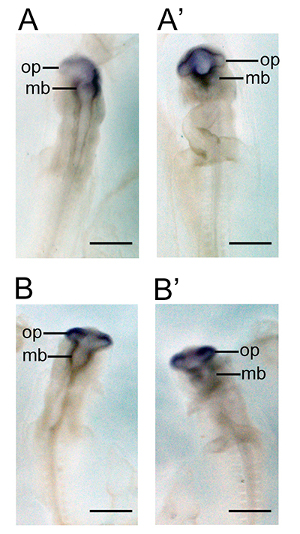
Figure 3. Whole mount in situ hybridization performed on zebra finch embryos developmentally exposed to methylmercury. Expression patterns of orthodenticlehomeobox 2 (Otx2) were characterized in embryos exposed to 0.0 ppm methylmercury (A, A’) and 2.4 ppm methylmercury (B, B’) via parental diet. The dorsal (A) and ventral (A’) expression of Otx2 is visible throughout the midbrain and optic vesicles during stage 1222. The treatment group embryos were dissected at the same time point, but were developmentally delayed as seen in the dorsal (B) and ventral (B’) view of head structures, which are characteristic of stage 1122. Abbreviations: mb, midbrain; op, optic vesicle. Scale bars represent 1 mm.
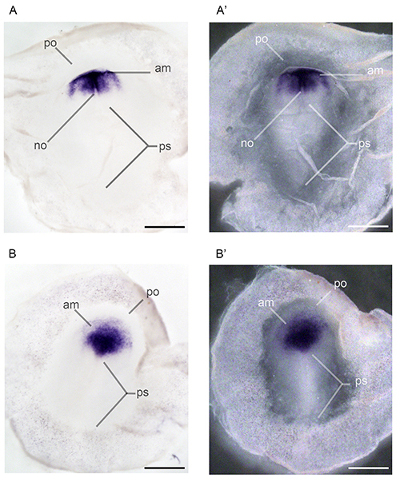
Figure 4. Whole mount in situ hybridization performed on zebra finch embryos developmentally exposed to methylmercury. Expression patterns of orthodenticlehomeobox 2 (Otx2) were characterized in stage 622 embryos exposed to 0.0 ppm methylmercury (A, A’) and stage 522 embryos exposed to 2.4 ppm methylmercury (B, B’) via parental diet. Abbreviations: am, anterior margin of mesoderm; no, notochord, notochord mesoderm; po, proamnion, anterior blastopore; ps, primitive streak22. Scale bars represent 1 mm.
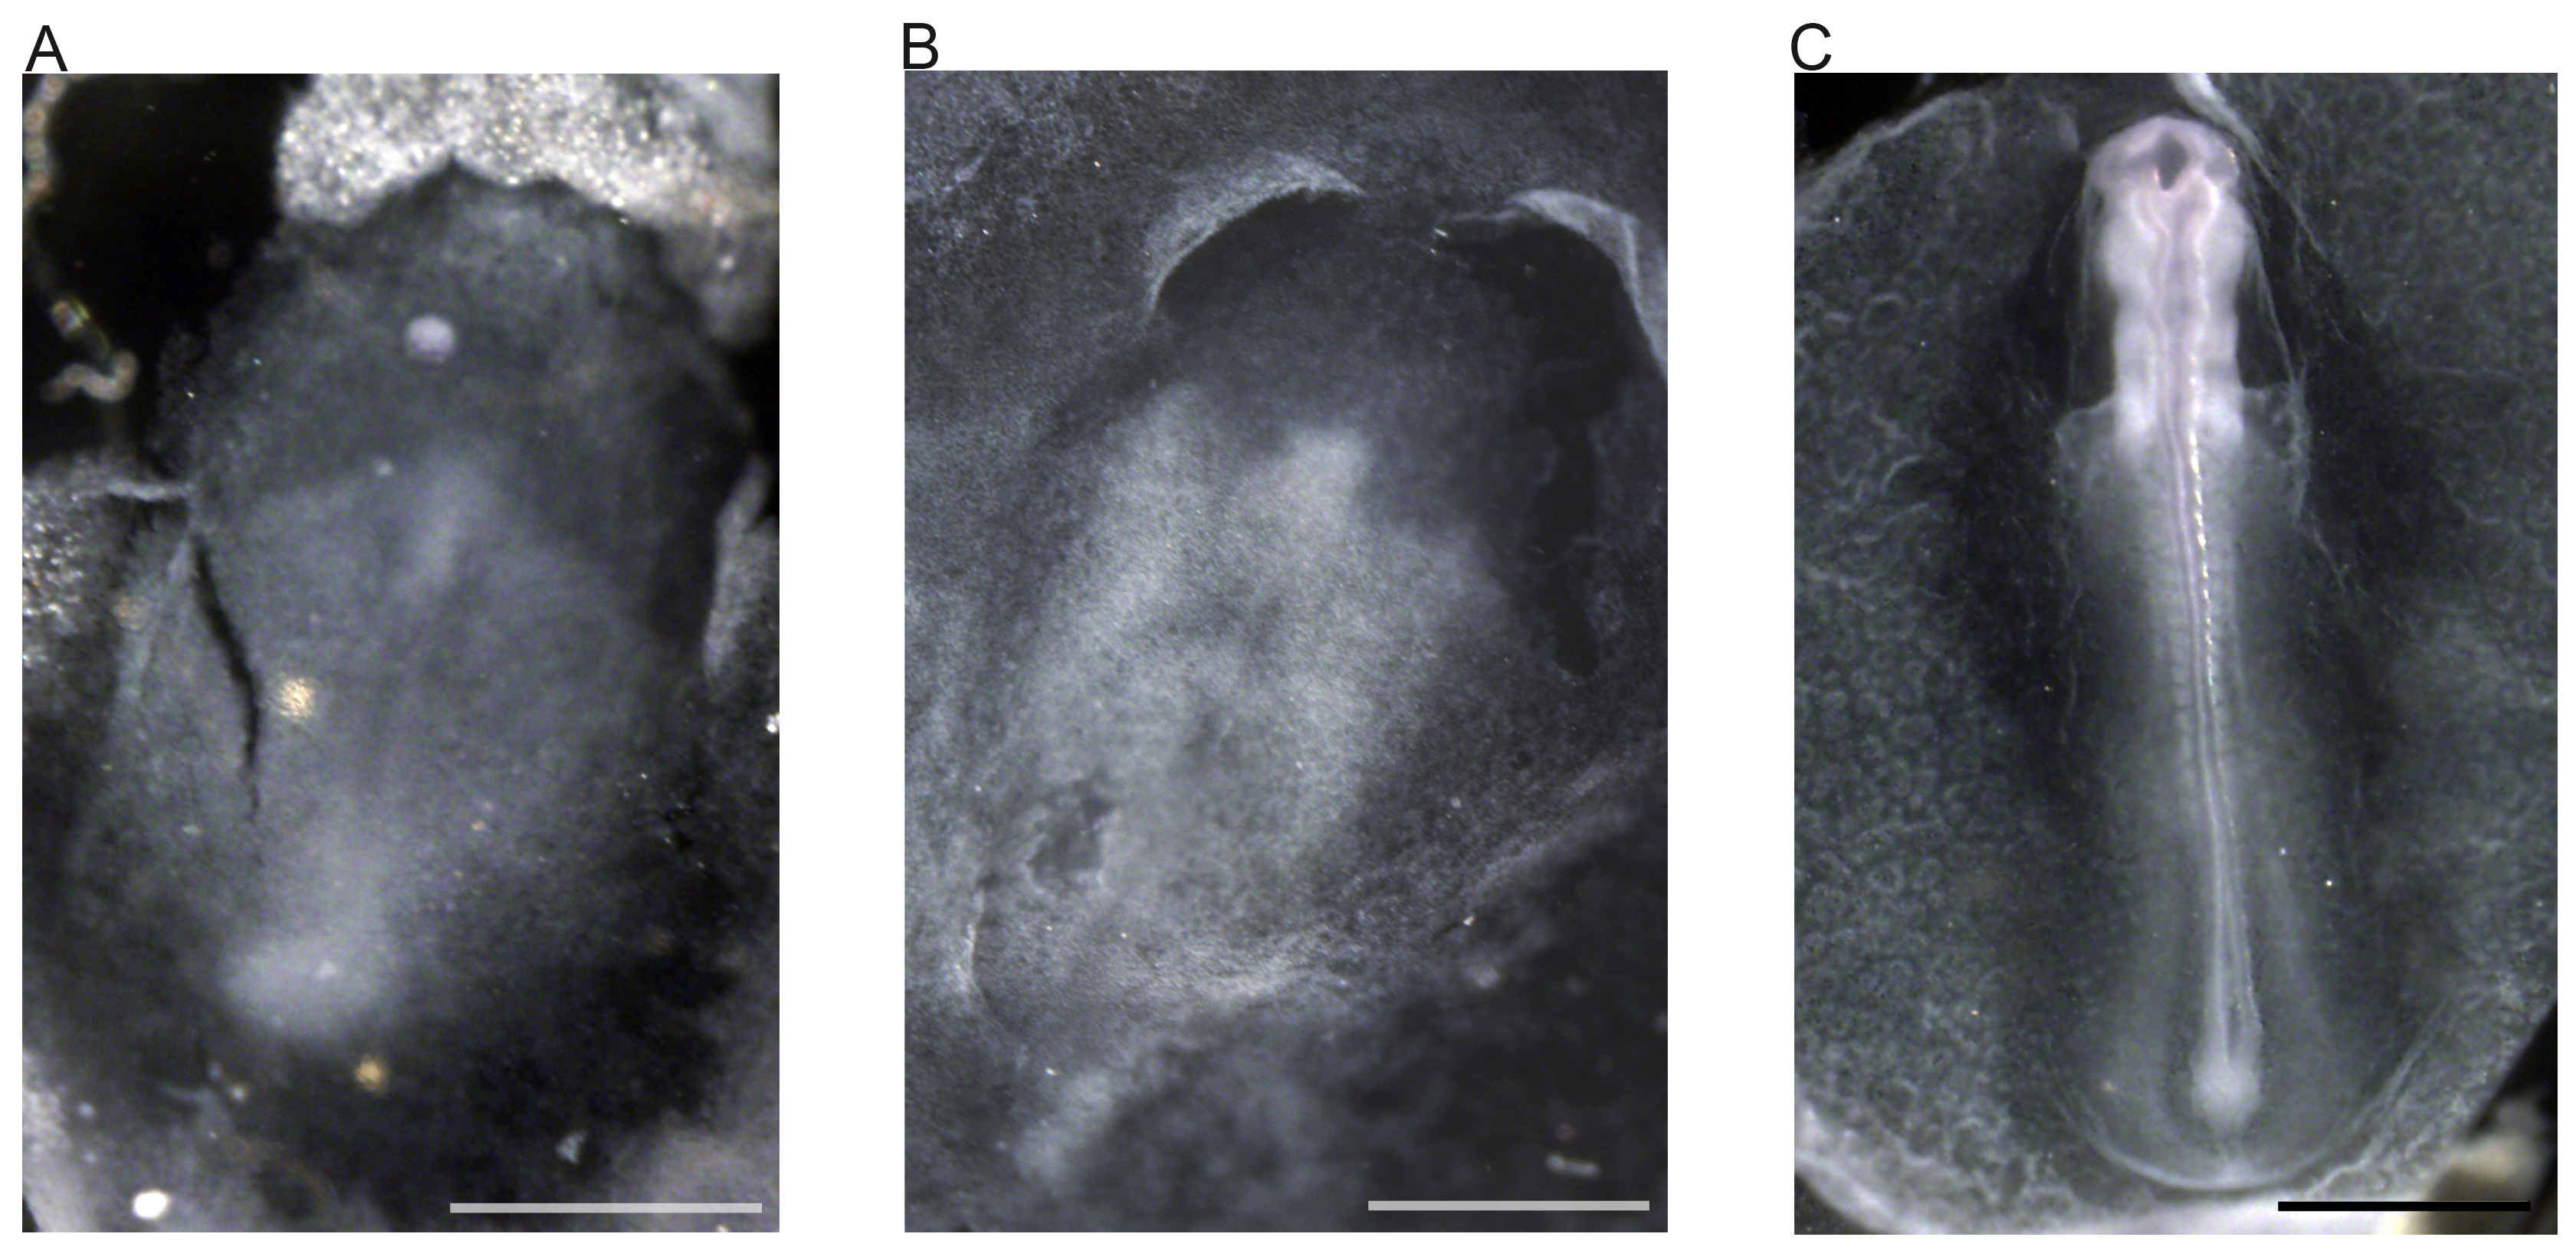
Figure 5. Whole mount in situ hybridization performed on zebra finch embryos using sense probe. (A) Stage 522 embryo. (B) Early stage 622 embryo. (C) Stage 1122 embryo. Scale bars represent 1 mm.
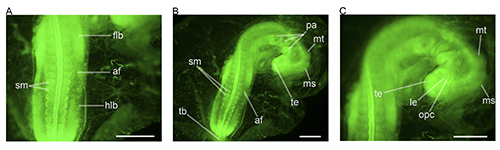
Figure 6.EdU incorporation and detection in zebra finch embryos. EdU “click” chemistry was used to detect proliferating cells in a stage 1622 embryo (A, B, C). EdU is incorporated into the DNA in the place of thymidine26,27 and is detected using click chemistry27. Proliferation is clearly visible in the lateral edges of the somites, and the tailbud. Panel A shows proliferation occurring exclusively in the posterior of the embryo and also shows individual proliferative cells. Panel B shows the proliferative locations in the whole embryo. Panel C shows the anterior region, and shows the highly proliferative telencephalon (te) in greater detail. Abbreviations: af, amniotic fold; flb, forelimb bud; hlb, hindlimb bud; le, lens vesicle; ms, mesencephalon; mt, metencephalon; opc, optic cup; pa, pharyngeal arch; sm, somite mesoderm; tb, tailbud; te, telencephalon. Scale bars represent 1 mm. Please click here to view a larger version of this figure.
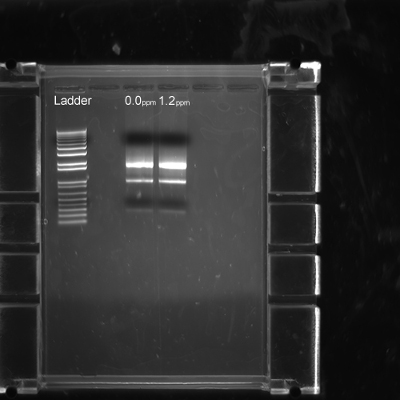
Figure 7. Quality of RNA extracted from dissected zebra finch embryos. Control (0.0 ppm) and 1.2 ppm methylmercury embryos were dissected and flash frozen as described in Step 3.8. Each lane shows RNA extracted from two homogenized embryos from each treatment group.
Recent development of an embryological staging guide22 and genome annotation make the zebra finch a desirable model organism for developmental studies. However, the small size and fragility of the zebra finch embryos, which range from 3 to 7 mm in stages 1 – 1022, can make dissections difficult11,14. Locating and cleanly removing embryos from the surface of the yolk can be challenging. This protocol provides sufficient detail to perform the procedure with ease. This protocol demonstrates the critical steps that are not typically known, but are necessary to ensure a successful dissection. For example, it is essential to leave a small layer of yolk between the embryo and sheet of weigh paper to preclude sticking.
Both the identification and removal of the embryo can be difficult. To troubleshoot identifying the embryo on the surface of the yolk, shine light directly above the yolk after it has been removed from the egg, and look at the yolk at a 45° angle to find the embryo. Once the embryo is located, cut the yolk on weigh paper taking care to not tear the embryo.
If further applications include imaging for anatomical differences, in situ hybridization, or cell proliferation assays, it is important to remove the vitelline membrane in stage 1 – 822 for better visualization of structures. If experiencing difficulties when removing the yolk or the vitelline membrane in early stages, fix the embryo in 4 % PFA before washing it in 1X PBS to reduce embryonic fragility. By first removing the vitelline membrane during dissection as described, structures are clearly visible and intact in zebra finch embryos after performing an in situ hybridization.
A limitation of EdU is that administration of dosage volumes over 478 nl leads to embryonic fatality. However, the vast dosage range allows varying levels of proliferative cell tagging.
The “click” reaction used in this kit is the Copper(I)-Catalyzed-Alkyne-Azide-Cycloaddition (Cu(I)AAC). In this specific reaction, an alkyne-containing thymidine analogue molecule (EdU) is incorporated by actively dividing cells. The alkyne group in the EdU protrudes from the helical structure of the DNA, and is detected by exposure to an azide molecule conjugated to a green, fluorescent molecule which binds to the free alkyne group. The green fluorescence shows the newly proliferating cells in the embryo. The bio-orthogonality of the azide and the alkyne groups prevents non-specific staining because these reactive species are not naturally present in organisms. Also, because the DNA does not need to be denatured in order for the reaction to occur, further DNA-dependent analysis can be easily performed27.
An inherent limitation of this method is the small size and fragility of zebra finch embryos. Removing the vitelline membrane of embryos stages 1 – 1522 can result in damaging embryonic structures if not performed with caution. However, this protocol simplifies the dissection method, allowing investigators to use early embryonic stages to examine structural anomalies and gene expression that have not been previously studied in depth. This protocol opens the way for a plethora of cellular-molecular assays that will allow investigators to determine the developmental origins of adult phenotypes. For example, it will be possible to examine gene expression implicated in vocal learning under various environmental conditions or following pharmacological treatments at the earliest stages of development28,29,30,31. Although not demonstrated in this paper, this method potentially allows for other procedures such as radioactive in situ hybridization on zebra finch tissue sections and electroporation/di ovosurgery32,33,34. Given that the zebra finch has been established as an important model organism within a vast body of literature, such studies provide untapped opportunities to link developmental mechanisms with adult physiology and behavior, in particular the development of language7,9.
The authors have nothing to disclose.
The authors thank their funding sources, Howard Hughes Medical Institute Undergraduate Science Education Program to the College of William and Mary; Grant sponsor: NIH (M.S.S); Grant number: R15NS067566. They also acknowledge support from the College of William and Mary, Department of Biology and College of Arts and Sciences for assistance with animal care.
Chicken egg incubator | We use a Picture Window Hova-Bator Incubator, Circulated Air Model | ||
Click-iT EdU Alexa Fluor 488 Imaging kit | Invitrogen | C10337 | Detection of cell proliferation. |
Dissection microscope | We use Olympus SZ61 | ||
7'' Drummond capillary for Nanoject II injector | Drummond | 3-00-203-G/X | |
Drummond Nanoject II microinjector | Drummond | ||
Dumont Tweezers #55 | World Precision Instruments | 14099 | |
Ethanol (EtOH) | |||
50mL Falcon tube (polypropylene) | Fisher Scientific | 06-443-18 | |
FastPrep Lysis Matrix H tubes | MP biomedicals | 6917-100 | Used for RNA extraction, used to homogenize embryos |
Fiber optic illuminator lamps (High Intensity Illuminator) | Dolan-Jenner Industries | Fiber-Lite MI-150 | |
Glass vials with screw cap (DEPC treated) | Fisher Scientific | 03-338A | |
Microcentrifuge eppe tube (1.5 mL) | Fisher Scientific | 05-408-129 | |
Mineral oil | Sigma-Aldrich | M-8410 | |
Modeling Clay | Any brand | ||
Narshige PB-7 needle puller | Narshige | ||
Omni Bead Ruptor Homogenizer | OMNI International | 19-010 | Used for RNA extraction |
4% Paraformaldehyde (4% PFA): 20 mL 8% PFA (32g paraformaldehyde, 350mL sdd H2O, adjust pH to 7.6, 400mL sdd H2O), 20mL 2xPBS | Fixation of embryos. Caution, is harmful and do not inhale. | ||
Phosphate buffered saline (1xPBS): 200mL 10X PBS, 1800 mL Barnstead H2O, adjust pH to 7.4 | |||
Phosphate buffered saline (10xPBS): 800mL Barnstead, 2.013g KCL, 80.063g NaCl, 2.722g KH2PO4 monobasic, 14.196g Na2HPO4 dibasic, 200mL Barnstead H2O, adjust pH to 6.5 | |||
Phosphate buffered saline with 0.1% Tween-20 (1xPTw): 1800mL Barnstead H2O, 200mL 10X PBS, adjust pH to 7.4, 2mL Tween-20 | |||
35mL Plastic petri dish | Fisher Scientific | 08-757-100A | |
plastic wrap | Any brand | ||
Prepease RNA Spin Kit | PrepEase, Affymetrix | 78766 1 KT | Used for RNA extraction, used to homogenize embryos |
Reaction Mix: 875μL 1xPBS, 100mM 20μL CuSO4 (Kit Component E), 5μL Alexa Fluor 488 azide (Kit Component B), 100μL diluted reaction buffer additive (Kit Component F) | Invitrogen | C10337 | Detection of cell proliferation. |
sdd H2O | |||
Seed cup | We use it as a container when incubating eggs | ||
Stainless steel scalpel | |||
Standard nest box | We use Abba Plastic Finch Nestboxes | ||
4mL, Teflon Lined Cap, Glass Vials | Fisher Scientific | 02-912-352 | |
Transfer pipettes (polyethylene) | Fisher Scientific | 13-711-7M | |
4×4 weigh paper | Fisher Scientific | 09-898-12B |