This video describes optogenetic techniques by activating genetically modified somatosensory neurons and recording elicited behavioral response with a high-speed video camera.
Protocol
1. Mount Larvae for Behavior Experiments
Make 1.5% low melt agarose in ddH2O and store in a 42 °C heat block to prevent it from solidifying.
Using a glass Pasteur pipette, transfer one of the pre-screened larvae into a tube of 1.5% low melt agarose with as little blue/embryo water as possible.
Transfer larvae in a drop of agarose onto a small Petri dish.
Under a dissecting microscope, position larva dorsal up.
When agarose has solidified, cut away the agarose with a thin razor blade (#11 scalpel), leaving a wedge of agar around the entire larva.
Make two diagonal cuts at either side of the yolk; take care not to nick the larva.
Fill the area surrounding the agarose with embryo/blue water.
Pull agarose away from the trunk and tail of the larva (Figure 1).
2 . Prepare High-speed Camera and Imaging Software
Mount high-speed camera onto dissecting scope.
Connect camera to computer.
Turn on computer.
Turn on high-speed camera.
Open video/imaging software (We use AOS imaging software and will describe procedures for using it here, but other imaging software is equally acceptable).
Adjust camera settings accordingly (i.e. 1,000 frames per sec (fps), 50% trigger buffer or other preferred settings).
Start recording.
3. Activate Single Neurons Using a 473 nm Laser
Attach stimulator, laser and optic cable.
Turn on stimulator.
Set stimulator to a maximum of 5 Volts and a pulse duration of 5 msec.
Turn on laser according to manufacturer's instructions.
Use a dissecting microscope to position the tip of the optic cable near cell body of a neuron with ChEF-tdTomato expression (Figure 1).
Deliver pulse of blue light to activate sensory neuron.
Record behavior using a high-speed camera set at 500 or 1,000 frames per sec.
Repeat experiment as desired, waiting 1 min between each activation to avoid habituation. (We record a minimum of three responses for each neuron).
To release larvae, pry apart agarose with forceps, taking care not to injure the animal. This animal can be allowed to develop further and the procedure can be repeated at an older stage to characterize development of the behavior. The embryo can also be remounted for high-resolution confocal imaging of the activated cell to correlate behavior with cellular structure, as described below.
Transfer larva to culture plate with fresh blue/embryo water. We use a 24-well plate to keep track of individual larvae.
Representative Results
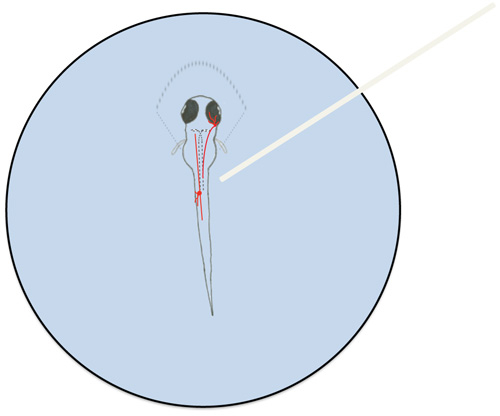
Figure 1. Diagram of a mounted zebrafish larva and representative neurons involved in the larval touch response. Zebrafish larvae were partially mounted in 1.5% low melt agarose (represented by dashed lines surrounding the rostral portion of the larva). A trigeminal neuron (in the head) and a Rohon-Beard neuron (in the trunk) are depicted in red. Mauthner cells are outlined by dashed lines in the larva. The optic cable (white) is shown positioned over the RB neuron cell body.
Materials
Low Melt agarose
Sigma
A9045
or equivalent
Petri dish (100×15 mm)
Any
Any
Non-Sterile scalpel blades
Fine Scientific Tools, Inc.
10011-00
or equivalent
blue/embryo water
10 L ddH2O 0.6 g Instant Ocean 6 drops methylene blue
High speed camera
AOS Technologies, Inc.
X-PRI (130025-10)
or equivalent
Glass Pasteur pipette
Fisher
1367820B
or equivalent (10-15 mm diameter)
473 nm portable laser
Crystal lasers
CL-473-050
or higher power, with TTL option
S48 Stimulator
Astro-Med, Inc. Grass Instrument division
S48K
or equivalent
Tricaine
Sigma
A5040
200 μm optic fiber
ThorLabs
AFS200/220Y-CUSTOM
Patch Cord, Length: 3 m, End A: FC/PC, End B: FC/PC, Jacket: FT030
50 μm optic fiber
ThorLabs
AFS50/125Y-CUSTOM
Patch Cord, Length: 3 m, End A: FC/PC, End B: FC/PC, Jacket: FT030