Bacterial Endophthalmitis Mouse Model: A Method for Generating Bacterial Endophthalmitis via Intravitreal Injection of Bacterial Suspension into Eye of Mouse

Published: April 30, 2023

Abstract

Source: Mursalin, M. H. et al., Intravitreal Injection and Quantitation of Infection Parameters in a Mouse Model of Bacterial Endophthalmitis. J. Vis. Exp. (2021).

This video describes a method for generating a mouse model that mimics bacterial endophthalmitis – an intraocular infection resulting from a bacterial invasion into the eye’s vitreous cavity – via intravitreal injection of a bacterial suspension into the eye. This mouse model helps study the disease mechanism and evaluate therapeutics for it.

Protocol

All procedures involving animal models have been reviewed by the local institutional animal care committee and the JoVE veterinary review board.

1. Sterile glass needles

  1. Turn On the needle pipette puller.
  2. Adjust the Heater knob until the display shows 12.6.
  3. Open the door and manually feed the 5 μL capillary tube through the upper clamp and heater filament until half of the tubing extends below the filament (Figure 1A).
  4. Confirm that the capillary tube is in the “V” groove in the upper clamp. Tighten the upper clamp.
  5. With the lower clamp open, manually adjust the vertical slide up until the lower clamp reaches its upper limit. Confirm that the tube is in the “V” groove in the lower clamp. Tighten the lower clamp.
  6. Close the door and confirm that the ‘Ready’ light is on. Push the Start button to initiate the heater and pulling sequence (Figure 1B).
  7. Ensure the heater turns off automatically after heat and gravity pulls the capillary tube apart (Figure 1C), and the slide moves downward.
  8. Open the door. While holding the top of the capillary tube, untighten the top clamp. Remove the upper capillary tube and set it aside.
  9. Hold the capillary tube in the bottom slide and untighten the lower clamp. Remove the lower capillary tube and set it aside.
  10. Use a microelectrode beveler with a 0.05 μm alumina abrasive grinding plate to bevel the pulled capillary tube to create the injection needles.
  11. Pipette enough water onto the grinding plate to cover the surface (Figure 1D).
  12. Turn On the beveller so that it begins to rotate at 60 rpm. Place the pulled capillary tube into the pipette clamp in the “V” groove. Tighten the clamp and adjust the angle of the pipette clamp to 30°.
  13. Adjust the tip of the pointed edge of the capillary tube approximately two-thirds distance away from the center of rotation of the grinding plate.
  14. Lower the clamped capillary tube by adjusting the coarse control knob at the top of the manipulator. Continue to lower the capillary tube until the tip of the capillary tube extends below the surface of the water and contacts the abrasive surface of the grinding plate.
  15. Monitor the beveling progress using the microscope attached to the beveller. After 5 min, adjust the fine control to raise the glass needle from the grinding plate.
  16. Remove the glass needle and place it under 10x magnification to check the tip of the capillary tube (Figure 1E,F).
  17. To ensure that there are no blockages, insert the glass needle into a pipette holder on a syringe and push air into a 1 mL tube of 99% ethanol. If air bubbles form at the tip of the needle, the needle has no blockages and can be used for microinjection. This process also ensures the sterility of the glass needles.
  18. One capillary tube can hold up to 5 μL fluid. Mark the capillary tube into 10 sections to calculate the distances on the needle to mark for 0.5 μL volumes. Mark a scale with that distance that holds 0.5 μL for future preparation. For a 5 μL needle, distances of 0.7 mm apart equate to 0.5 μL (Figure 1G).

2. Mouse intravitreal injection

  1. Perform all procedures in this section under Biosafety Level 2 conditions.
  2. Prepare the procedure site by placing medical underpads on the operating table.
  3. Turn On the microinjector and open the gas valve on the compressed air tank attached to the microinjector. Adjust the tank regulator until the gas delivery is approximately 60 psi.
  4. On the microinjector, press Mode until the screen shows Balance. Press Balance and place the computer mouse on the operating table. Connect the stainless-steel pipette holder to the tubing attached to ‘Fill/Output’ of the injector. This tube is always connected to the injector.
  5. Insert the capillary needle to the other end of the pipette holder by screwing tight the pipette holder connector around the needle.
  6. Turn on the ophthalmic microscope and turn on its light to an intensity of 50%. Adjust the microscope over the procedure site on the operating table and adjust the microscope to the desired focus.
  7. Before the procedure begins, confirm that the mouse is adequately anesthetized by testing the pedal withdrawal reflex. Be sure to follow your IACUC approved protocol for anesthesia.
  8. Place the anesthetized mouse on the medical underpads with its nose pointed to the right and leaning on its left side.
  9. Look at the right eye of the mouse through the ophthalmic microscope and open the lids by opening the tongs of a reverse action forceps on either side of the eye to expose the injection site (Figure 2C).
  10. Fill the capillary needle with the Bacillus cereus (ATCC 14579) bacterial solution (200 CFU/μL dilution) by left clicking the mouse pad connected to the microinjector (Figure 2D).
  11. Secure the animal’s head with the left hand and place the tip of needle at the limbus of the eye. With the needle in the bevel up position and at 45° angle, puncture the mouse eye, but ensure that only the sharp tip of the needle (~0.5 mm) is inserted when injecting.
  12. Once the needle tip is inserted, move the left hand from the mouse head to the mouse pad and right click on the mouse pad to inject 0.5 μL of the B. cereus dilution prepared in Brain Heart Infusion (BHI) broth. To prevent leakage, leave the needle tip inside the mouse eye for 2-3 seconds before removing (Figure 2E).
  13. Release the forceps and place the mouse into a cage that is sitting on a warming pad. Monitor these mice until they have recovered from anesthesia (Figure 2F).
  14. Once mice are recovered from the anesthesia, return the cage to its proper rack. If the mice will be subjected to retinal function analysis by electroretinography, cages should be returned to a dark room for proper dark adaptation.

Representative Results

Figure 1
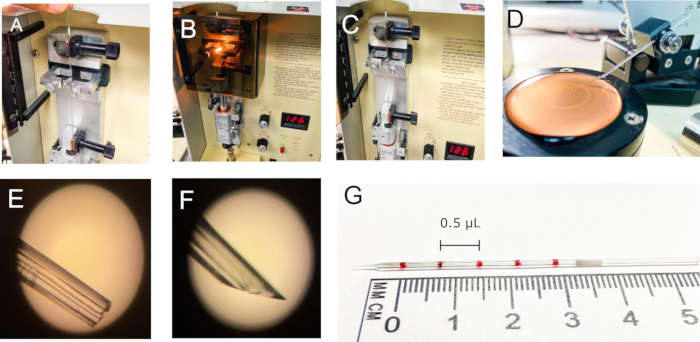
Figure 1: Making beveled glass needles. Glass needles were made from disposable microcapillary pipettes using a needle/pipette puller and a micropipette beveler. (A) Clamped glass capillary tube in the needle/pipette puller. (B,C) Creation of glass needles using the desired voltage. (D) Beveling the glass micropipettes. (E,F) Glass micropipettes before and after beveling. (E) Scaling the glass needles. Space between two black points holds 0.5 µL.

Figure 2
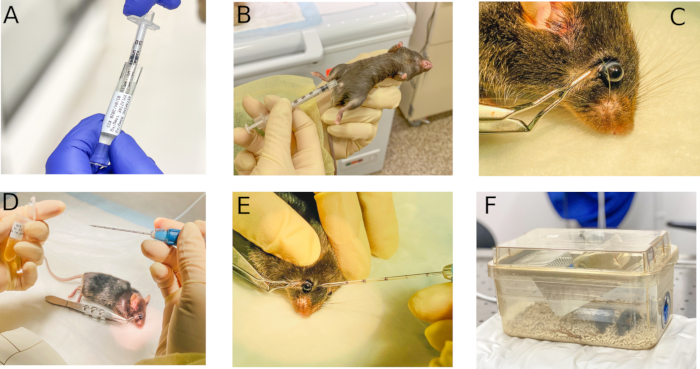
Figure 2: Mouse intravitreal injection. The injection procedure is performed using a pressurized air injector with viewing of the operating field using a commercial microscope (A) ketamine and xylazine drug to anesthetize the mouse. (B) Administration of ketamine and xylazine by intraperitoneal injection to anesthetize the mouse. (C) Clamping periocular skin back to proptose the eye. (D) Filling up the needles with bacteria using the air pressurized injector. (E) Intravitreal injection. (F) Monitoring infected mouse after anesthesia.

Divulgazioni

The authors have nothing to disclose.

Materials

Cell Microinjector  MicroData Instrument, Inc.  PM2000  NA
Microcapillary Pipets 5 Microliters  Kimble  71900-5  NA
Micro-Pipette Beveler  Sutter Instrument Co.  BV-10 NA
Microscope OPMI Lumera  Zeiss  NA
Reverse action forceps  Katena  K5-8228 NA

Tags

check_url/it/20816?article_type=t

Play Video

Citazione di questo articolo
Bacterial Endophthalmitis Mouse Model: A Method for Generating Bacterial Endophthalmitis via Intravitreal Injection of Bacterial Suspension into Eye of Mouse. J. Vis. Exp. (Pending Publication), e20816, doi: (2023).

View Video