Science Education
>

Cell Culture Techniques and Practices to Avoid Contamination by Fungi and Bacteria in the Research Cell Culture Laboratory

PREPARAZIONE ISTRUTTORI
CONCETTI
Student Protocol
JoVE Journal
Biologia
Author Produced
È necessario avere un abbonamento a JoVE per visualizzare questo.  Accedi o inizia la tua prova gratuita.
JoVE Journal Biologia
Cell Culture Techniques and Practices to Avoid Contamination by Fungi and Bacteria in the Research Cell Culture Laboratory

1. Preparations

  1. General
    1. Wear a clean lab coat designated to be worn only in the cell culture room and no other parts of the laboratory.
      NOTE: The lab coat does not need to be sterile.
    2. Wear new gloves that have not touched any other surfaces. Make sure the gloves fit tightly. Nitrile, powder-free gloves are best.
      NOTE: The gloves do not need to be sterile.
    3. To prepare for work, spray the gloves, lab coat sleeves, and interior of the biological safety cabinet with 70% EtOH. Wipe the working surface and glass panel dry with a lint-free paper towel.
      NOTE: Using 70% EtOH kills bacteria with the highest efficiency16. The paper towel does not need to be sterile.
    4. Keep water baths inside the cell culture room and only use these for warming culture media or thawing cells. Drain and wash the water baths once a week, following the manufacturer’s instructions for cleaning.
  2. Inside the biological safety cabinet
    1. Limit the number of items brought into the cabinet. Do not interrupt the airflow inside the biological safety cabinet by blocking the front or back grills.
      NOTE: See Figure 1 for an explanation of how air flows inside a cabinet.
    2. Spray all the items placed inside the cabinet with 70% EtOH and wipe them dry. Begin by spraying the top of the media bottle and working down. Similarly, with a clean paper towel, wipe it dry, progressively working the way to the bottom. Do not go back up toward the cap.
    3. If the cabinet is large enough to accommodate serological pipettes, they can be placed inside, otherwise they can be stored in a receptacle mounted on the outside of the cabinet. Check either side of the encased pipette for holes, tears, or punctures in the packaging before use. Do not rip off the wrapping. Instead, gently peel the ends of the wrapping, insert the serological pipette into a pipette aid, and remove the wrapping in one fluid motion.
    4. Do not hover over open bottles or flasks; reach over open bottles or flasks, or open items over the tops of already opened items in the biological safety cabinet.
      NOTE: The airflow inside the cabinet pushes down on the work surface, so any contamination present on the sleeve, for example, may enter the cell cultures.
    5. Do not pour liquids. Instead, add them using a serological pipette. After supplementing the media, mix the contents thoroughly and initial the bottle. Also, ensure to include a label for what the media was supplemented with.

2. Working with adherent cell lines

  1. If a plastic flask is needed, spray the entire bag and place it inside the cabinet.
  2. Use autoclaved glass pipettes or disposable sterile plastic pipettes to aspirate the media or washing solutions. Carefully remove the metal cap from the storage container. Isolate one glass pipette by gently shaking the container at an angle. When reaching into the container, avoid touching any other pipettes.
    NOTE: Handle the chosen pipette from one end only. 
  3. Quickly replace the caps on the bottles as soon as possible. Place the caps on the work surface upside down so that the rim does not touch the work surface. Do not grab the cap from the top or bottom; instead, touch the caps from the sides.
  4. When aspirating liquids, use a vacuum trap flask located outside of the cabinet in a secondary container on the floor.
    NOTE: Do not throw any liquid waste in biohazard waste bags as the bags will leak. Waste will be created while working inside the cabinet. Moving hands in and out of the cabinet too often will interrupt the airflow. Leave any waste inside the cabinet temporarily. Place it off to the side so it will not interrupt the work.
  5. Generously spray the gloves with 70% EtOH any time they become dry. Rub the hands together so the gloves are not dripping wet.
  6. If a serological pipette mistakenly touches something in the cabinet, do not hesitate to throw it out. Start anew with a clean serological pipette instead of using one that may be contaminated.

4. Checking and storing cells

  1. Before placing cells in the incubator, check to see how they look under the microscope. If the cells have been thoroughly suspended, single cells should be observed.
  2. Do not speak, sneeze, cough, or breathe heavily into the incubators. Quickly open and close the incubator doors. Leaving doors open for longer than necessary may allow contaminants present in the air to enter the incubators.
    NOTE: Wearing a mask while working in the cell culture room can help since mycoplasma may be present in the human mouth. Avoid the use of cell phones in the cell culture room, as talking is not recommended.
  3. Ensure caps on all the bottles are tightly closed before removing the bottles from the cabinet.
  4. Store cell culture media in the dark at 4 °C when not in use since it is light sensitive.
  5. Spray the interior of the cabinet with 70% EtOH again after the cell culture work is complete and wipe the surface dry with a paper towel. Empty the biohazard trash waste bags. Repeat this process and replace the gloves when switching to a different cell line.

5. Working with suspension cell lines

  1. For suspension cells grown in glass flasks, ensure the gloves are sprayed thoroughly with 70% EtOH, then touch the aluminum foil with the wet gloves and spray only the bottom of the flask before placing it inside the cabinet.
  2. When taking a sample for cell counting, remove only one 1.5 mL tube from its container. Do not touch any other tubes. Place the cap upside down on the working surface. Do not touch the inside rim. Handle it with care from the sides and replace it once finished.
  3. Carefully remove the double-folded piece of aluminum foil that covers the entire neck of the flask. Handle the glass flask from the bottom only—do not touch it from the neck—once the foil is off. Use a 1 mL serological pipette to take a sample for cell counting.
  4. Do not let media drip down the side of the flasks; if it does, spray a paper towel with 70% EtOH and clean it up right away.
  5. Ensure caps and aluminum foil are tightened before removing bottles or flasks from the biological safety cabinets.

6. Cell incubation

  1. Use separate incubators for different cell types to prevent cross-contamination of the different cell types.

7. Liquid waste collection

  1. Collect liquid waste in a vacuum trap flask located outside the cabinet on the floor in a secondary container labeled ‘Waste’.
    NOTE: The hose is connected to a high-efficiency particulate absorbing (HEPA) filter, which is replaced on a monthly basis.

8. Cleanup

  1. Remove the biohazard waste bag and wash the glass flasks as soon as possible. Keep a glass-washing protocol by the sink. See Supplementary File 1 for the washing protocol.
  2. Autoclave the cell culture glassware instead of sending it to a glass washing facility. Keep it separate from glassware in the main area of the lab.
    NOTE: SF-9 cells leave a rim of dead cells on the side of flasks if the glass is not scrubbed well. See Supplementary File 1 for the autoclave protocol.

9. Organization

  1. Organize the cell culture room so that all the supplies are located in one area, thereby minimizing the need for lab members to leave the room in search of supplies.
  2. Label any plastic bottles used to harvest cells and reused in cell culture afterward as ‘For Cell Culture Use Only’. Use the designated cell culture bottles for one specific cell type. Store the bottles in the cell culture room for easy access.

10. Identifying bacteria, fungi, and mycoplasma contamination

NOTE: Not following the workflow above can lead to bacterial, fungi, and mycoplasma contamination.

  1. Always before beginning work, observe flasks for heavy turbidity, extra growth in the form of fuzzy balls, and dense accumulations of cells on the side, all of which are indicators of contamination.
    NOTE: An experienced eye can tell the difference between turbidity caused by microbial contamination versus the actual cells. While cells cause the normally clear media to appear cloudy, bacterial contamination causes heavy turbidity with white color.
    1. Visually identify mold contamination by noting the appearance of round, fuzzy balls floating in the media (see Figure 2).
    2. Visually identify bacterial contamination if media is cloudy, white or turbulent (see Figure 2).
    3. Identify mycoplasma contamination by doing a monthly mycoplasma test. One PCR-based test instructs users to take a 1.5 mL sample of cells, perform a cell count using 10 μL, dilute to 0.08 x 10⁶ cells/mL, spin down the cells, lyse the cells using the buffer contained in the kit, and spin down one final time. The supernatant is incubated with primers that amplify a range of mycoplasma species. Run a DNA gel to visualize the bands. No bands mean that mycoplasma is not identified.
      NOTE: This major contaminant can be present in the human mouth. It is good practice to test for mycoplasma contamination in cells after thawing them and before using them for experiments. Afterward, monitor the cells for mycoplasma contamination once a month. Many companies offer mycoplasma test kits. Pick one that is suitable.

Cell Culture Techniques and Practices to Avoid Contamination by Fungi and Bacteria in the Research Cell Culture Laboratory

Learning Objectives

If the proper cell culture techniques and practices outlined in this paper are not followed, contamination by fungi and bacteria may occur in the research cell culture laboratory. Figure 2 shows flasks containing contamination in both the suspension and adherent cultures.

When not following aseptic techniques, mold contamination may occur 2–3 days later. Round fuzzy balls floating in the media are noticeable in suspension cells, while mold growth in attached cells can be observed as large, irregular, white, or green patches.

For bacteria, contamination is observed the following day. The media is turbulent, white, and cloudy. The white color is typical of bacterial cells, which multiply much more rapidly than cell lines. An experienced eye is able to tell the difference between non-contaminated media and contaminated media. For attached cells, one can compare a bottle of unopened media with a flask to check if any turbulence is seen in the flask.

Inside the biological safety cabinet, the number of items should be kept at a minimum. Avoid placing items on the back and front grills (see Figure 3). In this cabinet, a set of pipettes, tips, autoclaved glass pipettes, a pipette aid, and markers are inside. The working area in the middle is clear. Keeping cabinets organized in this way is a good idea. In addition, the operator should wear a clean lab coat and gloves before beginning work. A spray bottle with 70% EtOH should be kept nearby so the operator can spray their gloves often. The skin is covered by gloves or a lab coat. The operator should adjust their chair so their arms are at a 90° angle when working inside the cabinet, and items should be within easy reach inside the cabinet (see Figure 4).

Many species of mycoplasma can be reliably identified using a PCR-based assay. Figure 5 shows the results of a negative mycoplasma test. The band on the left shows the molecular weight standards for DNA. The four bands on the right are positive controls. No bands appear under the tested cell types because mycoplasma was not detected.

If the media contains pH indicators, it will be red for the optimal pH value of cells at 7.4. Once the cells grow, the media will change color from red to yellow3. This color change can also occur if bacteria take over the flask and overgrow (Figure 6). The yellow color indicates the pH is low. Observing a new, unopened bottle of media next to a flask is an objective way to observe contamination in attached cells. For suspension cultures, the user can closely observe the flask for any growths floating in the media or whether a thick ring of overgrown bacterial cells is present around the inside of the glass flask. For both cell types, a small sample can be taken and observed under the microscope. If other growths or cell shapes are observed, especially if the cells are moving, then this is an indicator of contamination (Figure 7). A thorough cleansing of the hemocytometer should be performed prior to cell counting, as this type of debris may be present only on the hemocytometer and not in the cell cultures themselves. 

The smell may be another indicator of contamination in an incubator. Bacterial overgrowth has a typical smell that an experienced cell culture user will notice. The smell always coincides with a contaminated flask, although one infected flask may not always cause the entire incubator to smell.

Mold contamination tends to be more prevalent in HEK 293 S cells grown in suspension. Bacterial contamination is more common in SF-9 cells. This may be because RIC cells are grown with humidity, thereby leading to moisture accumulation in the incubators. SF-9 cells are grown without humidity, so the environment is drier. The rate of contamination in adherent cultures is less than the rate of contamination in suspension cultures. This may be due to the smaller flask size, the non-reusable nature of the flask, or the vented cap instead of the use of aluminum foil.

Mycoplasma cannot be observed with the naked eye nor with a regular light microscope, although specialized transmission electron microscopy can detect mycoplasma. A mycoplasma identification kit should be used to test the cell cultures monthly. Many species of mycoplasma can be reliably identified using a PCR-based assay. A brief description about how this PCR test is performed can be found in the protocol section, and more information about mycoplasma can be found in the discussion section.

Figure 1
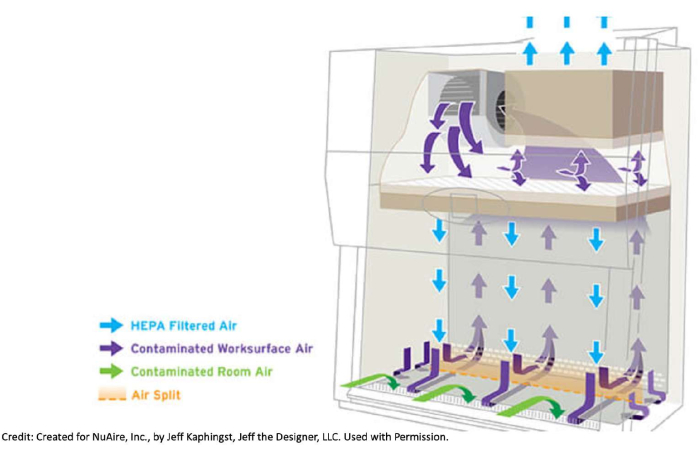
Figure 1: How air flows in a biosafety cabinet. Biological safety cabinets pull contaminated air from the room itself and from the cabinet through the front and back grills. This air goes under the metal working surface, toward the back of the cabinet, and up to the top of the unit where a HEPA filter is located. There, the air passes through the filter and gets filtered. This clean air pushes down on the work surface. Due to how the flow of filtered air is pushed down inside the cabinet, it is good practice to not hover. For example, it is undesirable to have a sleeve on top of an open bottle and risk having any potential contaminants be pushed into the media. The number of items brought inside the cabinet should be kept at a minimum, and items should not be placed on the front or back grills in order not to interrupt the air flow. Moving arms in and out of the cabinet too quickly can also disturb the airflow. Created for NuAire, Inc., by Jeff Kaphingst, Jeff the Designer, LLC. Used with permission. Please click here to view a larger version of this figure.

Figure 2
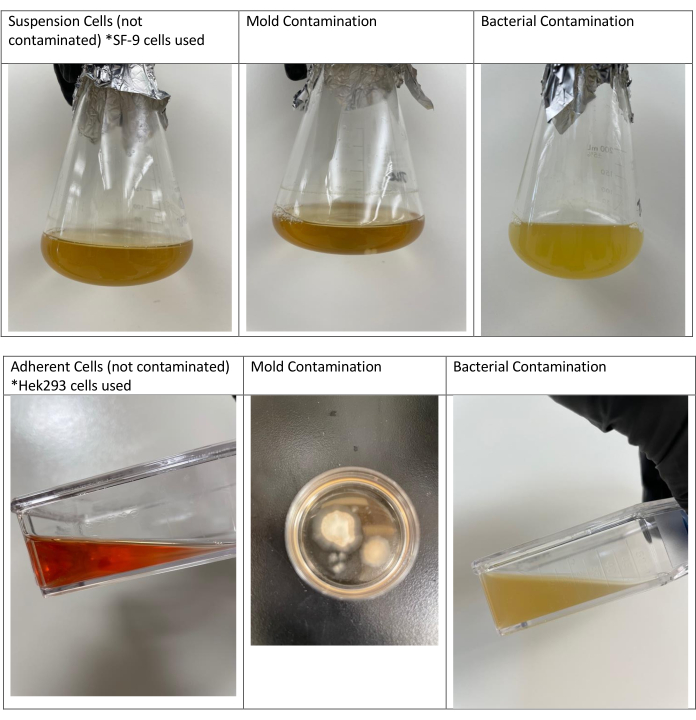
Figure 2: Non-contaminated suspension and adherent cells and cells contaminated with mold or bacteria. The first image on the left contains insect cells (SF-9 cells) that are not contaminated. The second image shows another flask of these cells contaminated with mold. The third flask was contaminated by bacteria, as can be noted by the thick, white, cloudy appearance. The second and third flasks were contaminated because none of the proper cell culture techniques and practices were followed. All flasks were prepared on the same day. Growth was observed the next day for bacterial contamination and 2 days later for mold contamination. Non-contaminated adherent cells are shown (Hek293 cells) along with mold and bacterial contamination in adherent cultures. Mold contamination is shown in the second line in a round Petri dish. The photo is taken from the top of the dish. Please click here to view a larger version of this figure.

Figure 3
Figure 3: Cell culture cabinet organization. Inside the biological safety cabinet, the amount of items should be kept at a minimum. Placing items on the back and front grills should be avoided. In this cabinet, a set of pipettes, tips, autoclaved glass pipettes, a pipette aid, and markers are inside. The working area in the middle is clear. Please click here to view a larger version of this figure.

Figure 4
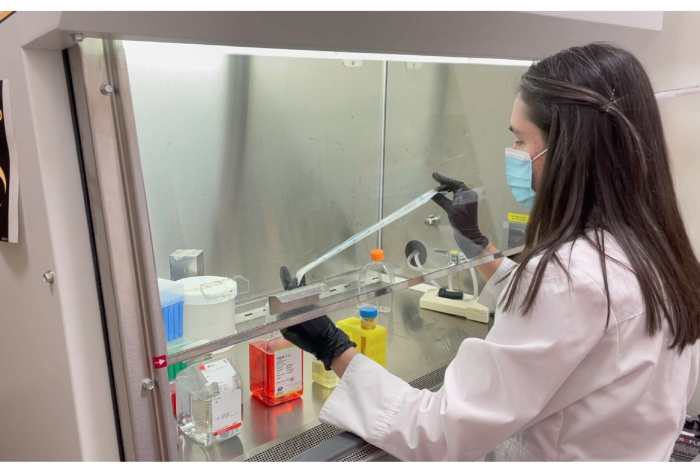
Figure 4: The correct way for an operator to work under the flow hood. An operator should wear a clean lab coat and gloves before beginning work. A spray bottle with 70% EtOH should be kept nearby so the operator can spray their gloves often. The skin is covered by the gloves or lab coat. The operator should adjust their chair so their arms are at a 90° angle when working inside the cabinet. Items should be within easy reach inside the cabinet. Please click here to view a larger version of this figure.

Figure 5
Figure 5: A negative mycoplasma test result. Many species of mycoplasma can be reliably identified using a PCR-based assay. The band on the left shows the molecular weight standards for DNA. The four bands on the right are positive controls. No bands appear under the tested cell types because mycoplasma was not detected. Please click here to view a larger version of this figure.

Figure 6
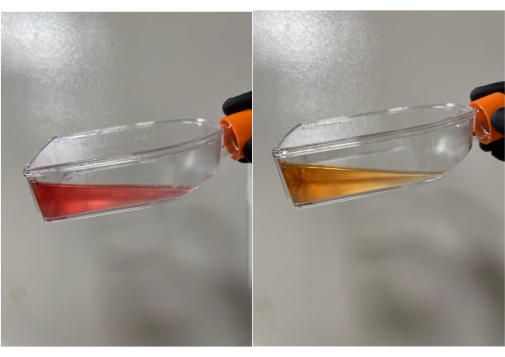
Figure 6: Normal media color change from red to yellow. Cell culture media changes the color from red to yellow if pH indicators are present. The yellow color indicates the pH is low and the media should be replaced. Please click here to view a larger version of this figure.

Figure 7
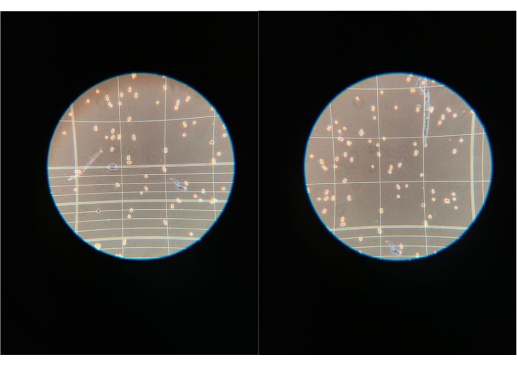
Figure 7: Contaminants observed under the light microscope. If other growths or cell shapes are observed under the light microscope while performing cell counts, then this may be an indicator of contamination. It should be noted that a thorough cleansing of the hemocytometer should be performed prior to cell counting as this type of debris may be present only on the hemocytometer and not in the cell cultures themselves. Please click here to view a larger version of this figure.

Supplementary File 1: Appendix Please click here to download this File.

List of Materials

DPBS Gibco 14-190-144
DMEM F-12 Media ATCC 30-2006
Glass Baffled Flask Pyrex  09-552-40
Glass Pipettes Fisher  13-678-6B
Pipette Aid Drummond 13-681-15A 
Serological Pipette Corning 07-200-573
T75 flask Corning 07-202-004
Trypsin Gibco 25-300-054
*Items may vary because this video is about general cell culture techniques

Lab Prep

Cell culture is a delicate skill necessary for growing human, animal, and insect cells, or other tissues, in a controlled environment. The goal of the protocol is to emphasize the correct techniques used in a research laboratory to prevent contamination from fungi and bacteria. Special emphasis is placed on avoiding mycoplasma contamination, a major concern in the cell culture room due to its small size and resistance to most antibiotics used for cell culture. These same techniques ensure continuous growth and maintain healthy cells. For new and experienced cell culture users alike, it’s important to consistently adhere to these best practices to mitigate the risk of contamination. Once a year, laboratories should review cell culture best practices and follow-up with a discussion or additional training if needed. Taking early action to prevent contamination in the first place will save time and money, as compared to cleaning up after contamination occurs. Universal best practices keep cell cultures healthy, thereby reducing the need to constantly thaw new cells, purchase expensive cell culture media, and reducing the amount of incubator decontamination and downtime. 

Cell culture is a delicate skill necessary for growing human, animal, and insect cells, or other tissues, in a controlled environment. The goal of the protocol is to emphasize the correct techniques used in a research laboratory to prevent contamination from fungi and bacteria. Special emphasis is placed on avoiding mycoplasma contamination, a major concern in the cell culture room due to its small size and resistance to most antibiotics used for cell culture. These same techniques ensure continuous growth and maintain healthy cells. For new and experienced cell culture users alike, it’s important to consistently adhere to these best practices to mitigate the risk of contamination. Once a year, laboratories should review cell culture best practices and follow-up with a discussion or additional training if needed. Taking early action to prevent contamination in the first place will save time and money, as compared to cleaning up after contamination occurs. Universal best practices keep cell cultures healthy, thereby reducing the need to constantly thaw new cells, purchase expensive cell culture media, and reducing the amount of incubator decontamination and downtime. 

Procedura

Cell culture is a delicate skill necessary for growing human, animal, and insect cells, or other tissues, in a controlled environment. The goal of the protocol is to emphasize the correct techniques used in a research laboratory to prevent contamination from fungi and bacteria. Special emphasis is placed on avoiding mycoplasma contamination, a major concern in the cell culture room due to its small size and resistance to most antibiotics used for cell culture. These same techniques ensure continuous growth and maintain healthy cells. For new and experienced cell culture users alike, it’s important to consistently adhere to these best practices to mitigate the risk of contamination. Once a year, laboratories should review cell culture best practices and follow-up with a discussion or additional training if needed. Taking early action to prevent contamination in the first place will save time and money, as compared to cleaning up after contamination occurs. Universal best practices keep cell cultures healthy, thereby reducing the need to constantly thaw new cells, purchase expensive cell culture media, and reducing the amount of incubator decontamination and downtime. 

Tags