Ring-Shaped Micropatterning Cell Chirality Assay: An In Vitro Technique to Determine Multicellular Chirality Based on Cell Alignment on Ring-Shaped Micropatterns
Abstract
Source: Zhang, H. et al. A Micropatterning Assay for Measuring Cell Chirality. J. Vis. Exp. (2022)
In this video, we describe a cell chirality assay to determine the alignment bias of cells in a confined geometric boundary such as a ring micropattern. Chirality is an inherent property of most cell types and is determined by genetic and environmental factors. Knowing the chirality of a normal cell population can help to screen drug-treated cells.
Protocol
1. Fabrication of polydimethylsiloxane (PDMS) stamps
- Draw an array of microscale rings using CAD software, with an inner diameter of 250 µm and an outer diameter of 450 µm. The pattern used in this protocol is a 10 x 10 array with an 850 µm distance between rings.
- Print a transparency mask of the pattern at the desired resolution using a microfabrication company's mask printing service (see Table of Materials).
NOTE: The provided dimensions of the ring have been proven to work for many cell types. - Conduct ultraviolet (UV) photolithography using the mask containing desired features to make a negative photoresist mold (such as SU-8).
- Cover a silicon wafer spin-coated with photoresist by the transparency mask fabricated in steps 1.1-1.2.
- On a UV contact aligner, polymerize the photoresist under transparent regions of the mask by UV light.
NOTE: After further wash and development, the master mold with desired features is fabricated. Operational details depend on the specific equipment used.
- Prepare PDMS elastomeric prepolymers by mixing with its curing agent at a 10:1 ratio and then cast the mixture onto the mold in a Petri dish.
- Place the dish in a vacuum chamber for 30 min to remove air bubbles in PDMS and bake in an oven at 60 °C for at least 2 h.
- After complete curing of PDMS, cut the pattern arrays into stamps.
NOTE: Thicker stamps (about 1 cm) may be preferred due to the ease of handling at the later steps of microcontact printing.
2. Coating of glass slides
- Clean the glass slides. Soak the slides in a 100% ethanol bath, sonicate for 5 min, and then rinse with water.
- Repeat this step first with acetone, then with isopropanol, followed by drying in a nitrogen stream.
- Use an electron beam (E-beam) evaporation equipment to coat titanium and gold layers on glass slides.
NOTE: For the titanium layer, the desired thickness is 15 Å (1 Å = 10-10 m). For the gold layer, the desired thickness is 150 Å. Coat titanium first and then gold, as the titanium layer serves as an adhesive between gold and the glass slide. - Place the cleaned slides into the evaporation chamber and insert gold and titanium crucibles under the shutters.
- Pump down the chamber to create a vacuum lower than 10-5 Pa before melting metals. Focus the electron beam onto the metal and adjust the power so that the depositing rate is appropriate for controlling the deposition thickness.
- Open the shutter to start the metal deposition. Close the shutter when the desired thickness is reached.
- Switch crucibles between sequential evaporation of two metals.
- Wait for the crucibles to cool down as required by the equipment, vent the chamber, and take the gold-coated glass slides out.
- Pump down the chamber again for equipment maintenance.
NOTE: Operational details may depend on a specific E-beam evaporator. Having a well-controlled, low depositing rate of titanium is important. A thick titanium layer often leads to poor visibility, especially for fluorescence imaging of the cells. After coating, the titanium/gold-coated glass slides can be stored in a dry vacuum chamber at room temperature for at least 1 month.
3. Microcontact printing
- Cut the titanium/gold-coated slide into smaller pieces, if desired. A square shape of 12 mm x 12 mm is recommended for a typical application (Figure 1B).
- Use a glass cutter to slide across the surface to leave a dented track, then hold the glass slide at both sides and bend at the dent to break into small quarters. Avoid touching the surface coated with gold.
NOTE: To visually determine which side of the glass is the coated surface in case of accidental tipping over, compare the reflection of light on both sides. The gold-covered surface will show a brighter reflection, whereas the non-coated side will have a dimmer reflection (from the titanium layer on the other side of the glass). An alternative way is to observe the edges of the slide, and the coating side can be determined from the vertical cutting surface. - Clean the slides by soaking in 100% ethanol in a Petri dish with the gold side up on an orbital shaker for at least 10 min. Aspirate out the ethanol, then dry each slide by blowing with a nitrogen stream.
- Clean the PDMS stamps with soapy water and then 100% ethanol. Dry the stamps with nitrogen gas.
- Prepare 2 mM octadecanethiol (C18) solution by dissolving 5.74 mg of C18 powder in 10 mL of 100% ethanol.
NOTE: Seal and store C18 solution at room temperature. Printing patterns with C18 creates an adhesive self-assembled monolayer for which the fibronectin and cells will preferentially attach. - Soak the PDMS stamps in C18 solution with the patterned surface facing down for 10 s and gently dry with nitrogen gas for 60 s.
NOTE: When drying, place the stream away from the stamp first (about 1 m) until most liquid is evaporated and then slowly move the stream closer to fully dry the stamp. This is to avoid C18 solution being blown away instead of drying on the stamp. - Lay the stamp face down onto the gold slides for 60 s before removal.
- To ensure proper stamping, gently tap the tweezers onto the stamps to properly transfer the patterns. Do not push down too hard, and the weight of tweezers is typically sufficient.
NOTE: Visual inspection of the stamp during tapping will ensure that the stamp and glass slide have made contact uniformly. - Prepare humidity chambers.
- Pipette 1 mL of 70% ethanol into an inverted Petri dish lid and lay down a piece of parafilm to cover the surface (covered face up).
- Use tweezers to lift, lay down parafilm to ensure no air bubbles, and remove excess ethanol if needed.
- Prepare 2 mM HS-(CH2)11-EG3-OH (EG3) solution: Dilute 5 µL stock solution in 5 mL of 100% ethanol.
NOTE: The diluted EG3 solution can be sealed and stored at 4 °C, and undiluted EG3 stock should be stored at -20 °C. The EG3 treatment is used to make the glass region without C18 non-adhesive to cells. - Micropipette 40 µL droplets of EG3 for each quarter glass slide onto the parafilm in the humidity chamber, leaving enough space between droplets to account for the spacing of the gold slides.
- Use tweezers to place C18-printed gold slides face down onto the droplets and ensure no bubbles under the slides. Gently push the slides together without lifting them to minimize evaporation.
NOTE: Place one edge of the glass slides down near the droplet, and then slowly lowering the other end of the glass slide down. If a bubble is present, push the gold slide without lifting it until the bubble is no longer present. - Seal the Petri dish tightly with parafilm and leave it at room temperature for at least 3 h.
NOTE: If extensive incubation is desired, double seal the Petri dish and leave it for up to 24 h. - In a biosafety cabinet, place gold slides face up in a Petri dish, soak and rinse 3 times in 70% ethanol to remove EG3, then leave in ethanol for 10 min for sterilization.
- Aspirate out the ethanol and replace it with sterile PBS.
- Prepare another humidity chamber as described in step 3.9, with PBS instead of ethanol.
NOTE: Due to the difference in surface tension, it is easier to first add 4-5 mL of PBS to lay down parafilm and remove bubbles, then aspirate out the excess. - Prepare the 50 µg/mL fibronectin solution (other proteins, if desired) in sterile PBS and micropipette 50 µL droplets of fibronectin solution for each quarter slide onto the parafilm, leaving some space between droplets.
NOTE: Fibronectin coating facilitates cell adhesion to patterned surfaces. - Use wafer tweezers to place slides face down onto the droplets and ensure no bubbles under the slides. Gently push the slides together without lifting them.
NOTE: Glass slide tweezers or wafer tweezers with straight wide tips are recommended for handling the slides. - Leave the Petri dish in the biosafety cabinet for 30 min.
- After 30 min, place the gold slides face up in PBS after rinsing for 3 times.
NOTE: Fibronectin-patterned slides can be stored in PBS at 4 °C for about a month.
4. Seeding cells onto micropatterned slides
- Warm up the cell culture media and trypsin in a 37 °C water bath.
NOTE: The following description of subculture is for NIH/3T3 cells. Culture conditions may vary depending on cell types. - (Optional) Soak patterned slides in culture media in a 12-well plate, warm up to 37 °C in an incubator prior to trypsinization of cells for better cell attachment.
- Trypsinize the cells, neutralize with FBS-containing media, centrifuge down at 100 x g for 3 min, and then resuspend by mixing well with fresh media.
NOTE: Make sure that the cells are fully dissociated from each other. - Count the cells, dilute to 200,000 cells/mL and add 0.5 mL of the cell suspension to each well containing one gold slide.
- Gently shake the well plate a few times for uniform cell seeding and store it in an incubator for 15 min to allow for cell attachment.
- After 15 min, check cell attachment under a microscope. Allow additional time, if needed.
NOTE: The attached cells will spread out on the surface with visible filopodium or flattening and will not move from the surface when the well plate is gently tapped or moved. - Aspirate out the media containing unattached cells from each well and add 1 mL of culture media. For drug treatment, supplement additional reagents to culture media at this step.
- Culture the cells in the incubator for 24 h and check confluency to determine if chirality has formed.
NOTE: Above 75% confluency is recommended for most cell types, and over-confluency may affect chirality characterization.
5. Image collection
- Fix the cells upon confluency.
- Remove culture media from the well plate and rinse once with PBS.
- Add 4% paraformaldehyde solution, incubate at room temperature for 15 min, and then rinse 3 times with PBS.
NOTE: If the fixation significantly changes cell morphology, imaging before fixation is recommended
- Use a phase-contrast microscope with camera functionality, image each ring on the slides at high resolution (10x object lens is sufficient for analysis).
6. Cell chirality characterization (Figure 2)
- Download MATLAB code files for chirality characterization.
- Add the code folder and sub-folders (with circular statistics toolbox inside) to the MATLAB path and open the "ROI_selection.m" file. In line 4, change the directory to the desired data folder (For window users, switch "/" into "" in lines 4 and 5).
- Change the image size in line 14, with the first two figures representing the inner circle size of the ring while the other two representing the outer.
NOTE: Make sure that the sizes of all images in a folder to be analyzed are identical. - Click on the Run button to execute the MATLAB code "ROI_selection.m" to determine the region of interest (ROI) in phase-contrast images.
- Manually drag the selection square to fit the ring, then double click on the image to confirm the selection.
- Repeat this step for every image in the folder (the next image will automatically pop up after confirming the ROI selection of a previous image); a ".mat" file will be generated to store the ROI information for each image.
- Open "Analysis_batch.m" file and change the directory of the folder same as step 6.2. (For window users, for the first-time use, switch "/" into "" in lines 5, 6, 124, and 130)
- Click on the Run button to execute the code "Analysis_batch.m" to determine the chirality of multiple cellular ring patterns. A "datatoexcel.txt" file will be generated, containing circular statistics for each ring as well as the numbers of clockwise, non-chiral, and anti-clockwise rings.
Representative Results
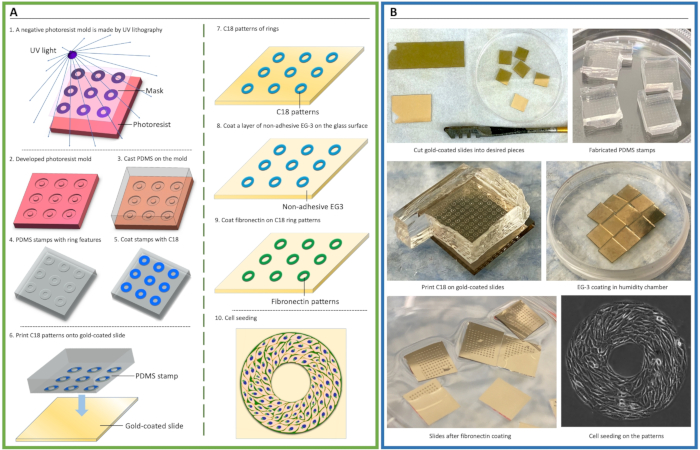
Figure 1. Schematic of cellular micropatterning. (A) Procedure of microfabrication and microcontact printing for cell patterning. A negative photoresist mold was made by ultraviolet (UV) crosslinking of photoresist via a mask containing micropatterning features (1-2). Polydimethylsiloxane (PDMS) elastomeric prepolymers were cast onto the mold to create stamps (3-4). Then, an adhesive self-assembly monolayer (SAM), octa-decanethiol (C18), was coated onto the stamp and transferred onto gold-coated glass slides via microcontact printing (5-7), followed by coating of non-adhesive ethylene glycol-terminated SAM, HS-(CH2)11-EG3 (EG3) (8), and fibronectin (9). Cells were then seeded to attach to the patterns (10). (B) Photos demonstrate the key steps of cell micropatterning.
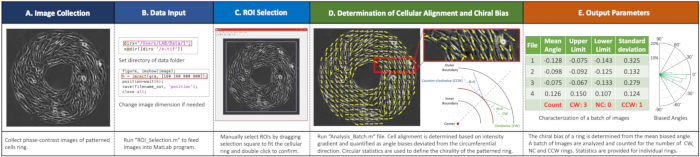
Figure 2. Workflow of imaging analyses. (A) Image collection. Acquire phase-contrast images of each ring. (B) Input data into the MATLAB program by running "ROI_Selection.m" file setting directory and image size. (C) Select regions of interest (ROIs) by dragging the selection square to fit the cellular ring and double click to confirm. (D) Determine cell alignment and chiral biases by running the "Analysis_Batch.m" file. (E) Example outputs with a summary of biased ring numbers and circular statistics for each ring.
Disclosures
The authors have nothing to disclose.
Materials
| 200 proof ethanol | Koptec | DSP-MD-43 | |
| BZX microscope system | Keyence | BZX-600 | |
| Dulbecco's modified eagle medium (DMEM), high glucose | Gibco | 11965092 | |
| Electron beam evaporator | Temscal | BJD-1800 | Gold-titanum film coating |
| Fetal bovine serum | VWR | 89510-186 | |
| Fibronectin from bovine plasma | Sigma | F1141-5MG | |
| Glass microscope slides | VWR | 10024-048 | |
| Glass tweezers | Exelta | 390BSAPI | |
| Gold evaporation pellets | International Advanced Materials | AU18 | |
| HS-(CH2)11-EG3-OH (EG3) | Prochimia | TH 001-m11.n3-0.2 | |
| MATLAB | Mathworks | MATLAB_R2020b | |
| NIH/3T3 cells | ATCC | CRL-1658 | |
| OAI contact aligner | OAI | 200 | UV photolithography |
| Octadecanethiol (C18) | Sigma | O1858-25ML | |
| Orbital shaker | VWR | 89032-088 | |
| Phosphate buffered saline (PBS) | Research product international | P32080-100T | |
| Polydimethylsiloxane Sylgard 184 | Dow Corning | DC4019862 | |
| Silicon Wafer | University Wafer | ID#809 | |
| Sodium pyruvate | Thermo fisher scientific | 11360-070 | |
| SU-8 3050 photoresist | MicroChem | Y311075 0500L1GL | |
| Titanium evaporation pellets | International Advanced Materials | TI14 | |
| Transparency mask (with feature) | Outputicity.com | N/A | Mask printing service |
| Trypsin-EDTA (0.25%) | Thermo fisher scientific | 25200-072 |
