Science Education
>

Head Implants for the Neuroimaging of Awake, Head-Fixed Rats

Instructor Prep
concepts
Student Protocol
JoVE 신문
신경과학
JoVE 비디오를 활용하시려면 도서관을 통한 기관 구독이 필요합니다.  전체 비디오를 보시려면 로그인하거나 무료 트라이얼을 시작하세요.
JoVE 신문 신경과학
Head Implants for the Neuroimaging of Awake, Head-Fixed Rats

All procedures were compliant with National Institute of Health guidelines and approved by the University of California, Irvine Animal Care and Use Committee. Seven males and one female rat (Sprague-Dawley, weight: 185-350 g) were used in this study. After study completion, the rats were sacrificed using carbon dioxide overdose.

1. Design of different components

  1. Design of the head implant:
    1. Make the head implant using CAD software (Figure 1C) and design it to image the area posterior to the bregma and adjacent to the midline centered on the somatosensory cortex. Ensure that the head implant covers an area of 0.9 mm to 1.9 mm on the skull away from the imaging area.
    2. Use only three screws to anchor the head implant on the rat's skull. Design all the screw holes so that they remain on the opposite side of the midline in the contralateral hemisphere of the imaged hemisphere.
    3. Place a bar, hollowed from the inside, in the upper part of the head implant to allow wires to fix the head cap to the head implant as shown in Figure 1D.
  2. Design of the head cap:
    1. Ensure that the head cap covers the imaging area completely and protects it from any sort of trauma as shown in Figure 1A, B. Add a curvature to the head cap so that it aligns to the shape of the head without causing difficulty to the animal's daily activities in the standard enriched cages.
    2. Cut the inner side of the head cap in a wider rectangular shape so that the upper part of the head implant can fit into it as shown in Figure 1E. Perpendicular to this rectangle, cut two other rectangular regions to anchor the head cap to the head implant.
    3. Pass one wire through the upper hollowed bar of the head implant for fixation of the head cap on the rat head as shown in Figure 1E-G. Pass the second wire in the same way.
      NOTE: These wires can be easily removed using pliers or forceps. The 3D printing files are provided (file format: STL) as Supplemental File 1 and Supplemental File 2.
  3. Design of the head frame:
    1. Design the head frame in a way that one cut part can move through the upper bar of the head implant and is fixed using a clamp.
    2. Angle the other cut part to provide extra strength for keeping the rat head-fixed to make the contralateral side completely accessible for imaging. For the purpose of this study, cut the steel plate with tin snips to produce the head frame (Figure 1H, I).
      NOTE: This part can be 3D printed as well.

2. Initial rat training

  1. Allow rats to acclimate to the vivarium environment in their cages for 2-3 days.
  2. Start handling the rat in a quiet room. Open the cage and have the experimenter put their hand inside the cage near the rat for 15-20 min to let the rat get habituated.
  3. Once the rat displays calmness by not getting startled or running away from the experimenter's hands, gently pick the rat up for handling. Handle the rat for 30-45 min each day before sling training.

3. Sling training

  1. Train the rats for at least 2-3 days in the slings before the surgical implantation of the head implant and head cap.
  2. Arrange the sling setup as shown in Figure 2A. Clean the sling setup using ethanol wipes.
    NOTE: All the slings are hand-sewn and made of a netting material either on the bottom or on both sides as shown in Figure 2A, B.
  3. For sling training, anesthetize the rats using 4% isoflurane for induction and 1% for maintenance until there is no hind paw pinch reflex.
  4. Under isoflurane anesthesia, place the rats on a flexible plastic sheet measuring 20 cm x 8 cm (length x width), where 10 cm x 8 cm of the plastic sheet is fully covered with the softer part of the Velcro.
    NOTE: Anesthetizing the rats for sling training is an optional step, primarily used to reduce stress and anxiety.
  5. For the first 2 days of the training, put the rat snuggly into a baby sock (size 0-3 months) with the head out through a small hole incised at the end of the sock.
  6. Wrap a small piece of absorbent pad around the lower body part to keep the rat dry and collect excrements.
  7. Wrap the rat in a breathable cotton cloth (size: 25 cm x 25 cm). Place the rat on a plastic sheet that has Velcro strips glued to it.
  8. Further secure the rat to the plastic sheet using 0.5 cm wide Velcro strips at a distance of 3-6 mm from each other.
  9. Secure the rat in the sling. Remove the gas anesthesia. Allow the rat to recover from gas anesthesia in the sling.
  10. When the rat starts whisking, offer a few drops of 10% sucrose solution as a reward every 10-15 min.
  11. Randomly present the rat with the sensory stimuli that will be used during imaging (here whisker stimulation, every 15-25 min) to make it accustomed to sensory stimuli. Manually stimulate the whiskers at random intervals.
  12. Train the rat in the sling for 1 h on day 1, 2 h on day 2, and 3 h on day 3 as shown in Figure 2C.

4. Presurgical preparation

  1. Print the head implant and head cap using the 3D printer (Figure 1).
  2. Sterilize all the surgical instruments and headpieces (implants and caps) by immersing the equipment in the Metricide28 germicide for 10 hours. Rinse tools thoroughly with sterile water just before surgery.
  3. Expose the rat to 4% isoflurane and then maintain at 1%-2% isoflurane until there is no hind paw pinch reflex. This surgery can be performed under many types of anesthesia, such as isoflurane, sodium pentobarbital, and ketamine-xylazine.
  4. Inject atropine (0.05 mg/kg) intramuscularly to reduce mucous secretions to help in breathing.
  5. Shave the head of the rat 5 mm centered around the midline using a hair trimmer starting from between the eyes to the back of the ears.
  6. Monitor the partial oxygen saturation and heart rate through a pulse oximeter and heart rate monitor probe secured to the hind leg of the rat.
  7. Wipe the rat’s head and the surrounding area three times with alternating rounds of betadine and 70% alcohol wipes.
  8. Fix the rat in a stereotaxic system.
  9. Insert a petroleum jelly-lubricated rectal probe to measure the rat's body temperature and maintain it through the heating blanket's feedback system to avoid hypothermia after anesthetic administration.
  10. Administer local anesthetic lidocaine hydrochloride at a concentration of 20 mg/ml, 0.07 mg/kg +/-0.2 body weight subcutaneously at the surgical site.
  11. Apply ophthalmic ointment to both eyes to prevent drying.
  12. Administer 2% local anesthetic subcutaneously over the surgical site.
  13. Inject 3 mL of lactated ringer's solution at room temperature subcutaneously to prevent dehydration and provide nourishment during surgery.

5. Surgery

  1. Remove the part of the skin over the surgical site (4 mm diameter centered around the midline and center of the head) using sharp surgical scissors. Dissect and remove part of the skin (~2 mm diameter, over the left somatosensory cortex) between the ear and eye on the temporal part of the head.
  2. Remove, using a scalpel, the underlying skin (pericranium) tissue to expose the skull. Clean the skull using sterilized cotton gauze.
  3. Retract/resect temporal muscle to expose desired size for imaging area [7.5 mm by 7.5 mm for this study]. 
  4. Expose the skull on the contralateral hemisphere for the head implant. Place the head implant on the skull to ascertain the location of anchoring screws for the implant as shown in Figure 2D-F.
  5. Mark the skull for drilling the screws using India Ink with drill bit 1. Drill the burr holes for the screws using dental drill bit 3. Screw the head implant in place.
  6. Dry the skull using sterile gauze. Apply a thin layer of tissue adhesive around and beneath the head implant to glue it to the skull. Apply a layer of dental cement to further support the head implant in place and let the cement dry for 2-3 min.
    NOTE: The use of tissue adhesive in addition to dental cement ensures a strong hold8.
  7. Using dental drill bit 3, thin a 7.5 mm x 7.5 mm area on the left side of skull just posterior to the bregma and lateral to the midline. Thin the skull to ~50 µm as shown in Figure 3A.
  8. Apply topical antibiotic ointment over the surgical site and then cover it with a thin layer of silicone rubber to protect the thinned skull as shown in Figure 3B. Cover the surgical site using the head cap as shown in Figure 3C. Fix it in place with the two small pieces of wires going through both the head implant and head cap as shown in Figure 3D, E. Apply silicone rubber to cover the head cap and skull to stabilize the head cap further on the rat's head as shown in Figure 3F.
    NOTE: Silicon rubber provides additional protection to thinned skull.
  9. Inject the rat with flunixin meglumine (2.5 mg/kg) subcutaneously for pain and inflammation management. To prevent infection, inject Enrosite antibiotic enrofloxacin (22.7mg/ml, 10mg/kg +/-.01), intraperitoneally.
  10. Move the rat to the recovery chamber to help maintain its body temperature with a warming blanket and a heat lamp. Monitor the rat continuously until it regains consciousness and can maintain sternal recumbency.
  11. Return the rat to its separate cage once it fully recovers.
  12. For the next 3 days, administer flunixin and buprenorphine to alleviate inflammation and pain and enrosite to prevent infection twice daily.

6. Awake imaging

  1. Anesthetize the rat with 4% isoflurane for induction and 1% for maintenance when there is no hind paw pinch reflex. Inject acepromazine (0.3-0.5 mg/kg) subcutaneously.
    NOTE: This concentration of acepromazine is below mild sedation levels and only helps keep the rats calm throughout the imaging process.
  2. Using customized strips of Velcro, fix the rat on the plastic sheet used during the training procedures. Wrap the lower body part using an absorption pad and place the rat snugly in the sling.
  3. Remove the silicon rubber. Remove the head cap by removing the fixation wires. Fix the headframe in the head implant as shown in Figure 2G.
  4. Lock the headframe in clamps as shown in Figure 2H, I.
  5. Remove gas anesthesia. Flush the imaging area with saline 3x and clean with wet gauze. Dry the imaging area and make a well, using petroleum jelly, around the imaging area. Fill the well with sterilized saline and cover with a glass slide (Figure 2E).
  6. Refer to the acquisition procedures for intrinsic signal optical imaging, the whisker stimulation protocol, and data analysis and presentation, which have been discussed in detail previously6,7.
  7. Throughout the experiment, monitor the rats for signs of agitation and restlessness, which can be further reduced by covering the eyes of the rats with a soft cloth or gauze (optional).

Head Implants for the Neuroimaging of Awake, Head-Fixed Rats

Learning Objectives

The representative optical imaging signals from a single trial of an anesthetized rat and the summed response (of 40 collected trials) of an awake rat are shown (Figure 4). The signal intensity for single-whisker stimulation of an awake rat can be visualized at a higher threshold than for the anesthetized rat, showing a stronger signal from the awake animal. The C2 whiskers of rats are stimulated at 5 Hz for 1 s, and the functional response is displayed as a fractional change compared to the baseline. The darker areas (below the negative threshold) are the main areas of neuronal activity, and the bright white areas (above the positive threshold) show the oxygenated blood response to stimulation9. The images are aligned so that from left to right is from rostral to caudal (C) and from top to bottom is the medial to lateral (L) direction, as shown by the arrows.

Figure 1
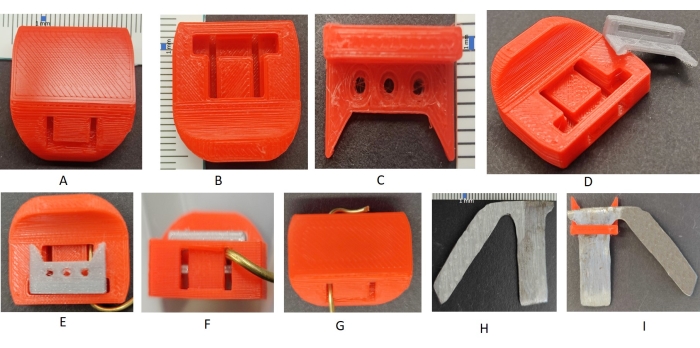
Figure 1: Head cap, head implant, and head frame. (A) The head cap (top view): the side of the top view shows the curvature to align along the curvature of the head to protect the head; the two hollowed rectangular parts are for the metal wires to pass through the head cap. (B) Head cap (bottom view) shows the wider rectangular cut to fit in the top bar of the head implant and the two perpendicular cuts for the wires to move through the implant and the head cap to keep them in place. (C) Head implant with the three cut holes for the anchoring screws. The positions of the anchoring screws on the head implant can be adjusted according to the head of the rat. (D) Head cap and head implant (side view); the side view of the head implant shows the rectangular bar hollowed from the inside to allow the wire to pass through to anchor the head cap to the head implant. (EG) View of the head implant anchored in the head cap through one wire piece; bottom view, side view, and top view to show how the head implant is fitted inside the head cap. (H) Head frame, (I) head implant anchored in the head frame. The distance between two lines on the scale (as shown by the blue rectangle) is 1 mm. Please click here to view a larger version of this figure.

Figure 2
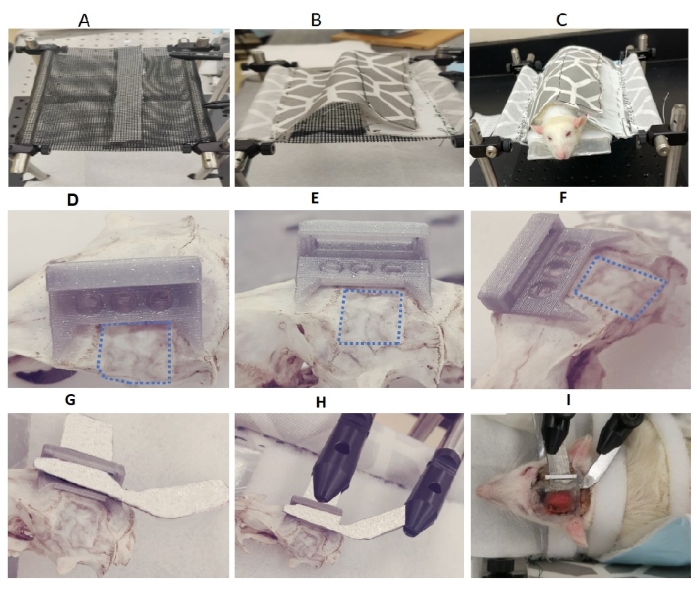
Figure 2: Slings, head implant, and fixation of the head frame for awake, head-fixed imaging. (A,B) Customized sling with netting material for either bottom only or both sides; (C) rat placed on the plastic sheet, fixed with Velcro strips, during sling training; (DF) top and side views of the head implant on a rat skull above the contralateral hemisphere. Dotted lines show the imaging area. The top and side views clearly show the three holes to fix the head implant to the skull with the anchoring screw. (E) The side view shows the hollow bar through which the wire passes to anchor the head cap to the head implant when the rats are not imaged. One leg of the head frame passed through the hollow part of the head implant for imaging the rat cortex. (G) Head frame through the head implant for awake, head-fixed rats. (H) The head frame through the head implant with its two legs clamped for awake, head-fixed imaging (I) of awake, head-fixed rats during the imaging sessions. Please click here to view a larger version of this figure.

Figure 3
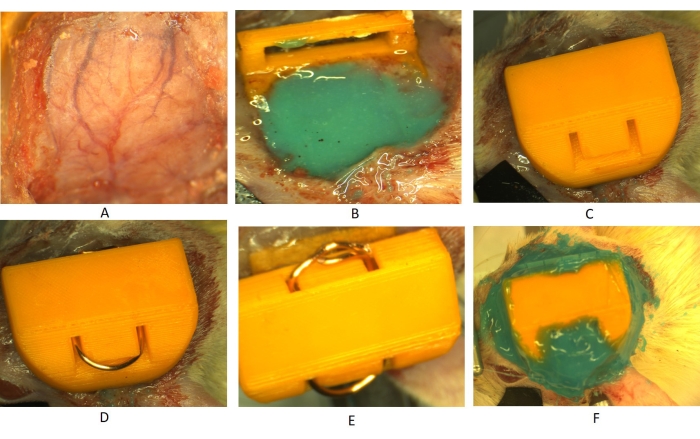
Figure 3: Head implant placement. (A) The thin skull preparation for awake, head-fixed imaging. (B) Head implant fixed on the rat skull and the thin-skull imaging area covered with the rubber silicone. (C) Head cap placed on the head implant. (D,E) Head cap anchored to the head implant using coated metal wires. (F) The head cap and the surrounding area covered with rubber-silicone for further support in the fixation and protection of the skull. Please click here to view a larger version of this figure.

Figure 4
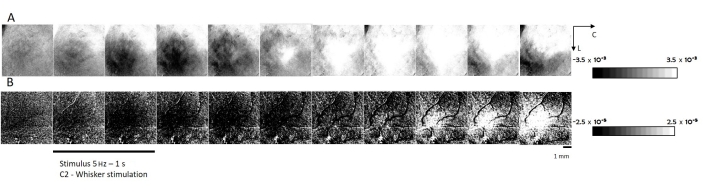
Figure 4: Functional responses of C2 whisker stimulations. (A) A representative single trial functional response of a 5 Hz C2 whisker stimulation for 1 s of awake, head-fixed rat imaging, with each trial lasting for 7 s with an inter-trial interval of 3 s ± 2 s. The threshold of grayscale representation of fractional change from baseline (−3.5 × 10⁻³ to 3.5 × 10⁻³). (B) A representative single trial functional response of a 5 Hz C2 whisker stimulation for 1 s of an anesthetized (sodium pentobarbital) rat. The threshold of grayscale representation of fractional change from baseline (−2.5 × 10⁻⁴ to 2.5 × 10⁻⁴). The functional response of the awake, head-fixed rat is 140 times stronger than that of the anesthetized rat. Each frame is a 0.5 s frame. The images are aligned so that from left to right is from rostral to caudal and from top to bottom is from the medial to lateral direction as shown by the arrows. The darker areas (below the negative threshold) are the main areas of neuronal activity, and the bright white areas (above the positive threshold) show the oxygenated blood response to stimulation. Scale bar = 1 mm. Abbreviations: C = caudal; L = lateral. Please click here to view a larger version of this figure.

Supplemental File 1: 3D printing file for the head implant. Please click here to download this File.

Supplemental File 2: 3D printing file for the head cap. Please click here to download this File.

List of Materials

Rats Charles River Sprague Dawley
Isoflurane Pivetal 21295098 General anesthetic
Lidocaine HCl 2% injection Phoenix L-2000-04 Local anesthetic
Atropine sulfate injection Vedco 5098907512 Help in respiration
Lactated Ringer's injection solution Vedco 50989088317
Flunixin injection Vedco 6064408670 Pain management
Enrosite injection (Enrofloxacin 2.27%) VetOne 501084 Avoid infection
PromAce injection (Acepromazine maleate) Beohringer Ingelheim 136059
Animax ointment Dechra Veterinary Products 122-75 active ingredients of nystatin 1000units per gram, neomycin sulfate 2.5mg per gram, thiostrepton 2500 units per gram, and triamcinolone acetonide 1mg per gram
Puralube ophthalmic ointment Dechra Veterinary Products 211-38
Povidone-iodine PVP prep pads Medline MDS093917 Betadine generic
Isopropyl alcohol swabs BD 326895
Vetbond tissue adhesive 3M 1469SB
Bur (drill bit), standard operatory carbide SS White Burs 14829 #3 bur
Screws, 00-90 x 1/8 flat head stainless steel J.I. Morris F0090CE125 Anchor screws
Stereotaxic system Kopf Instruments 1430
Homeothermic heating blanket Harvard Apparatus 50-7220-F
Pulse oximeter & heart rate monitor Kent Scientific MouseStat Jr.
Petrolatum Fisher Scientific P66-1LB Vaseline generic
Wire, bare copper Fisher Scientific 15-545-2C 20 gauge
Teets Cold Cure powder Pearson Dental C73-0054  active ingredient: Methyl Methacrylate
Teets Cold Cure liquid Pearson Dental C73-0078  active ingredient: Methyl Methacrylate
Silicone mold rubber Smooth-On Body Double Fast silicon polymer
Metricide 28 (Germicide) Metrex Oct-05
India ink, black Pelikan 301051
Dental drill NSK Dental Ultimate XL-F
3D printer Prusa Research i3 MK3S+
Sew on fasteners Velcro 90030
Pet screening utility fabric Joann 10173334 Netting material
Bur (drill bit), standard operatory carbide SS White Burs 14829 #1 bur

Lab Prep

Anesthetics, commonly used in preclinical and fundamental scientific research, have a depressive influence on the metabolic, neuronal, and vascular functions of the brain and can adversely influence neurophysiological results. The use of awake animals for research studies is advantageous but poses the major challenge of keeping the animals calm and stationary to minimize motion artifacts throughout data acquisition. Awake imaging in smaller-sized rodents (e.g., mice) is very common but remains scant in rats as rats are bigger, stronger, and have a greater tendency to oppose movement restraints and head fixation over the long durations required for imaging. A new model of neuroimaging of awake, head-fixed rats using customized hand-sewn slings, 3D-printed head implants, head caps, and a headframe is described. The results acquired following a single trial of single-whisker stimulation suggest an increase in the intensity of the evoked functional response. The acquisition of the evoked functional response from awake, head-fixed rats is faster than that from anesthetized rats, reliable, reproducible, and can be used for repeated longitudinal studies.

Anesthetics, commonly used in preclinical and fundamental scientific research, have a depressive influence on the metabolic, neuronal, and vascular functions of the brain and can adversely influence neurophysiological results. The use of awake animals for research studies is advantageous but poses the major challenge of keeping the animals calm and stationary to minimize motion artifacts throughout data acquisition. Awake imaging in smaller-sized rodents (e.g., mice) is very common but remains scant in rats as rats are bigger, stronger, and have a greater tendency to oppose movement restraints and head fixation over the long durations required for imaging. A new model of neuroimaging of awake, head-fixed rats using customized hand-sewn slings, 3D-printed head implants, head caps, and a headframe is described. The results acquired following a single trial of single-whisker stimulation suggest an increase in the intensity of the evoked functional response. The acquisition of the evoked functional response from awake, head-fixed rats is faster than that from anesthetized rats, reliable, reproducible, and can be used for repeated longitudinal studies.

Procedure

Anesthetics, commonly used in preclinical and fundamental scientific research, have a depressive influence on the metabolic, neuronal, and vascular functions of the brain and can adversely influence neurophysiological results. The use of awake animals for research studies is advantageous but poses the major challenge of keeping the animals calm and stationary to minimize motion artifacts throughout data acquisition. Awake imaging in smaller-sized rodents (e.g., mice) is very common but remains scant in rats as rats are bigger, stronger, and have a greater tendency to oppose movement restraints and head fixation over the long durations required for imaging. A new model of neuroimaging of awake, head-fixed rats using customized hand-sewn slings, 3D-printed head implants, head caps, and a headframe is described. The results acquired following a single trial of single-whisker stimulation suggest an increase in the intensity of the evoked functional response. The acquisition of the evoked functional response from awake, head-fixed rats is faster than that from anesthetized rats, reliable, reproducible, and can be used for repeated longitudinal studies.

Tags