1. Quality Control of Genomic DNA
NOTE: Genomic DNA (gDNA) was extracted from peripheral blood using the well-established silica-membrane-based DNA purification method. In advance of the below procedures, the concentration of gDNA was determined using a spectrophotometer.
- Prepare the gDNA sample at a concentration of 10-100 ng/µL.
- Add 10 µL of DNA sample buffer to an 8-tube strip.
- Add 1 µL of DNA ladder or gDNA to the tubes. Vortex the mixture for 1 min using the microplate attachment.
- Load the tube, the gel device, and pipette tips into the electrophoresis instrument (Table of Materials) and start the run by pressing the 'Start' button.
NOTE: The electrophoresis system will automatically operate with one click on the Start button. - Confirm that the lower marker contained in the DNA sample buffer is correctly assigned on the electropherograms. If it is incorrectly assigned, manually assign the marker in the 'Electroherogram mode' of the software.
NOTE: The DNA integrity number (DIN) will be automatically calculated. The DIN value comes from the DNA integrity. High and low DIN values indicate highly intact and strongly degraded gDNA, respectively. - Specify the size region of the gDNA (> 200 bp) in the 'Region mode' of the software to automatically calculate the concentration of gDNA (> 200 bp).
2. Primer and Probe Design
- Calculate the melting temperature (Tm) values using any open-access tool under the following conditions: 10-25 bases, 50 mM Na+/K+, 0.80 mM dNTPs, and 3 mM Mg2+ (Table of Materials). Design the forward and reverse primers to amplify the genomic region containing target alleles with the Tm value around 60 °C and the amplicon length at 100-300 bp.
NOTE: Refer to Table 1 for the concentration of oligonucleotides. - Design the locked nucleic acid (LNA) probes for the reference and variant alleles based on the following conditions: (i) 1-6 LNAs are present in each probe; (ii) a fluorescent dye and a quencher are present at the 5'- and 3'-terminuses of each probe, respectively; (iii) the difference between the Tm values of the matched and mismatched probes is > 10 °C; (iv) Tm values of the matched and mismatched probes are higher and lower than those of the primers, respectively [e.g., forward primer: 60.8 °C, reverse primer: 59.8 °C, reference allele probe (matched/mismatched): 62.6/45.3 °C, variant allele probe (matched/mismatched): 61.7/50.5 °C]. The Tm values were calculated using the open access tool also used for step 2.1.
- Ensure that the designed primers and probes do not encompass the single nucleotide polymorphisms with a frequency of > 0.1% as determined from databases [e.g., the Single Nucleotide Polymorphism database (dbSNP)].
3. Digital PCR
- Prepare the primers, probes, and gDNA stock solutions in the concentrations described in Table 1 with a TE buffer and store them at -20–4 °C.
- Mix the reagents at room temperature in a total volume of 15 µL to a final concentration as described in Table 1.
- Add 3 µL of distilled water instead of gDNA in a no-template control (NTC).
- Prepare 3.5x the amount of the PCR mixture in triplicate to account for the pipetting error.
- Pipette the PCR mixture up and down to mix it.
- Set the loading platform onto the chips built in the 8-tube strip and set them on the autoloader. Ensure that there is contact between the chip and the loading platform.
- Fit a loading slider on the platform and hold the slider with the stopper off of the loader.
- Pipette 15 µL of the PCR mixture on the platform near the tip of the slider (Figure 1A).
- Run the loader by pressing the button of the loader (for approximately 1 min).
NOTE: It is not a problem if a small amount of PCR mixture remains on the platform. It is possible to sequentially rerun the loader. - Set the chip-in-a-tube filled with PCR mixture in the side slot of the sealing enhancer. Push the slide lid and the edge of the top lid to not break the chip (Figure 1B).
- Run the sealing enhancer (approximately 2 min). Sequentially rerun the sealing enhancer for 1 min if a puddle of liquid is still visible because an incomplete sealing causes cross-contamination of the positive signals (Figures 1C and 1D).
- Add 230 µL of sealing fluid, an oil-based reagent, to the tubes.
NOTE: The chips should now be immersed in the fluid. - Set the tubes in the thermal cycler. Run the thermal cycler as described in Table 2 (for approximately 2 h). Tune the temperature or the duration of the PCR if there is an uneven distribution of positive partitions (Figure 1E).
NOTE: It is recommended to set the ramp rate to around 1 °C/s. - Leave the tubes in the thermal cycler for at least 15 min to reduce the baseline noise.
NOTE: The tubes can be left overnight as well. Fluorescence signals were detected even the following day. - Set the tubes on the detection jig and pour 6 mL of distilled water into the jig. If air bubbles are visible inside and outside of the tubes, clear them (Figures 1F and 1G).
- Load the jig into the detector and run it with a click on the 'Run' button of the software after the selection of Fluorescence, Experiment, and Sample/NTC tabs (Table of Materials).
NOTE: The dual color detection of eight samples with a default intensity takes approximately 4 – 5 min. - Confirm the position plot, histogram, and 2D scatter plot.
NOTE: If the fluorescence intensity of the negative partitions is high, adjust the intensity with a click on the Settings button of the software so that it falls within the range of 30–70. - Calculate the variant allele fraction (VAF) using the following formula:

Here, Cv and Cr are the copy numbers of the variant and the reference allele, respectively.
NOTE: They are automatically calculated in the software program based on Poisson statistics.
4. Collection of PCR Product
- Remove the sealing fluid from the tube.
- Add 100 µL of TE buffer to the tube. Vortex vigorously for 30 s and briefly centrifuge the tube.
- Transfer the TE solution to another tube and add 30 µL of 3 M sodium acetate and 200 µL of ethanol.
- Cool the solution at -20 °C overnight.
- Centrifuge the solution for 30 min at 16,000 x g and remove the supernatant.
- Add 300 µL of 80% ethanol to the tube and vortex.
- Centrifuge the solution for 15 min at 16,000 x g and remove the supernatant. Allow the precipitate to air-dry for 5 min.
- Dissolve the precipitate in 1–5 µL of TE buffer after air-drying.
- If necessary, assess the product size using an electrophoresis instrument with reference to step 1. Load 1 µL of the solution to the gel device for a high sensitivity (Table of Materials).
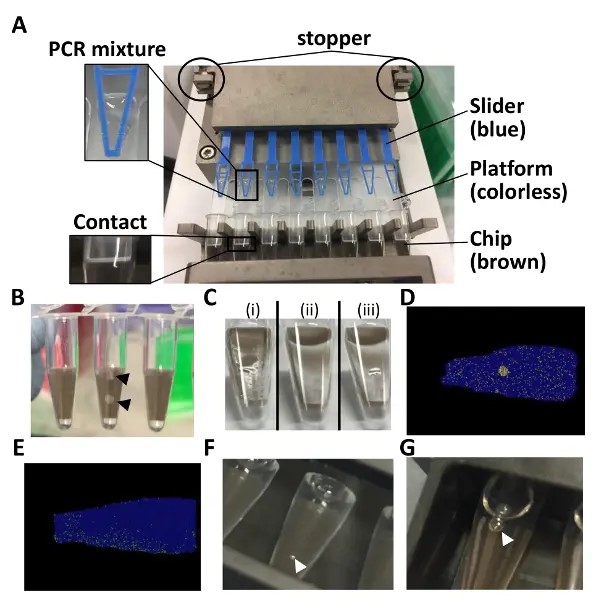
Figure 1: Points to note for the dPCR assay with chip-in-a-tube format. (A) This panel shows how to set up the 8-tube strip in the autoloader. (B) This panel shows broken chips. (C) This panel shows how the chip surfaces just after (i) loading and (ii) sealing. (iii) A puddle of liquid is visible in the case of an incomplete sealing. (D) This panel shows the position plot in the case of cross-contamination. (E) This panel shows the position plot in the case of an uneven distribution. (F) This panel shows how air bubbles on the tube surface are immersed in water. (G) This panel shows air bubbles inside the tube. Throughout the entire figure, black and white arrowheads indicate broken chip pieces and air bubbles, respectively.
Table 1: Reagents used for the dPCR assay. Depending on expected precision and sensitivity.
| Reagent | Concentration of stock solution |
Volume (μL) | Final concentration | Recommended final concentration |
| DNase/RNase-Free Distilled Water | – | 1.75 | – | – |
| 2x PCR Master mix | – | 7.5 | – | – |
| LNA probe for major allele | 2 μM | 0.5 | 66.7 nM | 3.33–100 nM |
| LNA probe for minor allele | 2 μM | 0.5 | 66.7 nM | 3.33–100 nM |
| Forward primer | 1 μM | 0.5 | 33.3 nM | 3.33–50.0 nM |
| Reverse primer | 1 μM | 0.5 | 33.3 nM | 3.33–50.0 nM |
| 20x dPCR solution | – | 0.75 | – | – |
| gDNA | 3.33 ng/μL | 3 | 666 pg/μL | 20 pg/μL–2,000 pg/μL |
Table 2: Thermal cycler conditions.
| Step | Temperature | Time | Cycles |
| Initial denature | 95 °C | 5 m | 1 |
| Denature Annealing and extension |
95 °C 58 °C |
50 s 90 s |
42 |
| Final extension | 70 °C | 5 m | 1 |
