骨盆 II: 窥镜考试成绩
English
COMPARTILHAR
Visão Geral
资料来源:
亚历山德拉 · 邓肯,GTA,实践临床,纽黑文康涅狄格
蒂凡尼库克,GTA,实践临床,纽黑文康涅狄格
Jaideep S.Talwalkar,MD、 内科、 儿科,耶鲁大学医学院,纽黑文,康涅狄格
提供舒适的窥镜安置是供应商,因为窥器是一个必要的工具,在很多妇科程序开发的重要技巧。病人和提供者往往担心窥镜考试,但它是完全有可能放置反射镜没有病人不适。它是重要为临床医师要注意语言的作用发挥到创造一个舒适的环境;例如,供应商应参考窥镜”账单”而不是”刀片”,以免触怒病人。
有两种类型的 speculums: 金属和塑料 (图 1)。此演示利用塑料,塑料 speculums 均为最常用在诊所的例行检测。当使用金属反射镜,它已建议使用如果病人经阴道分娩,产下的坟墓窥镜和佩德森窥镜,如果病人不。佩德森和坟墓 speculums 有不同的形状,和两个进来许多不同大小 (介质最常用)。之前放在金属反射镜,它有利于执行数字的宫颈考试,以评估为适当窥器大小。通过将一个手指放进阴道估计的深度和方向的子宫颈。如果患者的宫颈可以位于病人坐,,很可能病人,具有浅的阴道,因此应该与短的金属反射镜最舒适。
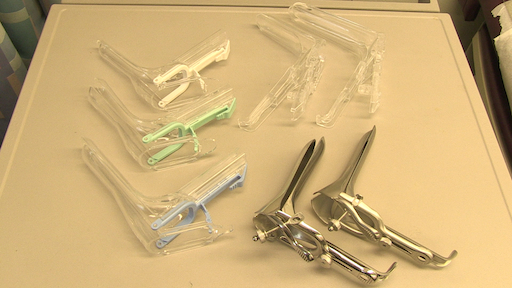
图 1。商业上可用 speculums 在不同大小的一张照片。
塑料 speculums 是所有形状像佩德森金属 speculums 和在不同的尺寸。为了评估塑料窥镜的适当大小,考官将两个手指放在病人的阴道,掌心向下,并试图把手指分开了: 如果在手指之间就没有空间,应使用小的塑料镜;如果在手指之间还有空间,应使用一种媒介之一。考试应永远不会执行与大窥器 (因为它是明显更长的时间) 无首先确定阴道管的长度。
窥器用于执行巴氏试验作为宫颈癌筛查考试的一部分。宫颈癌曾经在美国,妇女的癌症死亡的主要原因,但近几十年来的病例和死亡病例数已显著下降1。这种变化归功于拉脱落细胞巴氏染色法在 1928 年,可以通过阴道和子宫颈涂片诊断宫颈癌的发现。巴氏试验,它是现在被称为,在宫颈癌和癌前检测到异常细胞。目前的指南建议的筛查间隔可以发现通过美国预防服务工作组 (USPSTF) 网站2。
可以使用任一 1) 常规玻璃幻灯片执行测试和固色剂用锅铲和宫颈刷 (传统的”子宫颈抹片”) 或 2) 比较普遍利用液基细胞学检查与宫颈的扫帚或铲和宫颈刷 (图 2)。无论使用哪种工具,这些样本是从内外部 os 和 squamocolumnar 交界处或过渡区周围 os (图 3)。该视频演示了锅铲和宫颈液基细胞学检查,作为液体制剂与画笔是宫颈病变检测更有效的方法和铲和宫颈刷提高标本采集。
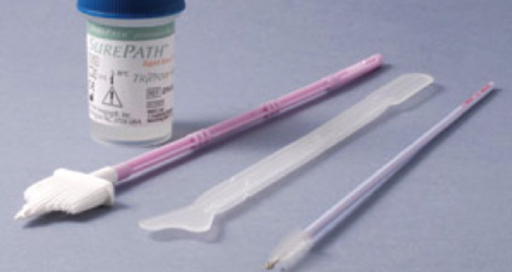
图 2。巴氏涂片工具。序列中所示是: 液体细胞学罐、 宫颈刷的宫颈扫帚、 压舌板。
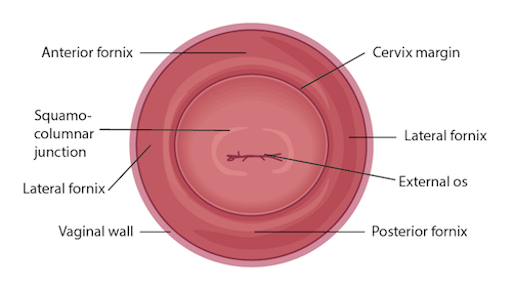
图 3。子宫颈图标记的有关结构。
Procedimento
Applications and Summary
This video reviewed the techniques for performing a comfortable speculum exam and collecting the samples for a Pap test. Before the exam is started, the examiner should ensure all supplies are prepared and let the patient know what to expect. Being able to perform a comfortable speculum exam is an important skill for any practitioner, as it is used in a wide variety of gynecological procedures and can provide a wealth of information. When the speculum is inserted, it is possible to observe the cervix and vaginal walls for a variety of signs including tone, color, discharge, lesions, polyps, ulcerations, and more-all of which may be clinically significant and can help with the process of diagnosis. A well-inserted speculum also allows easy access to the cervical os, at which point samples may be taken for the Pap test (as well as for other screenings, like chlamydia and gonorrhea). It's necessary to use a speculum to access the cervix for many other procedures, including inserting or removing an intrauterine device (IUD), a loop electrosurgical excision procedure (LEEP), and more.
Many patients may feel anxiety about the speculum and experience it as the most invasive part of the gynecological exam. The provider can offer the patient general support and empathy, along with specific tools to make the exam more comfortable for themselves. Asking the patient to take a deep breath and then bear down as if having a bowel movement before insertion can open the vaginal introitus and greatly aid comfort. The examiner may offer a particularly anxious patient the opportunity to insert the speculum themselves by placing it upside-down with the handle pointing toward the ceiling as the provider talks them through opening it3. It is often easier to get a clear view of the cervix with an upside-down insertion, but it is not a technique practitioners should employ, because it places the examiner's hand directly against the patient's clitoris.
There are many things the practitioner can do to ensure the exam is comfortable. The speculum should be inserted at an oblique angle to avoid putting too much direct pressure on the urethra. When the speculum is inserted fully, the bills should be angled below where the cervix was located during the digital exam. The practitioner can then apply enough posterior pressure to the speculum, so there is space visible in the vagina over the bills; this allows the bills to be opened without putting pressure on the delicate anterior structures. The most important thing is to never insert or remove a speculum while the bills are open. This is very painful and risks injuring the patient. The examiner should not touch the thumb lever until the speculum is positioned fully and ready to be opened. The lock on the speculum should be released fully before removal, and any pressure maintained manually. Once the cervix is free, the thumb lever should be completely released and the speculum smoothly removed the rest of the way, allowing the vaginal walls to close the bills on the way out.
Referências
- Cervical Cancer Statistics. U.S. Preventive Services Task Force. Centers for Disease Control and Prevention (2014).
- Cervical Cancer: Screening. Recommendation Summary. U.S. Preventive Services Task Force (2012).
- Wright, D., Fenwick, J., Stephenson, P., Monterosso, L. Speculum 'self-insertion': a pilot study. Journal of Clinical Nursing. 14(9): 1098-1111 (2005).
Transcrição
The speculum exam is used in a wide variety of gynecological procedures and can provide a wealth of diagnostic information. The speculum is a bivalve instrument, which is utilized for separating the walls of the vaginal canal. This not only allows for visual inspection of the cervix, but also provides an access to this region for specimen collection during diagnostic procedures such as the Papanicolau, or Pap test, which is performed to check for any precancerous changes. This video will illustrate the proper technique of using the speculum for cervical inspection, and the appropriate method for collection of samples for the Pap test.
Let’s begin with the review of the steps involved in prepping for the speculum exam and the Pap test, followed by a discussion of what a physician should look for while inspecting the cervix through the speculum. There are different types of commercially available specula. Some are made up of disposable plastic, while the metal ones are reusable. In this demonstration, we will use a plastic speculum.
Before starting the exam, it is essential to familiarize yourself with the instrument to be used and understand how it functions. After that you shall begin with the exam. Remember, this procedure usually comes after the external pelvic inspection, so at this point the patient history has been obtained, and they are already in the modified lithotomy position.
Make sure that the patient is seated at the end of the table to allow compete insertion of the speculum. Also lay out the supplies for the Pap test, including a cytology canister; lubricant squeezed onto a clean tray with a liner, and a spatula and endocervical brush OR just a cervical broom to collect the cell sample.Label the liquid cytology canister with the patient’s information. Then unscrew the lid of the canister until it is resting on top such that it can be easily lifted off.
It is essential to understand how to hold a speculum. In case you’re using a plastic speculum, place it in your non-dominant hand and position your index finger above the bills, your middle finger below the bills, and your thumb on the back of the speculum, avoiding the thumb lever as that would open the speculum. Using your dominant hand spread the water-based lubricant on the outside of the bills. Show the speculum to the patient without pointing it directly at them, and let them know what to expect during the exam, “Dialogue”.
Start by letting the patient know that you will first place the back of your hand on their thigh. This is done to prepare the patient for the exam by establishing a non-invasive contact first. Now separate the labia minora with the dominant index and middle finger pads to get a clear view of the vaginal introitus. Next, explain the relaxation technique to the patient, “Dialogue”. The vaginal introitus should open up as the patient bears down. Let the patient know that you are about to insert the speculum, “Dialogue” and place it halfway into the vaginal canal, keeping the bills at about 45° angle. Next, bring your non-dominant hand to the bottom handle and rotate the speculum flat, while simultaneously clearing the labia on both sides. Then angle the tip of the bills toward the floor and insert fully, such that the tip ends up below the cervix. Stop when the speculum is flushed against the patient’s pelvis.
Next place one of the dominant fingers inside the bills and apply strong posterior pressure while pulling down on the handle with the other hand until it is perpendicular to the floor. Make sure you apply enough pressure to see the space above the speculum. Now, while maintaining posterior pressure with the finger inside the speculum, you can smoothly depress the thumb lever to open the bills. Stop once resistance is met. Then engage the lock by pushing the thumb lever up one or two clicks and remove the finger from inside the speculum. Hold the speculum steady and, using a light source, check if the cervix is visible. Note the tone, color, and position of the cervix and observe for discharge, lesions, polyps, ulcerations, and masses.
You can visually inspect the lower intravaginal part of the cervix. This includes the exocervix, which is normally 2-3 cm in diameter, pink in color, and has a smooth surface; the external os, which is the opening of the endocervix into the vagina; and the four fornices, which are the recesses between the cervix margin and the vaginal wall.
After the visual inspection of the cervix, proceed to collecting samples for the Pap test. With the speculum still in place, insert the spatula into the vagina, being careful not to touch the walls. Position the spatula with its long end in the os, and the short end pressed against the junction. Now rotate it 360°, while maintaining consistent pressure and contact with the exocervix. Carefully remove the spatula avoiding the vaginal walls. Place the spatula into the open cytology canister and thoroughly rinse it by vigorous swirling in the liquid following the manufacturer’s instructions. Next, insert the endocervical brush into the vagina avoiding contact with the walls. Push the brush into the os until only the bottom bristles are exposed and then slowly rotate it 180° in one direction. Do not over rotate. Carefully remove the brush avoiding the walls, and place it into the cytology canister. Thoroughly rinse the brush by vigorous swirling and press it repeatedly against the sides of the canister to release material. Instead of using both spatula and brush, one can use just the endocervical broom, which has different sizes of bristles forming a triangular pattern. If using this, then you would insert it so the longer bristles rest in the os and the shorter rest on the transition zone and rotate it about five to ten times, depending on manufacturer’s instructions. The release of the sample is same as for that for the endocervical brush.
After sample collection is complete, release the locking mechanism by pressing down on the thumb lever, and while holding the lever down and bills open, remove the speculum about two to three inches out, to ensure that the cervix is cleared off the tip of the bills. Remove your thumb from the lever and place it on the handle. Finally, rotate the speculum by 45° while smoothly removing it all the way out. Have your hand underneath the speculum to catch any possible discharge, and discard the speculum, if disposable. At the end, replace the canister lid. Now the sample is ready for subsequent cytological analysis.
“Examiner explaining different types of specula-the similarities and differences”
You’ve just watched JoVE’s illustration of the speculum exam and the Pap test. You should now understand how to use the vaginal speculum and how to collect cervical cell sample for diagnostic evaluation. As always, thanks for watching!