Science Education
>

Generation of Tumor Organoids from Genetically Engineered Mouse Models of Prostate Cancer

Instructor Prep
concepts
Student Protocol
JoVE Journal
Genetics
A subscription to JoVE is required to view this content.  Sign in or start your free trial.
JoVE Journal Genetics
Generation of Tumor Organoids from Genetically Engineered Mouse Models of Prostate Cancer

Animal procedures described here were performed with the approval of the Institutional Animal Care and Use Committee (IACUC) at the Department of Laboratory Animal Resources, Roswell Park Comprehensive Cancer Center, Buffalo, New York.

NOTE: Male mice to be dissected to isolate prostates or prostate tumors for generation of organoids should have at least reached the age of sexual maturity — about 8-10 weeks of age. Specific ages of mice can vary amongst studies. Some factors to consider when choosing age include age-dependent changes in prostate cell populations, age-dependent expression of specific promoter-driven Cre transgenes, and rate of prostate tumor progression in a particular GEMM.

1. Dissection and Imaging of Mouse ProstateTumor and Metastatic Tumors

  1. Preparations
    1. Obtain necessary sterile dissection tools. Stage dissection area on clean sterile surface with a 15 cm ruler, precision balance, analytical balance, spray bottle with 70% ethanol, phospho-buffered saline (PBS), and paper towels.
    2. Preparation of fixative solutions for visceral organs and bones not to be used for organoid generation
      1. For visceral organs: Prepare 4% paraformaldehyde (PFA) in PBS. For one mouse, make 20 mL of 4% PFA, aliquot into two 15 mL conical tubes and keep at room temperature until use.
      2. For long bones: Aliquot 10 mL of pre-made 10% neutral buffered formalin (NBF) in one 15 mL conical tube and keep at room temperature until use.
    3. Obtain untreated 10 cm dishes and fill with non-sterile PBS — these will serve as temporary containers for organs during fine dissection using a dissection microscope.
      NOTE: Sterile tools are used for dissecting tissues for generating organoids. Non-sterile tools are used for the initial incision and dissection of the hind limbs.
  2. Euthanasia and initial incision
    1. Euthanize the mouse by CO2 asphyxiation using a 2.0 L/min flow rate for 5 min. Remove the mouse from the cage and perform cervical dislocation. Use the precision balance to measure the mouse's body weight and record.
    2. Place the mouse on top of a paper towel and orient on the dissection surface ventral side up with the mouse's head facing away from the investigator. Affix the mouse to the board by stretching out its limbs and piercing each of the forepaws and hind paws with one disposable needle.
    3. Using a spray bottle, douse the mouse's fur with 70% ethanol. Using non-sterile dissection scissors and straight forceps, pinch just above the mouse's penis and make a small incision through the fur only.
    4. Continue the incision midline up to the mouse’s neck through the fur only. Make bilateral incisions from the point of the initial incision through the mouse's ventral plane through the fur only.
    5. Grasp the fur and carefully pull it away from the skin of the mouse. Pin down the fur to the board to allow access to both the abdominal and thoracic cavities.
  3. Extraction of male urogenital system en bloc
    1. Using sterile dissection scissors and straight forceps, carefully cut through the skin about 0.75 cm above the rectum. Continue the incision midline up to the ribcage without disturbing any organs in the abdominal cavity. Carefully pull the skin away and pin to the board to expose the entire abdominal cavity.
      NOTE: Do not allow these instruments to touch the outside of the mouse or any surface in the staging area, as these tissues will be used to generate organoids.
    2. Dissect the urogenital system and other organs according to the diagram in Figure 1A, with numbers indicating the order the organs will be removed from the mouse.
    3. Find the bladder, then grasp the fat pad to either the left or right and pull upward to expose the testicle. Carefully dissect away the testicle from the rest of the urogenital region and put aside. Do the same procedure on the other side.
      NOTE: Achieving the optimal tissue quality and detailed tumor characterization of prostate tumors requires that the entire urogenital region be removed from the mouse en bloc19. It is recommended that the urogenital region be removed first (Figure 1A).
    4. Grasp the bladder and carefully pull up so that the urogenital region lifts together, exposing the urethra underneath. While holding the bladder, orient the scissors so they are against the underside of the dorsal prostate and cut the urethra. The entire urogenital region will then release from the abdominal cavity.
    5. Put the urogenital region in a 10 cm dish filled with PBS. If still filled with urine, drain the bladder by making a small incision. Using the analytical balance, weigh the urogenital system and record.
  4. Extraction of pelvic lymph nodes, spleen, liver, kidney, lung, tibia, and femur
    1. Removing the urogenital system exposes the pelvic lymph nodes, positioned right behind the urogenital system (Figure 1A) and on either side of the spine. The lymph nodes will only be visible if they contain metastatic lesions or if there is local inflammation. Orient the straight forceps underneath the lymph node and pull up to remove the lymph node. Do the same procedure on the other side.
    2. Grasp the rectum with the straight forceps and cut. Pull on the rectum to unravel the entire colon and small intestine, looking for metastatic lesions in the mesenteric lymph nodes. When the entire ileum is removed, continue to pull on the duodenum to expose the stomach. Cut the esophagus to completely remove the stomach and discard. If any metastatic lesions in the lymph nodes are observed, carefully dissect away from the intestine and store in a 10 cm dish of PBS.
    3. Exposing and removing the stomach will pull the spleen from the dorsal side of the abdomen (Figure 1A). Remove the spleen and place in 4% PFA. The spleen serves as a staining control for hemotoxylin as it is highly cellular.
      NOTE: Visceral tissues not to be used for organoid generation will be fixed overnight in 4% PFA, washed with PBS, and then placed in 70 % ethanol.
    4. Remove the liver in the upper part of the abdomen (Figure 1A). Based on the metastatic load in the liver, individual lobes can be dissected, or the entire liver can be removed by carefully cutting along the diaphragm. (Do not cut through the diaphragm at this time). Place the liver in a 10 cm dish of PBS.
    5. Removing the liver will fully expose the kidneys on either side of the spine (Figure 1A). Remove the kidneys — along with the renal lymph nodes, if the nodes have metastatic lesions — by placing the straight forceps underneath the kidney and pulling up. Do the same procedure for the other side.
    6. To expose the thoracic cavity, carefully cut the diaphragm along the ribcage. Piercing the diaphragm will release the negative pressure in the thoracic cavity and expose the heart and lungs (Figure 1A).
    7. Grasp the sternum and pull up to open the thoracic cavity further. Observe the ventral face of the thoracic cavity along the rib cage for metastatic lesions in the thoracic lymph nodes and dissect, if present.
    8. While still holding the sternum, cut away the ventral rib cage to access the heart and lungs. Grasp the heart, pull up and cut underneath the lungs. To fully remove the heart and lungs en bloc, cut all anterior blood vessels and the trachea. Place the tissue in PBS and carefully remove the heart without damaging the lung tissue or lung metastatic lesions.
    9. Take the non-sterile straight forceps and dissecting scissors and cut the hind leg at the head of the femur. Carefully grasp the femur and remove the hind leg from the fur.
    10. Place the hind leg on a paper towel and grasp the hind paw. Use the single edge razor blade to scrap/cut away all muscle and connective tissue from the tibia and femur. Remove the femur from the tibia by cutting posterior to the patella and remove the tibia by removing the hind paw. Place the tibia and femur in 10% NBF. Do the same procedure on the other side.
      NOTE: For the purposes of examining the long bones of the mouse for metastatic lesions, the fibula does not need to be intact. The long bones will be fixed in 10% NBF for one week, then decalcified using neutral EDTA solution20. After three weeks, the bones will be transferred to 70% ethanol.
    11. After removing the hind limbs, take an ear or tail cutting for future genotyping. Discard the mouse carcass and all tissue not to be fixed or used for organoid generation.  
  5. Dissection of prostate tumor
    NOTE: Dissection of mouse prostate lobes can only be achieved using a dissecting microscope19. However, the prostate tumor load can be so high that individual lobes cannot be distinguished, and dissection can be carried out without a microscope. Nevertheless, the full protocol for dissection of individual prostate lobes is described below.
    1. Place the urogenital region in a 10 cm dish of PBS under a dissecting microscope and orient the ventral side up with the bladder and seminal vesicles facing away from the investigator. All manipulation of the urogenital region should be done using sterile instruments.
    2. Assess the general phenotype of the prostate tumor- most likely, either a fluid-filled or solid tumor will be observed in PCa GEMMs (Figure 2A, B).
      NOTE: Fluid-filled tumors are often located in the anterior prostate region (Figure 2A). Fluid filled tumors are made up of primarily connective tissue with scant epithelial components — thus these tumors are not optimal for organoid generation because of the low number of tumor epithelial cells, as will be discussed in the representative results section.
    3. If fluid filled tumors are present, poke a small hole in the tumor. Place the urogenital region in a new 10 cm dish of PBS.
    4. Take a pair of straight forceps in the non-dominant hand and curved forceps in the dominant hand. Flip the urogenital region to its dorsal face. Look for the proximal prostate region (Figure 1B), which can be identified by the pink/red color of the urethra. Grasp the urethra and hold firmly so to manipulate the urogenital tissue with the curved forceps.
      NOTE: During prostate dissection, always take note of the bladder's location, as this is the simplest way to locate the individual prostate lobes (Figure 1B).
  6. Removal of non-prostate tissue from the urogenital region
    1. While still on the dorsal face of the urogenital region, find the base of the seminal vesicle. Carefully remove the seminal vesicle and discard. Perform the same procedure on the opposite side.
      NOTE: Avoid puncturing the seminal vesicle, as that will release sticky and opaque secretory fluid which interferes with prostate dissection. If the seminal vesicle is punctured, transfer the remaining urogenital region to new 10 cm dish with fresh PBS.
    2. Remove and discard the vas deferens and as much fatty and connective tissue as possible using the curved side of the forceps.
    3. While still firmly holding the urethra/proximal prostate region, use a pair of fine, pointed scissors to remove the bladder from the urethra.
  7. Isolation of individual prostate lobes
    1. Locate the anterior prostate (Figure 1B). Ensure to firmly hold the proximal prostate region/urethra with the straight forceps. Remove the anterior prostate region by directly grasping the tissue with the curved side of the forceps and firmly pulling it away from the bladder and the rest of the prostate. Place the tissue in PBS.
      NOTE: For all prostate regions, dissecting scissors may be required to remove the tissue, depending on the size of the tumor.
    2. Locate the ventral prostate region (Figure 1B). Remove the ventral prostate region in the same manner as in step 1.5.7.
    3. At this point in the dissection, only the lateral and dorsal prostate regions should be present, while the proximal prostate region is still being grasped by the straight forceps. Assess the lateral and dorsal prostate regions (Figure 1B). If the lateral region can be distinguished from the dorsal region, remove the lateral prostate region as described in step 1.5.7. Do the same procedure on the opposite side.
    4. Remove the dorsal prostate region as described in step 1.5.7. Place the proximal prostate region in 4% PFA, as its structure within the muscular tissue of the urethra makes it unsuitable for organoid generation.

2. Generation of 3D Organoids from Prostate Tumor Tissue

NOTE: Figure 3 shows a pictorial description of the procedure for generation of tumor organoids.

  1. Preparation
    1. Prepare mouse prostate organoid media according to Drost et al.18 with the following alterations. Use conditioned medium instead of recombinant proteins for Noggin and R-Spondin and use a final concentration of 1% (v/v), instead of 10%, for both Noggin- and R-Spondin-conditioned medium.
      NOTE: HEK293 cells stably transfected with HA-mouse Noggin-Fc or HA-mouse Rspo1-Fc are used to produce Noggin- or R-Spondin- conditioned medium, respectively. These cell lines were a gift from the Calvin Kuo Laboratory at Stanford University.
    2. Prepare digestion solution in a 15 mL tube by diluting 20 mg/mL collagenase II with Advanced DMEM/F12(+++) media to a final concentration of 5 mg/mL. Add Y-27632 Rock Inhibitor to the collagenase II solution at a final concentration of 10 µM.
      NOTE: The ratio of digestion buffer to tissue is 1 mL to 50 mg, which we use according to Drost et al.18.
  2. Mincing and digestion of tumor tissue
    1. In the cell culture hood, place prostate tumor tissue in a sterile 10 cm culture dish, dissect and discard necrotic tissue.
    2. Mince the remaining prostate tumor tissue into 1 mm3 cubes by holding the tissue pieces with the sterile curved forceps and cutting with dissection scissors.
    3. Place the minced tumor pieces in the 15 mL tube with the digestion buffer by scooping them up with the curved side of the forceps. Digest the tumor tissue at 37 °C with shaking for 1.5 to 2 h. Check digestion progress every 20 min.
      NOTE: At this time, take out at least 2 mL of matrix from -20 °C storage and thaw on ice. 1 mL aliquots of matrix will take approximately 3 h to thaw.
    4. After tissue digestion, centrifuge tube at 175 x g for 5 min at 4 °C to form a cell pellet.
    5. Remove the supernatant, flick the tube to loosen the cell pellet, and resuspend the cell pellet in 1 mL of pre-warmed trypsin supplemented with 10 µM Y-27632 Rock Inhibitor. Put the tube in a 37 °C water bath for 5 min.
    6. After incubation, pipette up and down 5 times with a standard P1000 tip. Return the tube to 37 °C water bath for another 5 min and repeat step 2.2.6.
      NOTE: At this time in the procedure, warm a sterile 6-well cell culture dish by putting it into a 55 °C incubator. 
  3. Counting cells and resuspension in matrix
    1. Wash the cells by adding 9 mL of cold AdDMEM/F12(+++) and centrifuge the tube at 175 x g for 5 min at 4 °C.
    2. After centrifugation, remove the supernatant, flick the tube to loosen the pellet, and wash the cells again by adding 10 mL of cold AdDMEM/F12(+++). Centrifuge the tube at 175 x g for 5 min at 4 °C.
    3. After centrifugation, remove the supernatant, flick the tube to loosen the pellet, resuspend the cells in 1 mL of AdDMEM/F12(+++), and count the number of cells using a hemocytometer according to standard procedure.
    4. Seven-to-eight domes fit in one well of a 6 well dish when organoids are plated in matrix via a drop-wise fashion. Approximately 200 μL of matrix will produce 7-8 domes. Decide how many wells of organoids are needed for future experimental purposes and calculate the volume of matrix required. Then, calculate the volume of cell-containing solution needed to have a final concentration of 1.0 x 10⁶ cells/mL of matrix.
    5. After counting cells, centrifuge at 175 x g for 5 min at 4 °C. Remove the supernatant, flick the tube to loosen the pellet, and resuspend the cells in volume of matrix calculated in step 2.3.4.
      NOTE: Matrix remains in liquid form only at 4 °C; keep matrix stock tubes and matrix-cell solutions on ice at all times.
  4. Plating matrix domes and application of media
    1. Mix matrix-cell solution with a P200 pipet to evenly distribute the cells without introducing bubbles. Remove the 6-well culture dish from the 55 °C incubator.
    2. Carefully pipette 200 μL of matrix-cell solution and quickly drop the solution into a well to create domes.
    3. Repeat step 2.4.2. until volume of matrix-cell solution is spent. Allow the domes to solidify at room temperature for 2 min.
    4. Flip the 6-well dish upside-down and put the dish into a 37 °C incubator to continue solidification for 20 min.
    5. After incubation, add 2 mL of mouse prostate organoid media to each well. Add synthetic androgen R1881 to each well for a final concentration of 1 nM and Y-27632 Rock Inhibitor to a final concentration of 10 μM. Mix carefully and place the plate in a 37 °C incubator for culturing.
      NOTE: Organoid culture media needs to be supplemented with 10 µM Y-27632 Rock Inhibitor for only 1 week after organoid generation.

Generation of Tumor Organoids from Genetically Engineered Mouse Models of Prostate Cancer

Learning Objectives

Representative necropsy images of a mouse with a large fluid-filled primary prostate tumor in the anterior prostate region are shown in Figure 2A. In contrast, Figure 2B, shows representative necropsy images of a mouse with a large solid primary prostate tumor for which individual prostate regions are indistinguishable. Fluorescent dissection images show the same solid prostate tumor from Figure 2B expressing GFP, indicating that the tumors cells express Cre (Figure 2C). Tissue that does not express probasin, such as the bladder, express Tomato and thus does not express Cre (Figure 2C). The liver and lungs from the mouse from Figure 2B have metastatic tumors expressing GFP, showing that they originated from the primary prostate tumor, and are surrounded by normal tissue that expresses Tomato (Figure 2C). Finally, the pelvic lymph node from this mouse expresses GFP and not Tomato, indicating that this metastatic tumor has overtaken this organ and no normal tissue remains (Figure 2C).

We show images in Figure 4 of organoids we have generated from a solid prostate tumor. At Day 1, small organoids are forming, as seen in the representative phase contrast images. Fluorescent images on Day 1 show that both Tomato and GFP expressing cells are present in the tumor organoid culture (arrows). However, by Day 7 when prostate tumor organoids have fully formed, these organoids are expressing GFP and not Tomato. These data suggest that these organoids have originated from tumor cells that were expressing Cre and not from normal epithelial cells. These tumor organoids continue to be only GFP-positive as we expand our culture to passage 1 and 2.

In Figure 5, we show images of organoids we have generated from a fluid-filled prostate tumor. On Day 1, small organoids are forming, and fluorescent images show that both Tomato- and GFP-expressing cells are present in the organoid culture — similar to our observation at Day 1 for organoids generated from a solid prostate tumor (Figure 4). However, organoids from a fluid-filled prostate tumor express either GFP or Tomato at Day 7 — indicating that organoids have formed from cells that do not express Cre. This pattern continues at passage 1 and passage 2, where the culture has both Tomato- and GFP-expressing organoids. Further analysis of these organoids is severely limited because the line is a mixture of normal epithelial organoids and tumor organoids. We believe that fluid-filled prostate tumors are suboptimal in generating tumor organoids simply because there is a greater percentage of normal prostate epithelial cells. Since both normal prostate epithelial cells and prostate cancer cells form organoids, the lines generated from fluid-filled prostate tumors are a mixture of normal and cancer organoids. We obtain pure tumor organoid lines from fluid-filled prostate tumors by flow sorting for GFP-positive cells and generating organoids from that population of cells. Solid prostate tumors are primarily comprised of tumor cells, therefore organoids generated from these tumors are a more pure population of cancer organoids without prior sorting for GFP.

Figure 1
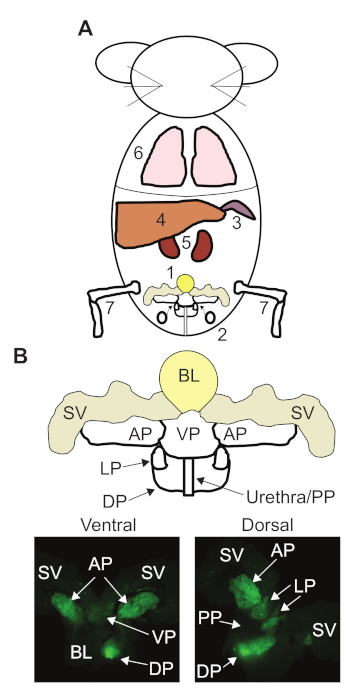
Figure 1: Our recommended dissection order for prostate cancer (PCa) genetically engineered mouse models (GEMMs) and anatomy of the mouse prostate. (A) The order we recommend in our protocol for dissecting the major organs from a PCa GEMM. 1. Urogenital region. 2. Pelvic lymph nodes. 3. Spleen. 4. Liver. 5. Kidneys. 6. Lungs. 7. Tibia and Femur. (B) Map of the mouse urogenital region and prostate anatomy. Fluorescent dissection images of a 12 week old mouse expressing probasin-Cre and the mT/mG Cre reporter transgene. Bladder (BL), seminal vesicles (SV), anterior prostate (AP), ventral prostate (VP), lateral prostate (LP), dorsal prostate (DP), and proximal prostate (PP). Please click here to view a larger version of this figure.

Figure 2
Figure 2: Representative dissection images of prostate cancer (PCa) genetically engineered mouse models (GEMMs). (A) The abdominal cavity prior to removal of the urogenital region and the urogenital region with a fluid-filled prostate tumor. (B) The abdominal cavity prior to removal of the urogenital region and the urogenital region with a solid prostate tumor. (C) Representative Tomato and GFP fluorescent images of a solid prostate tumor, liver, lung, and pelvic lymph node from a PCa GEMM that develops metastatic lesions. Scale bar = 5 mm. Bladder (BL), anterior prostate (AP), and dorsal prostate (DP). Please click here to view a larger version of this figure.

Figure 3
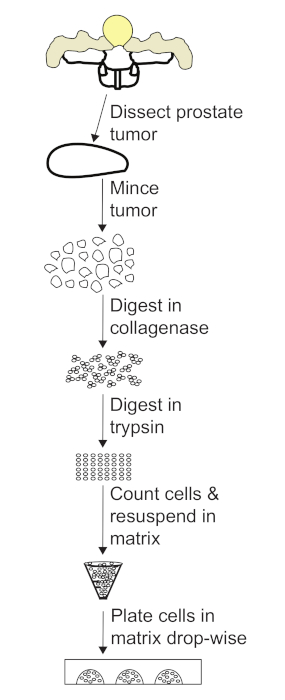
Figure 3: Flow chart of the protocol for generating prostate tumor organoids. After dissecting the prostate tumor, mince the tissue into 1 mm pieces. Digest the tumor pieces in collagenase, collect the cells, and digest in trypsin to obtain a single cell suspension. After counting cells, resuspend in volume of matrix required for a 1.0 x 10⁶ cell/mL cell concentration. Plate domes in dish using a drop-wise method. Please click here to view a larger version of this figure.

Figure 4
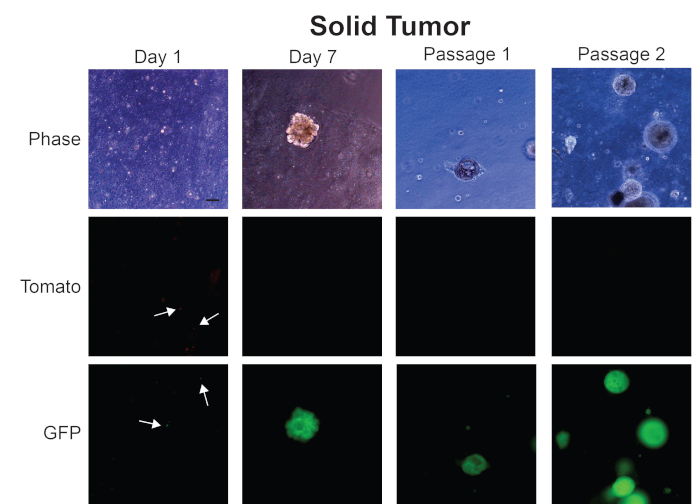
Figure 4: Representative images from generation of mouse prostate tumor organoids from a solid prostate tumor. Representative phase contrast, Tomato, and GFP fluorescent images from Day 1, Day 7, Passage 1, and Passage 2 of organoids generated from a solid mouse prostate tumor. Scale bar = 100 µm. Arrows indicate individual cells in fluorescent images. Please click here to view a larger version of this figure.

Figure 5
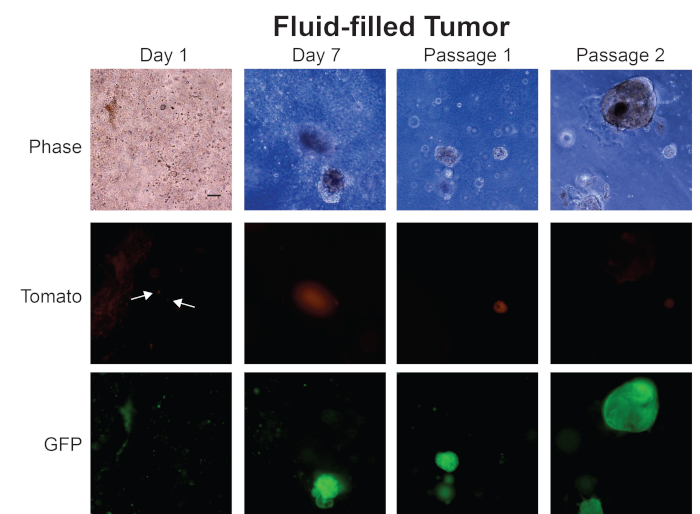
Figure 5: Representative images from generation of mouse prostate tumor organoids from a fluid-filled tumor. Representative phase contrast, Tomato, and GFP fluorescent images from Day 1, Day 7, Passage 1, and Passage 2 of organoids generated from a fluid-filled mouse prostate tumor. Scale bar = 100 µm. Arrows indicate individual cells in fluorescent images. Please click here to view a larger version of this figure.

List of Materials

0.25 % Trypsin+2.21 mM EDTA Sigma 25-053
1 1/4 in, 23 gauge, disposable syringe needles Becton Dickinson Z192430
10 % neutral buffered formalin Sigma HT501128
32 % paraformaldehyde Electron Microscopy Services 15714
A83-01 MedChemExpress HY-10432
Advanced DMEM/F12+++ Gibco 12634
Analytical balance Mettler Toledo 30216623
B27 (50X) Gibco 17504044
Collagenase II Gibco 17101015
Dissecting Board Thermo-Fisher 36-1
EHS Sarcoma matrix, Pathclear Lot#19814A10 Manufactured by Trevigen Requistitioned from the National Cancer Institute at the Frederick National Laboratory Holder of grants from the National Cancer Institute can request matrix
HEPES (1M) Sigma 25-060
human recombinant Epidermal growth factor (EGF) PeproTech AF-100-15
L-glutamine (200 mM) Sigma 25-005
N-Acetyl-L-Cysteine Sigma A9165
Penicillin-Streptomycin Sigma P4333
Precision balance Mettler Toledo 30216561
Scalpel #23 World Precision Instruments 504176
Scalpel Handle #7, 16 cm World Precision Instruments 500238
Single-edge carbon razor blade Fisherbrand 12-640
Stainless steel dissecting scissors, 10 cm, straight World Precision Instruments 14393
Stainless steel Iris forceps, 10 cm, curved tip, serrated World Precision Instruments 15915
Stainless steel Nugent utility forceps, straight tip, serrated World Precision Instruments 504489
Y-276632 (Rock Inhibitor) APExBIO A3008

Lab Prep

Methods based on homologous recombination to modify genes have significantly furthered biological research. Genetically engineered mouse models (GEMMs) are a rigorous method for studying mammalian development and disease. Our laboratory has developed several GEMMs of prostate cancer (PCa) that lack expression of one or multiple tumor suppressor genes using the site-specific Cre-loxP recombinase system and a prostate-specific promoter. In this article, we describe our method for necropsy of these PCa GEMMs, primarily focusing on dissection of mouse prostate tumors. New methods developed over the last decade have facilitated the culture of epithelial-derived cells to model organ systems in vitro in three dimensions. We also detail a 3D cell culture method to generate tumor organoids from mouse PCa GEMMs. Pre-clinical cancer research has been dominated by 2D cell culture and cell line-derived or patient-derived xenograft models. These methods lack tumor microenvironment, a limitation of using these techniques in pre-clinical studies. GEMMs are more physiologically-relevant for understanding tumorigenesis and cancer progression. Tumor organoid culture is an in vitro model system that recapitulates tumor architecture and cell lineage characteristics. In addition, 3D cell culture methods allow for growth of normal cells for comparison to tumor cell cultures, rarely possible using 2D cell culture techniques. In combination, use of GEMMs and 3D cell culture in pre-clinical studies has the potential to improve our understanding of cancer biology. 

Methods based on homologous recombination to modify genes have significantly furthered biological research. Genetically engineered mouse models (GEMMs) are a rigorous method for studying mammalian development and disease. Our laboratory has developed several GEMMs of prostate cancer (PCa) that lack expression of one or multiple tumor suppressor genes using the site-specific Cre-loxP recombinase system and a prostate-specific promoter. In this article, we describe our method for necropsy of these PCa GEMMs, primarily focusing on dissection of mouse prostate tumors. New methods developed over the last decade have facilitated the culture of epithelial-derived cells to model organ systems in vitro in three dimensions. We also detail a 3D cell culture method to generate tumor organoids from mouse PCa GEMMs. Pre-clinical cancer research has been dominated by 2D cell culture and cell line-derived or patient-derived xenograft models. These methods lack tumor microenvironment, a limitation of using these techniques in pre-clinical studies. GEMMs are more physiologically-relevant for understanding tumorigenesis and cancer progression. Tumor organoid culture is an in vitro model system that recapitulates tumor architecture and cell lineage characteristics. In addition, 3D cell culture methods allow for growth of normal cells for comparison to tumor cell cultures, rarely possible using 2D cell culture techniques. In combination, use of GEMMs and 3D cell culture in pre-clinical studies has the potential to improve our understanding of cancer biology. 

Procedure

Methods based on homologous recombination to modify genes have significantly furthered biological research. Genetically engineered mouse models (GEMMs) are a rigorous method for studying mammalian development and disease. Our laboratory has developed several GEMMs of prostate cancer (PCa) that lack expression of one or multiple tumor suppressor genes using the site-specific Cre-loxP recombinase system and a prostate-specific promoter. In this article, we describe our method for necropsy of these PCa GEMMs, primarily focusing on dissection of mouse prostate tumors. New methods developed over the last decade have facilitated the culture of epithelial-derived cells to model organ systems in vitro in three dimensions. We also detail a 3D cell culture method to generate tumor organoids from mouse PCa GEMMs. Pre-clinical cancer research has been dominated by 2D cell culture and cell line-derived or patient-derived xenograft models. These methods lack tumor microenvironment, a limitation of using these techniques in pre-clinical studies. GEMMs are more physiologically-relevant for understanding tumorigenesis and cancer progression. Tumor organoid culture is an in vitro model system that recapitulates tumor architecture and cell lineage characteristics. In addition, 3D cell culture methods allow for growth of normal cells for comparison to tumor cell cultures, rarely possible using 2D cell culture techniques. In combination, use of GEMMs and 3D cell culture in pre-clinical studies has the potential to improve our understanding of cancer biology. 

Tags