Science Education
>

Fabrication of the Composite Regenerative Peripheral Nerve Interface (C-RPNI) in the Adult Rat

Instructor Prep
concepts
Student Protocol
JoVE Journal
Bioengineering
A subscription to JoVE is required to view this content.  Sign in or start your free trial.
JoVE Journal Bioengineering
Fabrication of the Composite Regenerative Peripheral Nerve Interface (C-RPNI) in the Adult Rat

All animal experiments are performed under the approval of the University of Michigan's Committee on the Use and Care of Animals.

NOTE: Donor rats are allowed free access to food and water prior to skin and muscle donation procedures. Euthanasia is performed under deep anesthesia followed by intra-cardiac potassium chloride injection with a secondary method of bilateral pneumothorax. Any strain of rat can theoretically be utilized with this experiment; however, our laboratory has achieved consistent results in both male and female Fischer F344 rats (~200-250 g) at two to four months of age. Donor rats must be isogenic to the experimental rats.

1. Preparation of the dermal graft

  1. Anesthetize donor rat in an induction chamber utilizing a solution of 5% isoflurane in oxygen at 0.8-1 L/min. Once the rat has been anesthetized, remove from induction chamber and place on a rebreathing nose cone, lowering the isoflurane to 2-2.5% for maintenance of anesthesia.
  2. Administer a solution of 0.02-0.03 mL Carprofen (50 mg/mL) in 0.2 mL of sterile saline subcutaneously between the shoulder blades for analgesia.
  3. Apply artificial tears ointment to both eyes to prevent corneal ulcers.
  4. Using clippers, shave the entire lower hindlimb(s), ankle region, and sides of paw(s).
  5. Cleanse chosen hindlimb and plantar surface of paw with alcohol, followed by iodopovidone solution, ending with a final cleanse with alcohol to remove residual iodopovidone.
  6. Using a hand-held micro motor high speed drill with a removable round fine grit polishing stone (4000 rpm), burr the plantar surface of the paw to remove the epidermis. While burring, apply drips of saline as to not burn the skin. The underlying dermis will have a shiny appearance with pinpoint bleeding.
  7. Apply a tourniquet to the lower extremity to slow blood flow.
  8. Remove the plantar skin sharply with a #15 scalpel and place in saline-moistened gauze to prevent desiccation. Some tendinous and connective tissue will inherently be removed with the skin in this step and will be removed later.
  9. Apply gauze wrap to the bleeding foot to slow hemorrhage. Repeat steps 1.5-1.9 if doing two constructs.
  10. Under a microscope (20x magnification), remove the tendinous and connective tissue from the deep layer of the skin graft using micro-scissors. Take care not to make holes in the graft. The thinned dermal graft should be slightly opaque containing only dermis, measuring approximately 0.5 cm x 1.0cm in size.
  11. Place in saline-moistened gauze until ready for C-RPNI construct fabrication. Grafts should be utilized within 2 hours of harvest.

2. Preparation of the muscle graft

  1. Make a longitudinal incision along the anterior aspect of the lower hindlimb from just above the ankle to just below the knee with a #15 scalpel. Dissect through subcutaneous tissue to expose the underlying musculature.
  2. At the distal aspect of the incision, expose the tendinous insertions of the lower limb musculature. Tibialis anterior (TA) is typically the largest and most anterior of the muscles, and just underneath and posterior to this muscle lies the extensor digitorum longus (EDL). Isolate the distal EDL tendon from the other tendons in the area, taking care not to incise its insertion at this point.
  3. Ensure isolation of the correct tendon by inserting both tines of a forceps underneath the tendon and exerting upward pressure by opening the forceps to cause tendon excursion. Manipulation of this tendon should cause all of the toes to extend simultaneously.
  4. Perform a distal tenotomy with sharp iris scissors and separate the muscle from the surrounding tissues bluntly with tenotomies (or other blunt-tipped scissor) working proximally to find the tendinous origin.
  5. Once the proximal tendon is visualized, again perform a tenotomy utilizing sharp iris scissors. Place the muscle graft in a saline-moistened gauze to prevent desiccation.
  6. Once all desired grafts have been removed from a donor rat, euthanize primarily by intra-cardiac KCl injection (1-2 mEq K+/kg) followed by secondary euthanasia with bilateral puncture pneumothorax with a #15 blade.

3. Common peroneal nerve isolation and preparation

  1. Anesthetize and provide analgesia to the experimental rat according to protocol outlined in steps 1.1-1.3.
  2. Shave the desired thigh and cleanse with alcohol, betadine, ending with alcohol to remove traces of betadine.
  3. Move animal from surgical prep table to surgical microscope table and place on heating pad with temperature probe for body temperature maintenance. Maintain isoflurane at 2-2.5% and oxygen at 0.8-1 L/min.
  4. Mark the incision, extending from just distal to sciatic notch to the inferior portion of the knee. This marking should be inferior to, and angled away from, the femur. Make the incision with a #15 blade incising through the underlying biceps femoris fascia.
  5. Carefully dissect through the biceps femoris muscle with either a hemostat or blunt-tipped micro-scissors to the space underlying biceps femoris.
    NOTE: The sciatic nerve travels approximately in the same direction as the initial incision that was made. There are three branches, typically with sural nerve posterior and common peroneal and tibial nerve traveling superficial and deep to the knee, respectively.
  6. Following identification of the common peroneal (CP) nerve, using a pair of micro-, fine-tipped forceps and micro-scissors, carefully isolate the CP nerve from the other sciatic branches and remove any lingering connective tissue distally.
  7. At the point where the nerve crosses the surface of the knee, sharply transect the nerve with a pair of micro-scissors.
    NOTE: Using sharp scissors is extremely important in this step as causing significant trauma to the nerve could increase the risk of neuroma formation.
  8. Carefully free any remaining connective tissue from the CP nerve and work proximally to free the nerve to a length of approximately 2 cm.

4. C-RPNI construct fabrication

  1. Remove the muscle graft from saline-moistened gauze and remove all central tendinous tissue as well as a small central segment of epimysium. Leave the tendinous ends intact.
  2. Using an 8-0 nylon suture, secure the epineurium of the transected end of the CP nerve to the area of the muscle graft devoid of epimysium with two interrupted stitches on either side of the nerve.
  3. Secure the muscle graft to the femur periosteum with a single 6-0 nylon interrupted stitch both proximally and distally with the nerve-muscle junction facing away from the femur.
    NOTE: Secure the muscle so that it is at normal relaxed length. Try not to stretch the muscle significantly or leave too much laxity when securing.
  4. Place an 8-0 nylon stitch at the inferior, central margin of the muscle graft epimysium, securing it to the CP nerve epineurium in a way as to create laxity in the nerve within the muscle graft and help to relieve any future tension it may be exposed to with later ambulation.
  5. Remove the skin graft from the saline-moistened gauze and arrange it on the muscle graft in such a way to completely cover the nerve and the majority of the muscle. Ensure that the deep margin of the dermis is resting on the muscle. Trim any dermis that extends beyond the border of the muscle.
  6. Secure the skin graft to the muscle graft circumferentially using 8-0 nylon interrupted sutures. Typically, 4-8 total sutures are used depending on the size of the construct.
  7. Close the biceps femoris fascia over the construct in a running fashion with 5-0 chromic suture.
  8. Close the overlying skin with 4-0 chromic suture in running fashion.
  9. Swab the surgical area with an alcohol pad and apply antibiotic ointment.
  10. Cease inhalational anesthetic and allow rat to recover with food and water sources separate from cage mates.

Fabrication of the Composite Regenerative Peripheral Nerve Interface (C-RPNI) in the Adult Rat

Learning Objectives

Construct fabrication is considered unsuccessful if rats develop an infection or do not survive surgical anesthesia. Previous research has indicated these constructs require approximately three months to revascularize and reinnervate2,3,17,36. Following the three-month recovery period, construct testing can be pursued to examine viability. Surgical exposure of the constructs after three months will reveal revascularized muscle and skin if successful (Figure 3). At times, the free muscle and dermal grafts can consist solely of scar tissue, and/or the nerve will not be attached to the construct; these findings indicate an unsuccessful attempt. However, if successful, gentle squeezing of the common peroneal nerve with forceps proximal to the construct will result in visible muscle contraction (Video 1). Histological analysis of constructs should demonstrate viable skin, nerve, and muscle (Figure 4). Immunostaining will also reveal motor and sensory nerve reinnervation to their neuromuscular junctions and sensory end organs, respectively (Figure 5). If the common peroneal nerve does not reinnervate those tissues, immunostaining will not demonstrate any individual nerve fibers within the construct with the exception of the implanted nerve itself.

Electrophysiologic testing can be performed on these constructs in vivo (Figure 6); previous research has been conducted at 3 and 9 months following C-RPNI fabrication36 (Table 1). Following maximal stimulation with a hook electrode at the proximal common peroneal nerve just distal to its takeoff from the sciatic nerve, compound muscle action potentials (CMAPs) can be measured at the muscle component with visible muscle contraction. The type of electrode used at the muscle can vary according to preference, but epimysial patch, epimysial pad, and bipolar probe electrodes have been used successfully in this research. The average CMAP amplitude recorded at the muscle was 8.7 ± 1.6 mV at 3 months and 10.2 ± 2.1 mV at 9 months. The average conduction velocity was 10 ± 1.2 m/s at 3 months and 9.5 ± 0.6 m/s at 9 months. In comparison, CMAPs generated by physiologic EDL muscle typically range from 10-18 mV37. Following stimulation at the dermal component of the C-RPNI, compound sensory nerve action potentials (CSNAPs) were produced at the proximal common peroneal nerve, with average CSNAP amplitude measuring 113.7 ± 35.1 µV at 3 months and 142.9 ± 63.7 µV at 9 months. Figure 7 illustrates single and summation CMAP and CSNAP signals obtained during electrophysiologic testing in a graphical format.

The C-RPNI serves to amplify a nerve's inherent microvolt signal, and previous research has demonstrated sufficient amplification from the microvolt to millivolt level38. Therefore, if a construct does not provide that level of amplification, it is not considered successful. If either the dermal, muscle, or both components of the C-RPNI fail, testing would result in recordings that mimic the stimulation signal utilized. For the muscle component specifically, a suboptimal result (but one that is still considered operational) would be one that has CMAP amplitude and conduction velocity in the range that falls between the signal stimulation value and that of physiologic EDL muscle. Additionally, these signals can become attenuated and lack the characteristic CMAP waveform (Figure 8A). Suboptimal results at the level of the dermal component can occur but are difficult to quantify given that rats cannot express the quality of sensation they experience. These suboptimal results usually involve dampening of the waveform with significant background noise (Figure 8B). However, if there is significant scarring or callusing of the skin graft, or minimal graft survived, no CSNAPs will be appreciated at the proximal common peroneal nerve regardless of stimulation value.

Figure 1
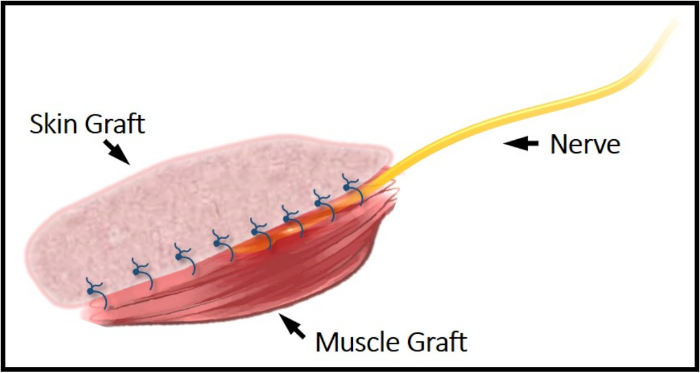
Figure 1: Illustrative schematic of the C-RPNI construct. The common peroneal nerve can be seen secured between the top dermal layer and bottom muscle layer. This construct is secured to the femur periosteum proximally and distally via EDL's tendinous junctions. Please click here to view a larger version of this figure.

Figure 2
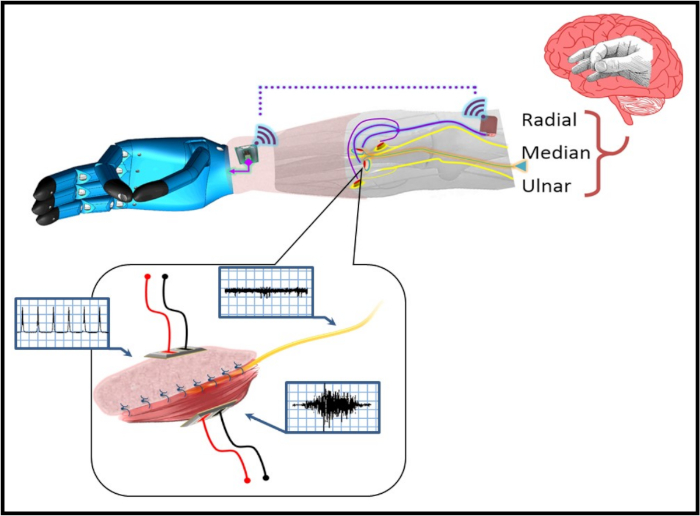
Figure 2: A pictorial representation of the C-RPNI in a patient with a trans-radial amputation. The user forms a desired motor intention at the cerebral level (e.g., pincer grasp), which is transmitted as an efferent motor signal to the C-RPNI via the implanted peripheral nerve. This signal generates a compound muscle action potential (CMAP) at the muscle component, which is recorded by implanted electrodes and recognized by the prosthetic device, generating the desired motion. Sensors on the device's fingertips recognize the amount of pressure generated, and relay that information to an electrode implanted in the dermal component of the C-RPNI. These signals activate the corresponding sensory end organs, generating an afferent compound sensory nerve action potential (CSNAP) transmitted through the peripheral nerve to the sensory cortex. An example signal generated at each component is pictured within the blue boxes pictured next to each component. Please click here to view a larger version of this figure.

Figure 3
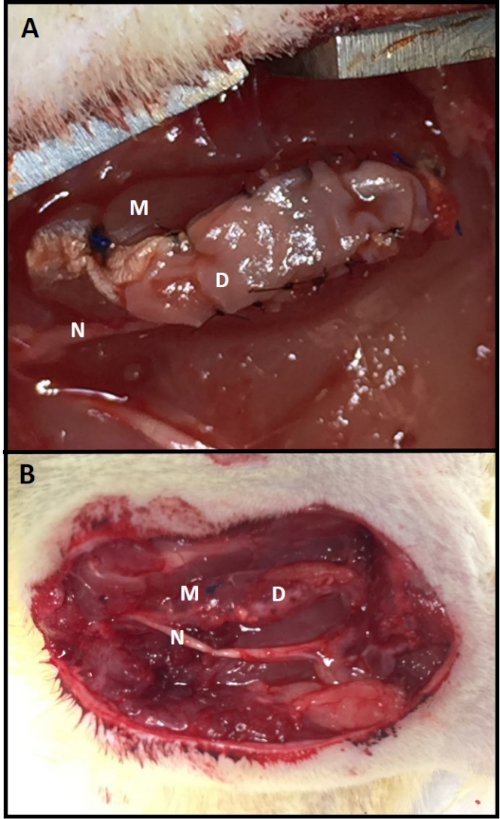
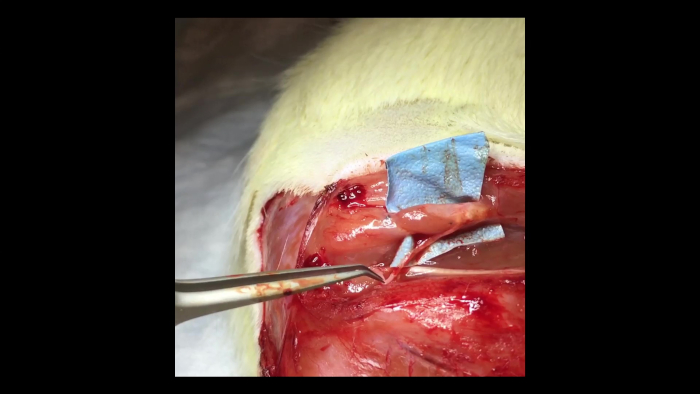
Figure 3: C-RPNI in vivo. (A) A C-RPNI immediately following fabrication and at (B) 3 months post-construction at time of electrophysiologic testing. The muscle component is the deep layer of the construct and the dermal, the superficial. Muscle tissue is marked by (M), dermis (D), and common peroneal nerve (N). Please click here to view a larger version of this figure.

Figure 4
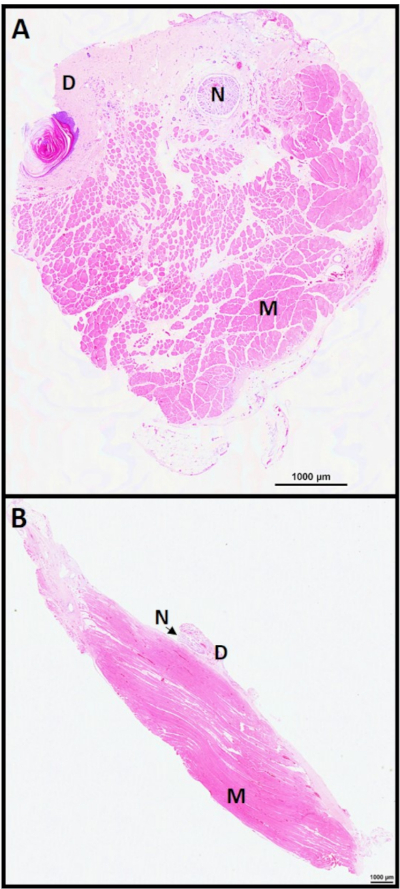
Figure 4: C-RPNI histology 6 months. C-RPNI H&E at 6 months in (A) cross-section and (B) longitudinal section. Muscle noted by (M), dermis (D), and nerve (N). Please click here to view a larger version of this figure.

Figure 5
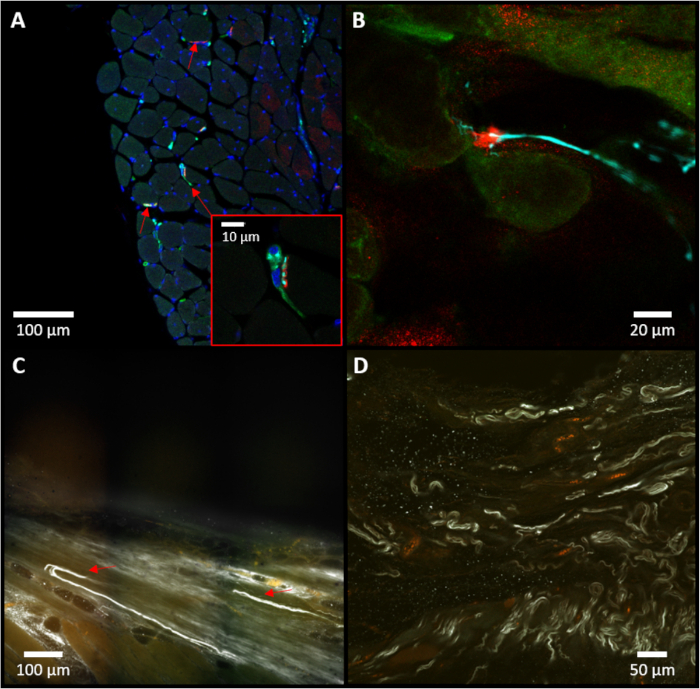
Figure 5: Immunostaining of the C-RPNI. (A) Representative example of a cross-section of muscle tissue, with red arrows identifying neuromuscular junctions. A higher magnification of the central neuro-muscular junction (NMJ) is pictured at the bottom-right. (B) Close-up of a neuromuscular junction noted in the sample. For (A) and (B), red staining (alpha-bungarotoxin) indicates presence of cholinergic receptors in muscle tissue; blue (neurofilament 200) specifies presence of neurofilaments within neuronal tissue; and green (choline acetyltransferase) notes specifically motor neuron presence. (C) Representative example of an iDISCO image focusing on the dermal junction, with red arrows marking sensory neurons (white) entering the dermis. (D) On-lay view of iDISCO demonstrating multiple sensory neurons (white, neurofilament 200). Please click here to view a larger version of this figure.

Figure 6
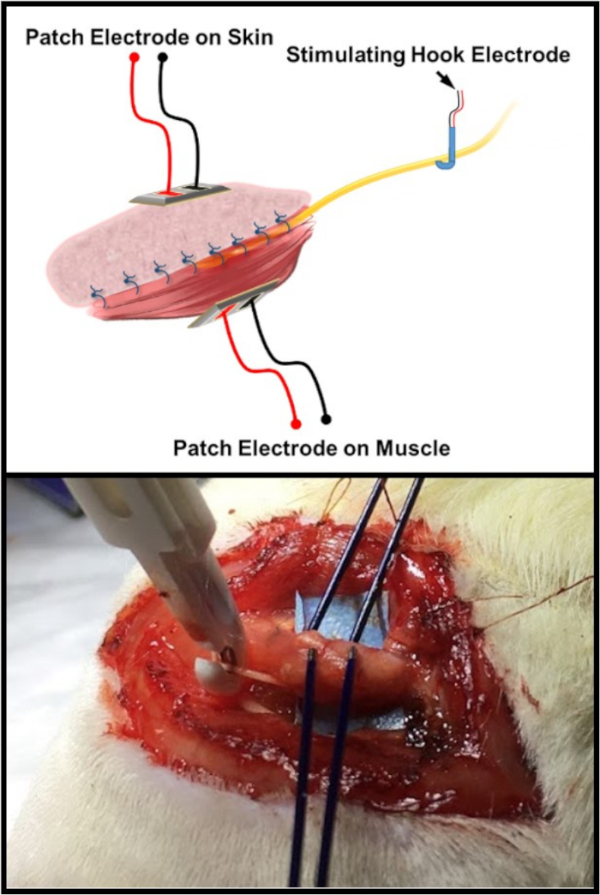
Figure 6: Electrophysiologic testing schematic. The top image is an illustration of the standard electrode arrangement for testing the C-RPNI constructs. There is a patch and/or probe electrode placed on both the muscle and dermal components of the C-RPNI, with a double hook electrode placed at the common peroneal nerve proximally. The bottom image is an in vivo example of the testing arrangement on a rat subject. Please click here to view a larger version of this figure.

Figure 7
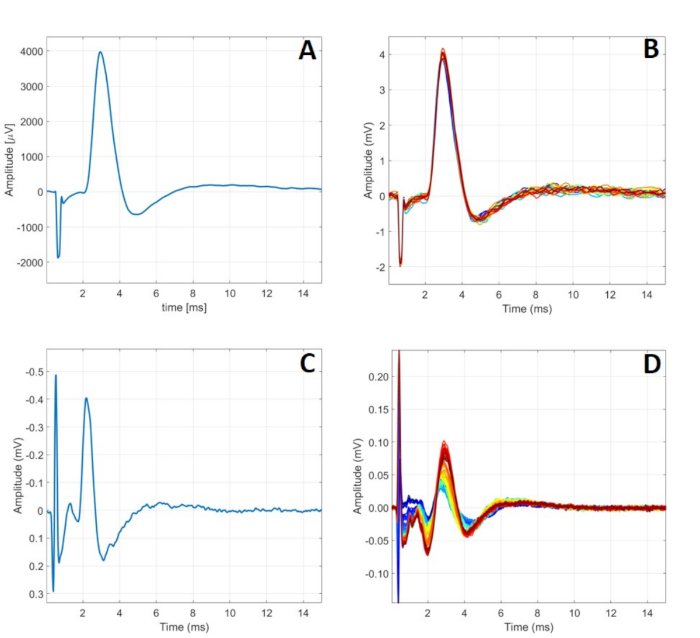
Figure 7: Typical C-RPNI electrophysiologic signaling. (A) A single CMAP signal recorded at the muscle component following a 5.00 mA signal applied to the CP nerve. (B) 24 CMAPs generated by 5.00 mA stimulation at the nerve. (C) A single CSNAP signal recorded from the proximal CP nerve following dermal component stimulation at 900 µA. (D) A series of CSNAPs recorded from the proximal CP nerve following increasing stimulation at the dermal component from 500 µA to 1000 µA. Please click here to view a larger version of this figure.

Figure 8
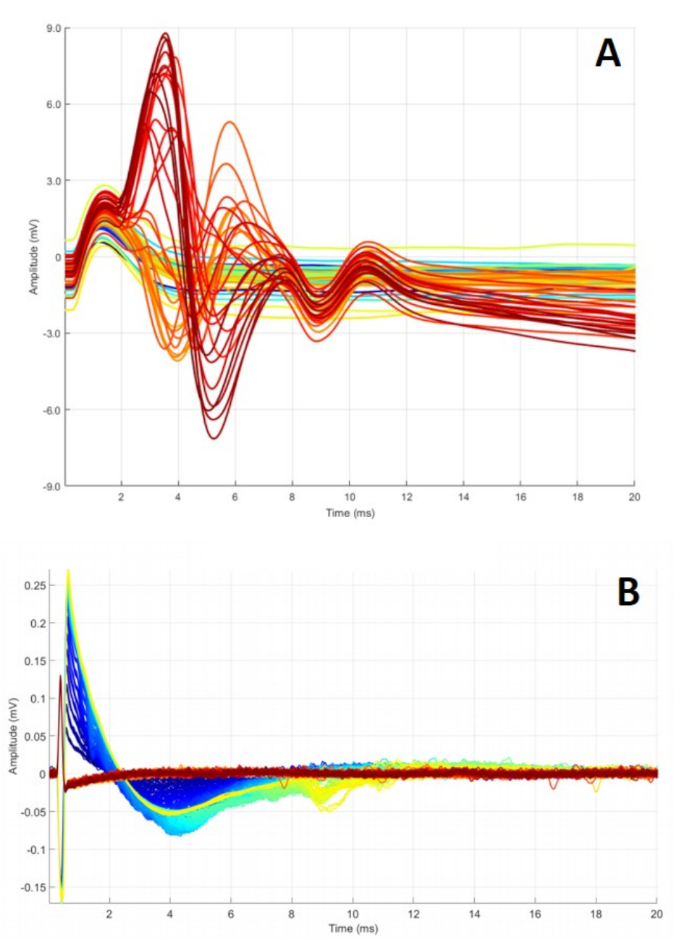
Figure 8: Abnormal C-RPNI signaling. (A) A series of CMAPs obtained while ramping CP nerve stimulation from 0.2 to 4 mA. Waveforms peak at different points and fail to return to baseline, possibly indicating defective electrodes or inadequate overall construct function. (B) Summation of CSNAPs obtained while stimulating dermal component, ramping 0.1 to 5 mA. These findings can occur for a multitude of reasons, including malfunctioning electrode(s), dermal graft scarring, and/or nerve damage. Please click here to view a larger version of this figure.

3 Month Data CMAP Data (Stimulate CP nerve and record from muscle graft) CSNAP Data (Stimulate skin graft and record from CP nerve)
Rat ID Number Construct Weight (g) Stimulation Amplitude (mA) Conduction Velocity (m/s) V Peak-to-Peak (mV) Stimulation Amplitude (mA) Conduction Velocity (m/s) V Peak-to-Peak (µV)
4607 0.087 4.17 11.3 10.3 18 11.1 121
4608 0.15 1.65 11.1 17.1 7.7 6.5 136
4611 0.113 8.3 9.6 11.2 10 10 121
4613 0.116 3.18 10 9.6 1.44 8.3 134
4614 0.189 3 10.8 9.6 7.39 9 151
4616 0.122 5.2 9.4 14.9 1.8 9.1 100
4620 0.118 2.91 7.6 7.4 8.7 10 219
9 Month Data CMAP Data (Stimulate CP nerve and record from muscle graft) CSNAP Data (Stimulate skin graft and record from CP nerve)
Rat ID Number Construct Weight (g) Stimulation Amplitude (mA) Conduction Velocity (m/s) V Peak-to-Peak (mV) Stimulation Amplitude (mA) Conduction Velocity (m/s) V Peak-to-Peak (µV)
4687 0.238 1.35 9.6 18.2 0.99 11 181
4688 0.131 1.08 10 8.8 1.11 8 132
4689 0.26 1.26 9.6 21.8 1.9 8.6 237
4690 0.192 4.2 8.3 12.8 n/a n/a n/a
4691 0.213 1.38 10 18.6 6.6 8 153
4693 0.178 1.11 9.6 15.1 8.7 8.3 306

Table 1: Electrophysiologic testing of C-RPNIs at 3- and 9-months post-construction. To obtain CMAPs, a recording electrode was placed on the muscle with a stimulating electrode on the proximal common peroneal nerve. A series of stimulations increasing in amplitude was applied to the nerve until maximal CMAP values were obtained and results recorded. A similar methodology was applied to the dermal component but with the recording electrode placed on the nerve and stimulating electrode on the dermis. For the sensory evaluation of rat 4690 at 9 months, the dermal graft was found to be too scarred to allow for testing.

Video 1
Video 1: Muscle contraction within a C-RPNI. A pair of forceps can be seen to the left of the video gently squeezing the proximal common peroneal nerve. This results in contraction of the muscle component of a 3-month-old C-RPNI that is visible to the viewer. Please click here to view this video (Right click to download).

List of Materials

#15 Scalpel Aspen Surgical, Inc Ref 371115 Rib-Back Carbon Steel Surgical Blades (#15)
4-0 Chromic Suture Ethicon SKU# 1654G P-3 Reverse Cutting Needle
5-0 Chromic Suture Ethicon SKU# 687G P-3 Reverse Cutting Needle
6-0 Ethilon Suture Ethicon SKU# 697G P-1 Reverse Cutting Needle (Nylon suture)
8-0 Monofilament Suture AROSurgical T06A08N14-13 Black polyamide monofilament suture on a threaded tapered needle
Experimental Rats Envigo F344-NH-sd Rats are Fischer F344 Strain
Fluriso (Isofluorane) VetOne 13985-528-40 Inhalational Anesthetic
Micro Motor High Speed Drill with Stone Master Mechanic Model 151369 Handheld rotary tool; kit comes with multiple fine grit stones
Oxygen Cryogenic Gases UN1072 Standard medical grade oxygen canisters
Potassium Chloride APP Pharmaceuticals 63323-965-20 Injectable form, 2 mEq/mL
Povidone Iodine USP MediChoice 65517-0009-1 10% Topical Solution, can use one bottle for multiple surgical preps
Puralube Vet Opthalmic Ointment Dechra 17033-211-38 Corneal protective ointment for use during procedure
Rimadyl (Caprofen) Zoetis, Inc. NADA# 141-199 Injectable form, 50 mg/mL
Stereo Microscope Leica Model M60 User can adjust magnification to their preference
Surgical Instruments Fine Science Tools Various User can choose instruments according to personal preference or from what is currently available in their lab
Triple Antibiotic Ointment MediChoice 39892-0830-2 Ointment comes in sterile, disposable packets
VaporStick 3 Surgivet V7015 Anesthesia tower with space for isofluorane and oxygen canister
Webcol Alcohol Prep Coviden Ref 6818 Alcohol prep wipes; use a new wipe for each prep

Lab Prep

Recent advances in neuroprosthetics have enabled those living with extremity loss to reproduce many functions native to the absent extremity, and this is often accomplished through integration with the peripheral nervous system. Unfortunately, methods currently employed are often associated with significant tissue damage which prevents prolonged use. Additionally, these devices often lack any meaningful degree of sensory feedback as their complex construction dampens any vibrations or other sensations a user may have previously depended on when using more simple prosthetics. The composite regenerative peripheral nerve interface (C-RPNI) was developed as a stable, biologic construct with the ability to amplify efferent motor nerve signals while providing simultaneous afferent sensory feedback. The C-RPNI consists of a segment of free dermal and muscle graft secured around a target mixed sensorimotor nerve, with preferential motor nerve reinnervation of the muscle graft and sensory nerve reinnervation of the dermal graft. In rats, this construct has demonstrated the generation of compound muscle action potentials (CMAPs), amplifying the target nerve's signal from the micro- to milli-volt level, with signal to noise ratios averaging approximately 30-50. Stimulation of the dermal component of the construct generates compound sensory nerve action potentials (CSNAPs) at the proximal nerve. As such, this construct has promising future utility towards the realization of the ideal, intuitive prosthetic.

Recent advances in neuroprosthetics have enabled those living with extremity loss to reproduce many functions native to the absent extremity, and this is often accomplished through integration with the peripheral nervous system. Unfortunately, methods currently employed are often associated with significant tissue damage which prevents prolonged use. Additionally, these devices often lack any meaningful degree of sensory feedback as their complex construction dampens any vibrations or other sensations a user may have previously depended on when using more simple prosthetics. The composite regenerative peripheral nerve interface (C-RPNI) was developed as a stable, biologic construct with the ability to amplify efferent motor nerve signals while providing simultaneous afferent sensory feedback. The C-RPNI consists of a segment of free dermal and muscle graft secured around a target mixed sensorimotor nerve, with preferential motor nerve reinnervation of the muscle graft and sensory nerve reinnervation of the dermal graft. In rats, this construct has demonstrated the generation of compound muscle action potentials (CMAPs), amplifying the target nerve's signal from the micro- to milli-volt level, with signal to noise ratios averaging approximately 30-50. Stimulation of the dermal component of the construct generates compound sensory nerve action potentials (CSNAPs) at the proximal nerve. As such, this construct has promising future utility towards the realization of the ideal, intuitive prosthetic.

Procedure

Recent advances in neuroprosthetics have enabled those living with extremity loss to reproduce many functions native to the absent extremity, and this is often accomplished through integration with the peripheral nervous system. Unfortunately, methods currently employed are often associated with significant tissue damage which prevents prolonged use. Additionally, these devices often lack any meaningful degree of sensory feedback as their complex construction dampens any vibrations or other sensations a user may have previously depended on when using more simple prosthetics. The composite regenerative peripheral nerve interface (C-RPNI) was developed as a stable, biologic construct with the ability to amplify efferent motor nerve signals while providing simultaneous afferent sensory feedback. The C-RPNI consists of a segment of free dermal and muscle graft secured around a target mixed sensorimotor nerve, with preferential motor nerve reinnervation of the muscle graft and sensory nerve reinnervation of the dermal graft. In rats, this construct has demonstrated the generation of compound muscle action potentials (CMAPs), amplifying the target nerve's signal from the micro- to milli-volt level, with signal to noise ratios averaging approximately 30-50. Stimulation of the dermal component of the construct generates compound sensory nerve action potentials (CSNAPs) at the proximal nerve. As such, this construct has promising future utility towards the realization of the ideal, intuitive prosthetic.

Tags