Science Education
>

High Throughput Microinjections of Sea Urchin Zygotes

Instructor Prep
concepts
Student Protocol
JoVE Journal
Biology
A subscription to JoVE is required to view this content.  Sign in or start your free trial.
JoVE Journal Biology
High Throughput Microinjections of Sea Urchin Zygotes

1. Preparation of Protamine Sulfate (PS) Coated Dishes

  1. Prepare 1% solution of protamine sulfate (PS) by adding 0.5 g of PS to 50 ml of deionized, distilled water (ddH2O) in a 50 ml conical tube. Shake well at high speed on a bench shaker at room temperature for 1-2 hr to ensure complete dissolution of PS. This solution can be stored at 4 °C for at least 3 months (make sure to completely dissolve gel-like precipitate before each use)3.
  2. Take a sleeve of 60 mm x 15 mm polystyrene Petri dishes and lay out both lids and bottoms on the bench.
  3. Pour 1% PS solution in each dish (both bottoms and lids can be used) just enough to cover the surface, leave for at least 2 min. The leftover PS solution can be reused many times within 3 months when stored at 4 °C.
  4. Place PS-treated dishes in a beaker filled with distilled water (dH2O). Leave the beaker under running dH2O for at least 10 min.
  5. PS-coated dishes can be used immediately or air dry for storage. Cover them to prevent dust accumulation. They can be stored at room temperature for 1 month3.

2. Obtain Sea Urchin Gametes and Immobilize the Eggs on a PS-coated Dish for Microinjection

  1. Spawn sea urchins by shaking or intracoelomic injection of up to 1 ml of 0.5 % KCl to induce contraction of smooth muscles to release gametes3 (Figure 2).
  2. If the animal is a male, as indicated by the white color sperm, collect sperm dry from the surface of an animal into a 1.5 ml tube. Dry sperm can be stored at 4 °C for a week without significant loss of biological function.
  3. If the animal is a female, as indicated by the yellow color due to the egg yolk content, collect its gametes by immersing the gonopores in a beaker full of sea water. The eggs will be released from gonopores and settle down by gravity.
  4. Filter the eggs from debris such as animal spines using 80 μm Nylon filter mesh. The best results are achieved if the eggs are used within 5-7 hr after spawning.
  5. Dejelly the eggs:
    1. Prepare 100 ml of acidic sea water for approximately 1 ml of egg. Use 0.5 M citric acid to adjust pH of sea water from pH 8.0 to 5.1-5.2. Too low of a pH will decrease fertilization and too high of a pH will not allow eggs to attach to the PS coated plates.
    2. Add eggs (not more than 1 ml) to acidic sea water and allow the eggs to settle down on ice for 10 min. Alternatively, the removal of the jelly coat can be facilitated by gentle swirling of the eggs during the treatment. One can effectively dejelly S. purpuratus eggs in 3-4 min this way.
    3. Carefully pour off acidic sea water, add fresh sea water and let the eggs settle down on ice again. Dejellied eggs can be stored on ice for up to 6 hr without fertilization problems

3. Row the Eggs

  1. Prepare 1 M stock solution of 3-aminotriazole (3-AT, MW = 84.08) by dissolving 0.84 g of 3-AT in 10 ml of ddH2O. This solution can be stored at 4 °C for up to 6 months.
  2. Prepare 1 mM working solution of 3-AT by adding 50 μl of 1 M stock solution to 50 ml of prechilled sea water. Keep the solution on ice.
  3. Prepare mouth pipette (Figure 3) for gentle handling of the eggs:
    1. Pipette tip is manually pulled from glass micropipettes (100 x OD 1.09 mm). Hold the micropipette with both hands over the open flame. As the glass begins to melt, carefully pull the ends of the pipette in opposing directions.
    2. Connect one pulled pipette to a plastic tubing (ID 1.14 mm), seal tight with Parafilm. The length of the tubing should be approximately 50-70 cm.
    3. Insert a sterile filtered P20 or P200 tip at the end of the tube opposite to the glass tubing to be used as the mouth piece.
    4. Clip the end of the glass micropipette with scissors to adjust the diameter of the tip. The optimal diameter slightly exceeds the diameter of the egg (80 μm).
  4. Pour   4 ml of 1 mM 3-AT sea water into each PS-coated dish (bottom or lid).
  5. Take the mouth pipette, put the P20/P200 tip in the mouth and secure it with the teeth. To aspirate eggs, first aspirate a small amount of sea water. By having a column of liquid prior to loading the eggs, one will have maximal control over the mouth pipetting technique.
  6. Position the micropipette tip near the eggs and gently aspirate in several hundreds of eggs in the pipette. Confine the eggs within the glass micropipette.
  7. Row dejellied eggs in a straight line on a dish by gently blowing them out of the mouth pipette while moving the tip in a straight line. Row the eggs right before the injections, because fertilization problems may occur due to prolonged exposure to 3-AT sea water3. Moreover, cationic adhesives like PS can be toxic to eggs, and it is not advisable to expose embryos to these reagents for long periods, especially if the fertilization envelopes have been removed.
  8. Make a scratch on the dish near the line of rowed eggs using a glass pipette. This scratch will be important to break the injection needle to adjust the flow of solution as needed. Alternatively, the scratch can be made before pouring 3-AT sea water to the dish.

4. Microinjection of the Sea Urchin Zygotes

  1. Turn on microinjection station. Here we describe the use of FemtoJet injection system.
  2. Pull injection capillaries using a needle puller. An example of a good needle is depicted in Figure 4. Note: For RNA injections, injection capillaries should be pretreated to avoid RNAase contamination31:
    1. Place injection capillaries into 50 ml conical tubes and add 50 ml of filtered methanol/HCl (9:1). Shake well and leave overnight for no longer than 10 hr.
    2. Pour off the methanol/HCl and rinse the capillaries 2x with filtered methanol in the same tube.
    3. Drain methanol as much as possible and lyophilize the capillaries overnight to ensure complete removal of methanol.
  3. Carefully mount the needle capillary on a needle loading holder and load it with <0.5 μl of a sample solution using microloader tips. Sample solutions usually contain 20% glycerol, depending on the injected material3.
  4. Place the dish with rowed eggs on the microscope stage (eggs should be aligned vertically when viewed through eyepieces) and focus on the eggs.
  5. Carefully mount the loaded needle onto the needle microinjecting holder and adjust the position of the needle to have a perfectly focused tip in the middle of the field.
  6. Depress the button to apply the maximum pressure for needle cleaning. Solution should come out of the needle. Adjust the pressure if necessary: injection pressure should be in the range of 90-360 hPa, with the compensation pressure at approximately 1/3 of the injection pressure.
  7. Adjust the solution flow by injecting into unfertilized egg. Using a joystick micromanipulator, direct the tip of the injection needle to the unfertilized egg. To facilitate needle entry, create a slight trembling by gentle tapping of the stage with a hard object such as a screw driver. An injection bolus forming inside the egg should be seen (Figure 5).
  8. If the injection bolus is not visible, slightly raise the tip of the needle above the eggs, locate the scratch on the dish and adjust it to be positioned in the middle of the field. Gently tap the needle tip to the scratch mark to break the tip of the injection needle. Adjust the injection and compensation pressures to ensure that the injection bolus does not exceed 1/5 of the diameter of the egg (1-2 pm).
  9. Once the injection bolus is calibrated, fertilize the eggs by adding diluted sperm (1:1,000) or 1-2 μl of sperm. Mix well carefully to prevent dislodging the row of eggs.
  10. Start injections immediately after the fertilization envelope becomes visible (Figure 5). Move along the line of rowed eggs using the stage controller and inject as many zygotes as possible by poking them with the needle controlled by joystick micromanipulator.
  11. After 10-15 min, the newly fertilized eggs will become hardened and cannot be injected any longer. Remove the dish from the stage and carefully aspirate out sperm in 3-AT sea water using a plastic Pasteur pipette.
  12. Do not let the zygotes dry. Quickly add fresh prechilled sea water to cover the dish. Incubate the embryos at 15 °C.

High Throughput Microinjections of Sea Urchin Zygotes

Learning Objectives

GFP and mCherry reporter constructs were in vitro transcribed and microinjected into the newly fertilized eggs. Embryos were incubated at 15 °C for 24 hr (until the blastula stage) and imaged using Zeiss Observer Z1 microscope. Injection of reporter constructs did not lead to any developmental defects (Figure 6). For quantification of fluorescent signals, image acquisition was performed at low magnification (100X) to maximally capture fluorescent pixels (Figures 6D-F). Fluorescent signals were quantified using Axiovision 4.8.2.0. The standard errors for the intensity of fluorescent signals within the population of 100-200 blastulae did not exceed 1.5% (data not shown).

Figure 1
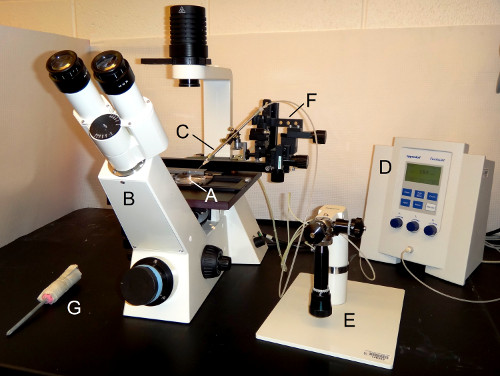
Figure 1. The microinjection setup. (A) A PS-coated dish with immobilized eggs is located on the stage of (B) an inverted microscope. Microinjection needle is attached to (C) a needle holder which is connected to a (D) pressure unit. Movement in the x-, y-, and z-dimensions is directed with using (E) the micromanipulator or (F) the coarse manipulator. (G) A screw driver wrapped with paper towels is used to gently tap the microscope stage to induce slight trembling to facilitate needle entry into the newly fertilized egg.

Figure 2
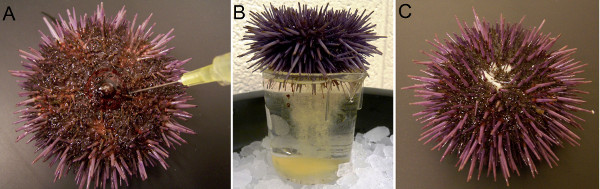
Figure 2. Spawning of the sea urchins. (A) Sea urchin is induced to shed by intracoelomic injection of 0.5% KCl. The needle points to the peristomial membrane surrounding the mouth of the animal, the only soft part of the animal. (B) Female sea urchin is placed with its gonapores immersed in the sea water in a plastic beaker to collect yellow eggs. (C) White sperm is released from gonapores of the male sea urchin.

Figure 3
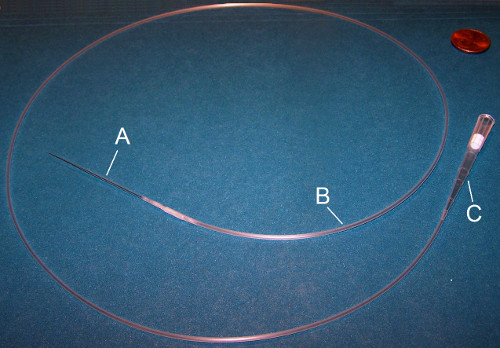
Figure 3. Mouth pipette. A mouth pipette consists of three parts: (A) Glass micropipette needle, (B) plastic tubing, and (C) a sterile filtered P20 or P200 tip. The glass micropipette is inserted into the plastic tubing which is connected to the P20 or P200 mouth piece.

Figure 4
Figure 4. Microinjection needle. (A) The microinjection needle is pulled using a needle puller with a specific setting. The setting of the needle puller needs to be empirically determined. Using a Narishege PC-10 needle puller, we use 72.8 °C for heat setting 1 and 83.7 °C for heat setting 2. Using the scratch on the plate we break the tip of the needle to facilitate solution flow. (B) The good needle should have a length of 500-600 μm from a width of 50 μm at the shoulder to 5 μm at the tip.

Figure 5
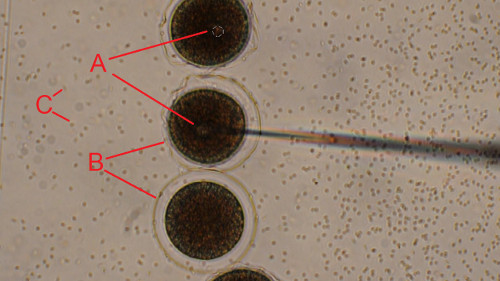
Figure 5. Injection of the newly fertilized sea urchin eggs. Dejellied eggs were rowed on a PS-coated dish and fertilized. Newly fertilized eggs were injected one by one while moving the microscope stage along the line of zygotes (from top to bottom). (A) Injection bolus is clearly seen to be forming inside the newly fertilized egg at the tip of the needle. (B) Transparent fertilization envelope is formed upon fertilization. (C) Sperm appear as small black dots in the background. Scale bar is 50 μm. Click here to view larger image.

Figure 6
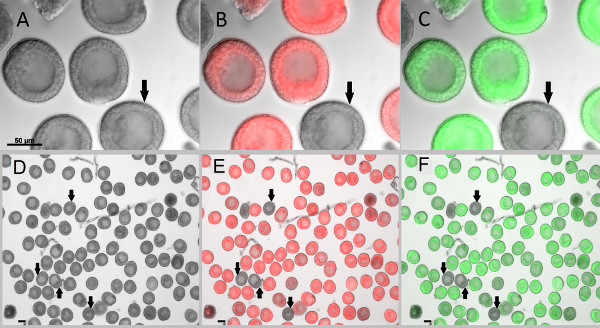
Figure 6. Microinjected zygotes developed into blastulae without developmental or morphological defects. Newly fertilized eggs were injected with fluorescent markers which allow them to be clearly distinguished from the uninjected embryos (shown by arrows). (A-C) Embryos imaged at 400X magnification. (D-F) Embryos are imaged at 100X magnification to capture most of the emitted fluorescence signals for reliable quantification. After 24 hr post fertilization, blastulae were collected and treated with 2x sea water for 2 min to immobilize the swimming embryos3, followed by 1x sea water wash. Images were acquired with Zeiss Observer Z1 microscope and AxioCam monochromic camera. (A,D) DIC images of the blastulae. (B,E) Overlay images of embryos injected with in vitro transcribed mCherry in fluorescence and DIC channels. (C,F) Overlay images of embryos injected with in vitro transcribed GFP in fluorescence and DIC channels. Scale bar is 50 μm. Click here to view larger image.

List of Materials

Glass pasteur pipettes VWR 14673-043
Inverted microscope Axiovert 40C Zeiss 4109431007990000 Injection microscope
Microloader tips Eppendorf 5242 956.003 Load injection solution
Nylon filter mesh 80 μm Amazon.com 03-80-37 Filter eggs to get rid of debris
P20 or P200 Aerosol Barrier Pipette Tips Fisher Scientific 02707432 or 02707430 Part of a mouth pipette
Parafilm Fisher Scientific 13 374 12 Part of a mouth pipette
Polyethylene tubing Intramedic PE-160 Part of a mouth pipette
Protamine sulfate MP Biomedicals, LLC 194729 Attach dejellied eggs to injection dishes
Sea urchins S. purpuratus Pt. Loma Marine Invertebrate Lab N/A
Sea water any pet store Instant Ocean
Sterile 60 mm x 15 mm Polystyrene Petri Dish Fisher Scientific 0875713A Injection dishes
Three-Axis Coarse Positioning Micromanipulator MMN-1 Narishige 9124 Manipulate injection needle
Three-Axis Joystick Type Oil Hydraulic Fine Micromanipulator MMO-202ND Narishige 9212 Manipulate injection needle
Transfer pipettes Fisher Scientific 13-711-9AM
Vertical needle puller Narishige PC-10 Pull injection needles

Lab Prep

Microinjection into cells and embryos is a common technique that is used to study a wide range of biological processes. In this method a small amount of treatment solution is loaded into a microinjection needle that is used to physically inject individual immobilized cells or embryos. Despite the need for initial training to perform this procedure for high-throughput delivery, microinjection offers maximum efficiency and reproducible delivery of a wide variety of treatment solutions (including complex mixtures of samples) into cells, eggs or embryos. Applications to microinjections include delivery of DNA constructs, mRNAs, recombinant proteins, gain of function, and loss of function reagents. Fluorescent or colorimetric dye is added to the injected solution to enable instant visualization of efficient delivery as well as a tool for reliable normalization of the amount of the delivered solution. The described method enables microinjection of 100-400 sea urchin zygotes within 10-15 min.

Microinjection into cells and embryos is a common technique that is used to study a wide range of biological processes. In this method a small amount of treatment solution is loaded into a microinjection needle that is used to physically inject individual immobilized cells or embryos. Despite the need for initial training to perform this procedure for high-throughput delivery, microinjection offers maximum efficiency and reproducible delivery of a wide variety of treatment solutions (including complex mixtures of samples) into cells, eggs or embryos. Applications to microinjections include delivery of DNA constructs, mRNAs, recombinant proteins, gain of function, and loss of function reagents. Fluorescent or colorimetric dye is added to the injected solution to enable instant visualization of efficient delivery as well as a tool for reliable normalization of the amount of the delivered solution. The described method enables microinjection of 100-400 sea urchin zygotes within 10-15 min.

Procedure

Microinjection into cells and embryos is a common technique that is used to study a wide range of biological processes. In this method a small amount of treatment solution is loaded into a microinjection needle that is used to physically inject individual immobilized cells or embryos. Despite the need for initial training to perform this procedure for high-throughput delivery, microinjection offers maximum efficiency and reproducible delivery of a wide variety of treatment solutions (including complex mixtures of samples) into cells, eggs or embryos. Applications to microinjections include delivery of DNA constructs, mRNAs, recombinant proteins, gain of function, and loss of function reagents. Fluorescent or colorimetric dye is added to the injected solution to enable instant visualization of efficient delivery as well as a tool for reliable normalization of the amount of the delivered solution. The described method enables microinjection of 100-400 sea urchin zygotes within 10-15 min.

Tags