1. Material Preparation
- Preparation of FEP tubes
- Clean the FEP tube (Figure 2A) by flushing liquids (in the steps noted below) through the tube and using a syringe attached with a blunt end cannula (Figure 2B). Note 1: Use gloves throughout the procedure. Note 2: We recommend cutting the tube in pieces of ca. 1 m in length and cleaning those in parallel.
- First flush the tube with 1 M NaOH repeatedly. Then transfer the tube to a 50 ml centrifuge tube filled with 0.5 M NaOH and ultrasonicate it for 10 min.
- Transfer the polymer tube to a small basin with ddH2O. Flush the tube first with ddH2O and then with 70% EtOH.
- Subsequently transfer the FEP tube to a fresh centrifuge tube with 70% EtOH. Again ultrasonicate this centrifuge tube for 10 min.
- Cut the cleaned FEP tube into pieces of about 3 cm (a typical length for use in zebrafish mounting and imaging) and straighten them if necessary. Store the cleaned FEP tubes in a fresh 50 ml centrifuge tube filled with ddH2O (Figure 2C).
- Clean the FEP tube (Figure 2A) by flushing liquids (in the steps noted below) through the tube and using a syringe attached with a blunt end cannula (Figure 2B). Note 1: Use gloves throughout the procedure. Note 2: We recommend cutting the tube in pieces of ca. 1 m in length and cleaning those in parallel.
- Preparation of Tricaine stock solution
- Prepare 0.4% Tricaine stock solution by dissolving 400 mg Tricaine (MS-222) in 97.9 ml ddH2O. After the powder has completely dissolved, adjust the pH to 7.0 using 2.1 ml 1M Tris (pH 9.0). Protect the solution from light. Store aliquots at -20 °C.
- Preparation of 3% methylcellulose
- Prepare 3% methylcellulose solution for the inner coating of the FEP tubes as described below. Heat up E311 in a glass bottle to approximately 60-70 °C and add the appropriate amount of methylcellulose powder. Add a stirring bar and stir at 4 °C. As soon as the solution is cooled down to below 30 °C, add Tricaine solution to a final concentration of 100 mg/L. Keep stirring at 4 °C overnight.
- Preparation of 1.5% and 0.1% agarose in E3
- Dissolve the appropriate amount of low melting point agarose powder in a defined volume of E3 in a glass flask. Heat up the mixture in a microwave and shake it once in a while, until the agarose solution appears homogeneous, without any remaining crystals.
- Prepare 1 ml aliquots of 0.1% agarose solution in 1.5 ml reaction tubes. The aliquots can be stored at 4 °C.
- Use the 1.5% solution to coat a plastic Petri dish. The thickness of the agarose layer should be ca. 2 mm. After the agarose is solidified, add E3 medium on top of the layer to prevent it from drying. The coated dish can be stored at 4 °C.
- Preparation of zebrafish
- Keep Zebrafish (Danio rerio) adults and embryos at 28.5 °C and handle them according to the established protocols11,12.
- Set up male and female fish in the afternoon and separate them using a divider. Remove the divider the following morning to time the mating of the fish.
- Collect the embryos in a dish filled with E3 and examine them using a stereomicroscope.
- At 24 hpf (or the developmental stage of your interest), select the zebrafish embryo for fluorescence expression and transfer the positive ones to a new dish with fresh E3.
- Carefully dechorionate the embryos using two sharp forceps (Figures 2D and 2E). Use the first forceps to grab and hold the chorion and the second forceps to tear it open and pull it off. Note 1: Perform this step with the help of a stereomicroscope.
2. Multilayer Mounting
- Coating the FEP tube
- Attach a blunt end cannula to a syringe. Insert the cannula carefully for about 3 mm into one end of a cleaned and cut piece of FEP tube (Figures 2F and 2G). Note 1: Use gloves and avoid any bending or squeezing of the tube.
- Dip the free end of the FEP tube into 3% methylcellulose and fill the tube with the solution.
- Slowly release the methylcellulose by pushing on the syringe. Discard the solution.
- Repeat steps 2.1.2 and 2.1.3 using E3. Note 1: The coated tubes need to be used for mounting immediately.
- Transferring the zebrafish to the agarose
- Heat up one aliquot of 0.1% agarose to 70°C in a heat block. Vortex the reaction tube briefly and transfer it to a heat block set to 38 °C (Figure 2H).
- Take the reaction tube out from the heat block and let it cool down briefly. Add Tricaine to a final concentration of 133-200 mg/L and vortex again (Figure 2I).
- Select one of the dechorionated zebrafish embryos and transfer it to the reaction tube with the preheated 0.1% agarose using a glass Pasteur pipette (Figures 2J and 2K). Note 1: Try to transfer as little additional E3 as possible.
- Mounting the zebrafish
- Take up the embryo with the syringe-attached FEP tube (Figure 2L). The tube should be filled completely with 0.1% agarose , with the embryo positioned close to either end of the tube and with the head pointing towards the opening of the tube. Note 1: Make sure to take up some agarose before taking up the fish. Note 2: Pull very gently on the syringe to avoid bubbles. Note 3: Keep the tube in a horizontal orientation to avoid leakage of its content (Figures 2M and 2N).
- Plugging the tube
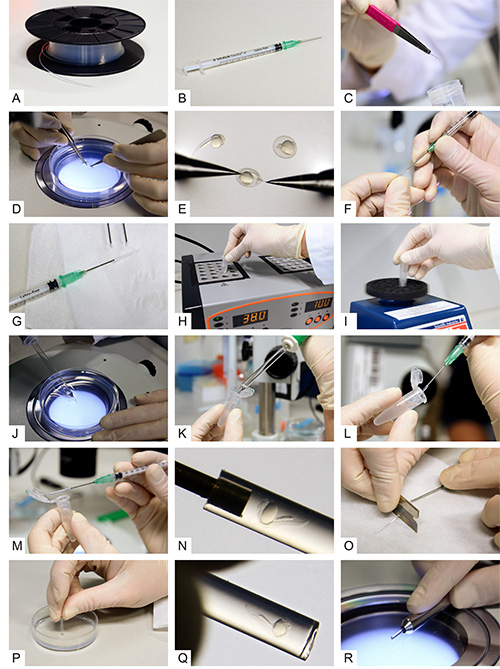
Figure 2. Multilayer mounting for zebrafish embryos. A) Fluorinated Ethylene Propylene (FEP) tubes on a cable drum before preparation. B) A syringe with a blunt end cannula attached. C) A cleaned and cut FEP tube. D, E) Dechorionation of 24 hpf zebrafish embryos. F) Attaching the tube to the blunt end cannula. G) The syringe with cannula and tube attached. H) An aliquot of 0.1% agarose inside a reaction tube while transferring it to a heat block. I) Vortexing of the melted agarose. J) Uptake of a dechorionated embryo using a glass pipette. K) Transfer of the embryo into the melted agarose. L) Intake of the embryo with surrounding agarose into the FEP tube. M, N) The zebrafish embryo inside the FEP tube. O) Cutting the tube between specimen and cannula. P) Plugging the tube by the use of an agarose-coated dish. Q) The embryo inside the plugged tube. R) The final sample preparation in a metal holder. Click here to view larger image.
- Use a razor blade to cut the tube off the cannula (Figure 2O).
- Slowly stick the end of the tube containing the fish through the entire layer of 1.5% agarose in the plastic dish to plug the tube (Figure 2P). Note 1: Avoid the formation of bubbles and try to obtain a straight plug surface by holding the tube exactly perpendicular to the agarose surface. Note 2: Rotate the tube slightly to obtain a nice plug.
- Keep the mounted specimen in a 1.5 ml reaction tube with E3 to avoid drying. The sample is now ready to be imaged. Before imaging, check whether the fish is sitting right on top of the plug (Figures 2Q and 2R). Make sure to also add Tricaine to the medium inside the imaging chamber at the same concentration as in the mounting medium.
Multiday Imaging of Zebrafish Vasculature Development
We use 1 dpf Tg(kdrl:GFP)13 zebrafish to demonstrate the advantages of the multilayer mounting strategy for long-term light sheet microscopy. The aim is to image the development of the vasculature in the entire zebrafish over a course of 2 days. The zebrafish embryo was mounted in 0.1% agarose inside a methylcellulose coated polymer tube. Here, the zebrafish is not restricted by the mounting medium and can develop normally. Its head raises, the tail extends and vascular sprouting appears unhindered (Figure 3).
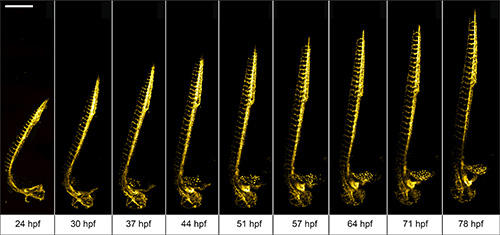
Figure 3. Multiday imaging of zebrafish vasculature development. The vasculature of a multilayer mounted 1 dpf Tg(kdrl:GFP) 13 zebrafish develops unhindered in a light sheet microscope over the course of two days. A 488 nm laser light sheet excited the fluorescence and the signal was detected using 10X/0.3 W objective and an EMCCD camera. Z-stacks were acquired on four adjacent positions every 10 min and subsequently stitched with Fiji 15. Maximum intensity projections of a subset of time-points are shown. Scale bar: 500 μm. Click here to view larger image.
Imaging of Early Zebrafish Embryogenesis
Here, we demonstrate the capability of FEP tubes as a mounting support for light sheet microscopy of early zebrafish embryogenesis during the first day after fertilization. The 8 hpf Tg(H2A:GFP)14 zebrafish embryo was mounted with its intact chorion inside an E3-filled tube with an inner diameter of 1 mm. That results in a slight clamping of the chorion. All developmental processes during embryogenesis are unaffected by the mounting and can be optimally visualized using light sheet microscopy. In this example, we imaged the specimen over a course of 12 hr (Figure 4). Typical shape changes during early embryogenesis, such as the increasing elongation of the yolk and thickening of tissue along the midline, would be oppressed when using the traditional mounting without chorion in 1.5% agarose.
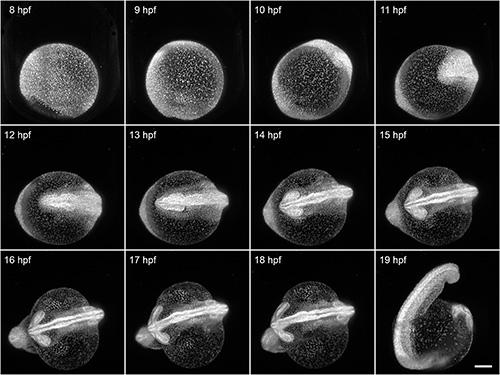
Figure 4. Imaging of early zebrafish embryogenesis. A Tg(H2A:GFP)14 zebrafish passes through early embryogenesis. A 488 nm laser light sheet excited GFP and the fluorescence signal was detected with a 10X/0.3 W objective and an EMCCD camera. Z-stacks from two angles were acquired every 3 min over a course of 12 hr. Normalized maximum intensity projections of a subset of the time-lapse are shown. Visible motion blur at 19 hpf results from the embryo twitching during acquisition, as no anesthetic were used. Scale bar: 150 μm. Click here to view larger image.