Science Education
>

Biomechanical Characterization of Human Soft Tissues Using Indentation and Tensile Testing

Instructor Prep
concepts
Student Protocol
JoVE Journal
Bioengineering
This content is Free Access.
JoVE Journal Bioengineering
Biomechanical Characterization of Human Soft Tissues Using Indentation and Tensile Testing

This protocol follows the ethical guidelines of our institution's human research ethical committee guidelines on the use, storage, and disposal of human tissue. Human tissue samples can be excised from cadaveric bodies that have been consented for research purposes with relevant ethical approvals. Samples can also be discarded tissue from consented patients undergoing surgical procedures, with relevant ethical approval.

1. Preparation of Skin

  1. Prepare specimens by manually dissecting off the adipose tissue and the thin layer of deep dermis using a scalpel blade and forceps. This step is important to ensure consistency between samples14.
  2. Cut the resulting sheet of split-thickness skin into a standardized sample size (e.g., 1 cm × 5 cm samples). Determine the specimen size based on the dimensions of the testing apparatus. If a tissue-engineered construct is also being tested, the specimen size should be appropriate for the material of interest14. Dispose of scalpel blades in the appropriate sharps bins.
  3. To enable completion of the mechanical calculations, measure the thickness of the skin being tested using electronic calipers before and after mechanical testing.

2. Tensile Testing

NOTE: All materials testing machines should be calibrated according to the manufacturer's guidelines prior to testing.

  1. Test skin samples in uniaxial tension using a materials testing machine (Figure 2A) at room temperature (22 °C)14.
  2. Orientate the skin samples in the same direction for all samples (e.g., perpendicular or in-line with Langer Lines (topological lines drawn on a map of the human body and referring to the natural orientation of collagen fibers in the dermis))14.
  3. Immobilize the sample between two clamps (a commercial jig), one affixed to a 98.07 N load cell and the other to an immovable base plate14. The resulting area between the clamps tested in uniaxial tension should be 1 cm x 4 cm (Figure 2).
    NOTE: A commercial jig was utilized to avoid non-uniform gripping and damage to the sample before testing. The sample is fixed to a "finger-tight" tightness.
  4. Cover the sample area (after placement in the apparatus) on both sides with petroleum jelly to prevent specimen desiccation.
  5. Program the tensile loading and relaxation testing regime into the software as a list of actions, as follows: Zero Load | Zero Position | Find Contact (Tensile loading) | Wait (Relaxation).
  6. Start the test with the software program. Load the sample under tension to 29.42 N at 1 mm/s. Use a rate and load that does not cause failure of the skin (e.g., 29.42 N at 1 mm/s).
  7. After the 29.42 N-load is reached, allow the tissue to relax for 1.5 h, a time-point at which there is minimal change in relaxation behavior, controlled by the computer software14.
    Note: The displacement is held constant during the relaxation phase, not the load.
  8. Calculate elastic and viscoelastic properties as per the analysis section guidelines. The mechanical properties investigated will represent the average properties of the split-thickness skin constituents (epidermis and dermis)14.
    Note: There is no defined tare load, as it is clear from the raw data when deformation is occurring and thus, only these data points are included.

3. Preparation of Cartilage

  1. Remove the skin and fascia from the cartilage specimen using a scalpel blade and forceps15,16.
  2. Divide the cartilage specimens into a standardized sample size (e.g., 1.5-cm blocks) using a scalpel blade and forceps. For all samples, use a semicircular-shaped indenter (Figure 2B) that has a diameter and thickness at least 8 times greater than the size of the cartilage sample. This ratio ensures that the indenter is not affected by any edge effects from specimen preparation15. Dispose of scalpel blades in the appropriate sharps bins.
  3. To enable completion of the mechanical calculations, measure the thickness of the cartilage to be loaded using electronic calipers before and after mechanical testing15,16.

4. Compressive Indentation Testing

  1. Compress the cartilage samples using a materials testing machine in a hydrated environment at room temperature. Cover the cartilage sample with phosphate-buffered saline (PBS) prior to and during compression testing to ensure that the sample is hydrated.
    NOTE: PBS does not exactly match the physiological environment, but it allows both the materials and the tissues to be compared equally15,16.
  2. Orientate the cartilage sample so the surface is perpendicular to the indenter. This allows the compression to be uniaxial and limits any shear loading15.
  3. Program the compressive loading and relaxation testing regime into the software as a list of actions, as follows: Zero Load | Zero Position | Find Contact (Compressive loading) | Wait (Relaxation).
  4. Start the test using the software program. Load the sample under compression to 2.94 N at 1 mm/s15,16.
    NOTE: This was determined to be a non-destructive load that is sensitive enough to identify both elastic and viscoelastic properties of cartilage15.
  5. After the 2.94-N limit is reached, allow the cartilage to relax for 15 min, a time-point at which there is minimal change in relaxation behavior, using the computer software15,16.
    NOTE: Figure 2C-D shows a typical set up for the compression and tensile testing of human tissue specimens. The same protocols can then be applied to synthetic biomaterials to match the biomechanical properties to the native tissue being analyzed. For example, Figure 2E-F demonstrates compression and tensile testing of human tissue closely matching a synthetic material's biomechanical properties.

5. Calculation of Young's Elastic Modulus for Indentation and Tensile Testing

  1. Collect the raw data including time (s), displacement (mm), and load (N) from the materials testing device14-16.
  2. Calculate the stress (MPa) and strain (%) using the formulas shown in Figure 3.
    NOTE: If a hemispherical indenter was used during compression testing, dividing the force by the cross-sectional area gives the nominal (average) stress, but not the peak stress.
  3. Use a linear scatter plot to plot the stress MPa (y-axis) against the strain (x-axis). Determine the linear curve fit. The linear curve fit is equal to y = mx + b with a respective R value.
    NOTE: All data points are included to achieve a minimum R value >0.98. The m value is the slope, which corresponds to the modulus of stress over strain, indicating compressive resistance or resistance to tension in MPa (i.e., Young's Modulus). If the R value is not >0.98, then the assumption of characterizing linear viscoelastic behavior is invalid.
  4. To identify the viscoelastic properties in which fluid flow from exposure to deformation has reached equilibrium, the ratio of stress over time over the last 200 s of mechanical testing and the final stress level at the end of the experiment are calculated.
    NOTE: With increasing time, the stress level will decrease (relax) as fluid flow reaches equilibrium17,18. A fast stress-relaxation response indicates that it is difficult to maintain high stresses within the sample17,18.

6. Relaxation Properties

  1. Plot stress in MPa (y-axis) against time in s (x-axis) on a linear scatter plot.
  2. Determine a linear curve fit to calculate the rate of relaxation. The linear curve fit is equal to y = mx + b with a respective value of the last 200 s. The m value is the rate of relaxation.
  3. Include all data points to obtain a minimum R value >0.98. The final stress (MPa) at 1.5 h for skin and 15 min for cartilage is the final absolute relaxation value.

Biomechanical Characterization of Human Soft Tissues Using Indentation and Tensile Testing

Learning Objectives

Figures 4 and 5 provide examples of data obtained via indentation and tensile testing. Figure 4 demonstrates typical values obtained after human cartilage indentation testing. Figure 4A is an example of a typical strain-versus-stress plot obtained after indentation testing. To obtain the Young's Modulus, all values are included until the line curve fit has a minimum R value of 0.98 (Figure 4B). The m value is the indicator of Young's Modulus in MPa; for example, in this data, the cartilage has a modulus of 1.76 MPa. Figure 4C shows a typical plot of stress against time to evaluate the relaxation properties of cartilage. The rate of relaxation is calculated from the last 200 s. Similarly, to obtain the rate of relaxation, the m value of a line curve fit in MPa is used. For example, in this data, the cartilage has a rate of relaxation of 8.78 x 10⁻⁶ MPa/s (Figure 4D). The absolute final level of relaxation is the final point of stress in MPa. For example, in this data set, the absolute final level of relaxation would be 0.028 MPa (Figure 4D).

Figure 5 shows how to evaluate the viscoelasticity of skin tissue after tensile testing. The analysis is carried out as per compression testing. Figure 5A demonstrates a typical strain-versus-stress plot obtained from the tensile testing protocol. To obtain the Young's Modulus in tension, all values are included until the line curve fit has a minimum R value of 0.98 (Figure 5B). The m value is the indicator of Young's Modulus in MPa; for example, in this data, the skin has a modulus of 0.62 MPa. Figure 5C shows a typical plot of stress against time to evaluate the relaxation properties of skin. The rate of relaxation is calculated from the last 200 s. Similarly, to obtain the rate of relaxation, the m value of a line curve fit in MPa is used. For example, in this data, the skin has a rate of relaxation of 3.1 x 10⁻⁵ MPa/s (Figure 5D). The absolute final level of relaxation is the final point of stress in MPa. For example, in this data set, the level would be 0.64 MPa (Figure 5D). The same analysis can then be utilized to analyze biomaterials under compression and tensile testing to match their biomechanical properties to native tissue.

Figure 1
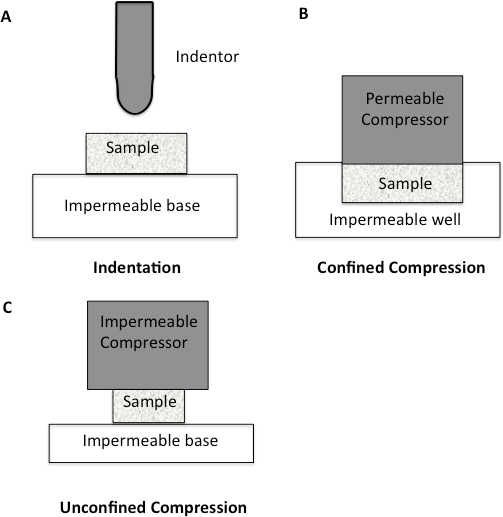
Figure 1: Schematic diagram to illustrate different compression methodologies. A. Indentation Testing. A load is applied to a small area of the cartilage using a non-porous indenter. B. Confined Compression. The cartilage specimen is placed in an impervious fluid-filled well. The cartilage is then loaded through a porous plate. Since the well is impervious, flow through the cartilage is only in the vertical direction. C. Unconfined Compression. The cartilage is loaded using a non-porous plate onto a non-porous chamber, forcing fluid flow to be predominantly radial.

Figure 2
Figure 2: Set-up of the mechanical testing machine. A. Illustration of the testing machine. B. Illustration of the indenter used for the compression testing analysis. C. Cartilage being analyzed using compression indentation testing. D. Skin tissue being analyzed under tensile testing. E. Tensile testing of a synthetic biomaterial. F. Compression testing of a synthetic biomaterial.

Figure 3
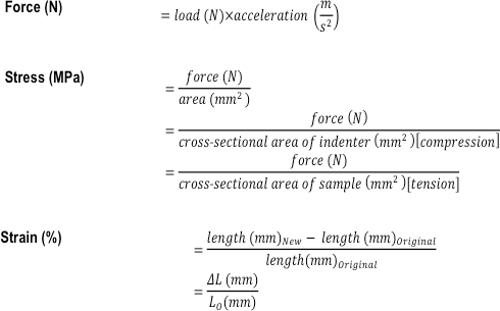
Figure 3: Formulas used to calculate the compressive and tensile mechanical properties of a tissue or tissue-engineered construct. The formulas used to calculate force (N), stress (MPa), and strain (%).

Figure 4
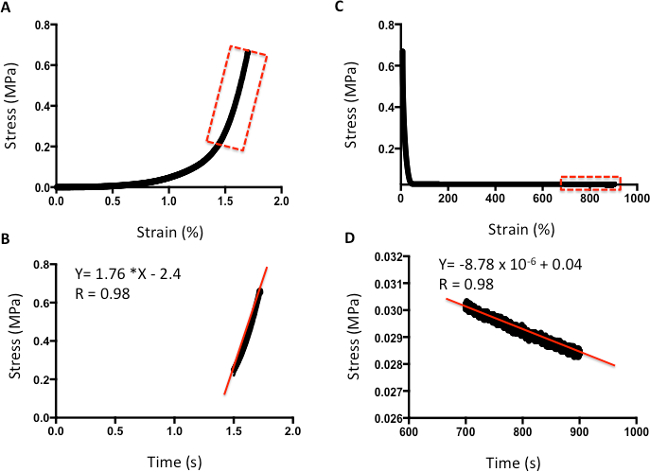
Figure 4: Example of compression analysis of human cartilage. A. Stress-versus-strain analysis. B. The m value of the line curve fit equation is the Young's Elastic Modulus in MPa. C. Stress-versus-time analysis to demonstrate relaxation properties. D. The m value of the line curve fit equation indicates the relaxation rate. The final absolute rate is the last point on the graph.

Figure 5
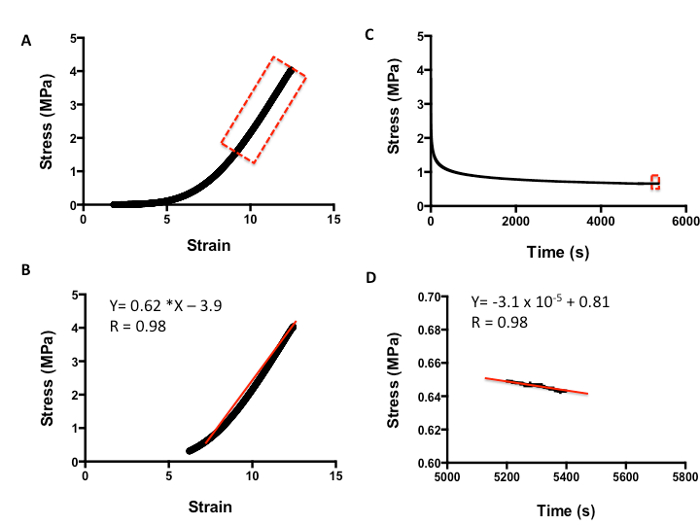
Figure 5: Example of tensile analysis of human skin. A. Stress-versus-strain analysis. B. The m value of the line curve fit equation is the Young's Elastic Modulus in MPa. C. Stress-versus-time analysis to demonstrate relaxation properties. D. The m value of the line curve fit equation equates to the relaxation rate. The final absolute rate is the last point on the graph.

List of Materials

Digitial Vernier Calipers Machine Mart 40218046 Digitial vernier caliper is used to measure sample thickness. 
Water Bath  Cole Parmer UY-12504-94 StableTemp Digital Water Bath Flask Holder used to defrost tissues samples if they are frozen. 
Mach-1 Material Testing Machine Biomomentum  V500c Mechanical Testing Machine used to test the mechancial properties of the tissues. 
Scalpel Blade  VWR 233-5335 Scalpel blades using to cut and dissect the tissues. 
Forceps  VWR 470007-554 Forceps used to dissect the tissues. 
Phosphate Buffered Saline (PBS) pH 7.2 Life Technologies  20012019 PBS is used to hydate the tissue samples 

Lab Prep

Regenerative medicine aims to engineer materials to replace or restore damaged or diseased organs. The mechanical properties of such materials should mimic the human tissues they are aiming to replace; to provide the required anatomical shape, the materials must be able to sustain the mechanical forces they will experience when implanted at the defect site. Although the mechanical properties of tissue-engineered scaffolds are of great importance, many human tissues that undergo restoration with engineered materials have not been fully biomechanically characterized. Several compressive and tensile protocols are reported for evaluating materials, but with large variability it is difficult to compare results between studies. Further complicating the studies is the often destructive nature of mechanical testing. Whilst an understanding of tissue failure is important, it is also important to have knowledge of the elastic and viscoelastic properties under more physiological loading conditions.

This report aims to provide a minimally destructive protocol to evaluate the compressive and tensile properties of human soft tissues. As examples of this technique, the tensile testing of skin and the compressive testing of cartilage are described. These protocols can also be directly applied to synthetic materials to ensure that the mechanical properties are similar to the native tissue. Protocols to assess the mechanical properties of human native tissue will allow a benchmark by which to create suitable tissue-engineered substitutes.

Procedure

Regenerative medicine aims to engineer materials to replace or restore damaged or diseased organs. The mechanical properties of such materials should mimic the human tissues they are aiming to replace; to provide the required anatomical shape, the materials must be able to sustain the mechanical forces they will experience when implanted at the defect site. Although the mechanical properties of tissue-engineered scaffolds are of great importance, many human tissues that undergo restoration with engineered materials have not been fully biomechanically characterized. Several compressive and tensile protocols are reported for evaluating materials, but with large variability it is difficult to compare results between studies. Further complicating the studies is the often destructive nature of mechanical testing. Whilst an understanding of tissue failure is important, it is also important to have knowledge of the elastic and viscoelastic properties under more physiological loading conditions.

This report aims to provide a minimally destructive protocol to evaluate the compressive and tensile properties of human soft tissues. As examples of this technique, the tensile testing of skin and the compressive testing of cartilage are described. These protocols can also be directly applied to synthetic materials to ensure that the mechanical properties are similar to the native tissue. Protocols to assess the mechanical properties of human native tissue will allow a benchmark by which to create suitable tissue-engineered substitutes.

Tags