Science Education
>

Rat Model of Widespread Cerebral Cortical Demyelination Induced by an Intracerebral Injection of Pro-Inflammatory Cytokines

Instructor Prep
concepts
Student Protocol
JoVE Journal
Neuroscience
This content is Free Access.
JoVE Journal Neuroscience
Rat Model of Widespread Cerebral Cortical Demyelination Induced by an Intracerebral Injection of Pro-Inflammatory Cytokines

All methods described here have been approved by local authorities (Bundesministerium für Wissenschaft und Forschung (Austrian Ministry of Science and Research); License Number: 66.010/0132-WF/V/3b/2014). The adult male DA rats (10 – 12 weeks of age) were housed in a 12/12 h light/dark cycle with free access to food and water.

1. Material Preparation
NOTE: The surgery is conducted under aseptic conditions. Prior to start, make sure that all surgical instruments including the drill bits are cleaned with an appropriate disinfectant.

  1. Prepare an anesthetic mixture: 0.02 mg/mL of fentanyl, 0.4 mg/mL of midazolam, and 0.2 mg/mL of medetomidine (final concentrations in the mixture).
    NOTE: See the respective Discussion section for alternative anesthetics.
  2. Prepare an antidote mixture: 0.07 mg/mL of flumazenil and 0.42 mg/mL of atipamezole (final concentrations in the mixture).
  3. Assemble the catheter and the catheter cap with the inlet and the screw. Cut the catheter to a length of 2 mm with a scalpel (Figure 1).
    NOTE: Do not use scissors for this, since they squeeze and distort the circular cross-sectional shape of the catheter tip.

2. Surgical Preparation

  1. Anesthetize the rat by an intraperitoneal (i.p.) administration of the anesthetic mixture (1.5 mL/kg of body weight).
  2. Shave the head of the rat between the ears using the electric shaver. Place a homeothermic blanket on the stereotactic frame before positioning the animal, to avoid hypothermia throughout the surgery.
  3. Immobilize the rat's head in the stereotactic frame using the ear bars and bite plate, ensuring that the head is horizontal and stable. Check the stability by applying pressure to the skull with finger or forceps.
    NOTE: A loose fixation and non-horizontal positioning within the stereotactic frame may cause a deviation from the intended coordinates.
  4. Apply lubricating eye drops to prevent cornea dryness during the surgery. Cover the eyes with an opaque material to prevent any surgical light exposure.
  5. Clean the shaven area by alternating the application of 70% ethanol and 10% povidone-iodine complex.
    NOTE: Follow all precautionary measures during surgery to the avoid infection. The surgery is conducted under aseptic conditions. If asepsis is broken, then the contaminated material has to be replaced.

3. Catheter Implantation

  1. Make a longitudinal incision of about 2 cm of length in the middle of the head skin. Use bulldog clamps to hold the skin off to the sides. For an overview of these steps, see Figure 2.
  2. Remove the blood using a cotton-tipped applicator.
  3. Remove the skull periosteum. Clean the tissue with the cotton-tip applicator and expose the skull bone. Allow the skull to dry for about 1 min.
  4. Identify the anatomical landmarks, Lambda, Bregma, and medial suture. With the drill installed on the stereotactic frame, position the drill tip at the Bregma as the starting point. Move 2 mm posterior from the Bregma and move ~2.4 mm laterally to the medial suture.
  5. Drill a 0.5 mm diameter hole for the catheter at this position. Gently puff away any bone dust.
    NOTE: It is important that the dura mater remains intact during the drilling. To ensure this, 1) use a drill that can be installed on the stereotactic frame, 2) inspect the hole frequently during the drilling, and 3) drill down in small steps-if too much pressure is applied to the skull, the drill tip will continue into, and damage the brain when the skull is fully penetrated.
  6. Drill 3 further holes (~1.3 mm in diameter) for the anchor screws a few millimeters away from the first hole. Gently blow bone dust away.
    NOTE: Select anchor screw locations that provide enough space for the catheter top (~2 mm in diameter) and the anchor screw tops (~1 mm).
  7. Remove the bone dust by irrigation with around 1 – 2 mL of sterile phosphate-buffered saline (PBS) or physiological saline using a syringe. Clean the skull. Tighten the anchor screws by 2 – 3 full turns.
    NOTE: The anchor screws are necessary to stabilize the set-up by holding the dental cement, and, thereby, the catheter, in place. Whilst tightening an anchor screw, ensure that it is not easily removable by gently lifting it upwards with forceps. Since the implantation of the catheter itself causes tissue trauma, additional dura injury whilst drilling for, or tightening the anchor screws will lead to multiple traumatic injuries, and possibly hamper the comparability within a group. Tighten the anchor screws first and insert the catheter last.
  8. Insert the 2-mm length catheter through the first hole, perpendicular to the skull surface. While still holding the catheter in, apply a little dental cement and let it polymerize with a brief (~5 s) exposure to the dental curing light to stabilize the catheter, allowing the use of both hands in the next step.
    CAUTION: While working with a dental curing light, avoid looking directly at the tip, or at the light reflected from the application area, as the high intensity of this light can cause retinal damage. Use appropriate protective goggles.
  9. Apply more dental cement around the catheter, anchor the screws, and solidify the dental cement with the dental curing light (~15 – 30 s). Confirm the hardening of the cement with the tip of a forceps.

4. Closing of the Wound and Antagonization of Anesthesia

  1. Close the head skin with resorbable sutures, anterior and posterior to the catheter.
    NOTE: Since there will be a bumpy set-up over the skull at the end of the implantation, do the wound closure accordingly. Lifting up the skin too much will result in discomfort for the animal.
  2. Inject the antidote mixture subcutaneously (1.5 mL/kg of body weight) using a 1 mL syringe with a 26 G needle.
  3. Administer enrofloxacin   (2.5%) by subcutaneous injection (7.5 mg/kg body weight) for prophylactic antibiotic treatment. Administer carprofen (1 mg/mL; 5 mg/kg body weight) and buprenorphine (1.2 mg/kg) for pain relief by subcutaneous injection.

5. Post-operative Care and Medication

  1. Return the animal to the modified cage and keep it under observation for 1 – 3 h, with an application of infrared light to avoid hypothermia. Constantly observe and reposition the animal every 5 to 10 minutes until post-operative recovery. Take special care to avoid constant light exposure to the eyes till recovery.
  2. Repeat enrofloxacin (7.5 mg/kg body weight) and carprofen (1 mg/mL; 5mg/kg body weight) administrations by subcutaneous injections the day after surgery. Buprenorphine is not necessary to be refreshed as the previous treatment is effective for 72 hours.

6. Preparation of Immunization Mixture (at the Earliest 14 Days after Catheter Implantation)

Note: Place the syringes on ice during the preparation procedure.

  1. Connect two 10 mL Luer lock tip glass syringes to the short arms of a 3-way stopcock and close the third outlet with the long arm.
  2. Ensure the connections are secure and leak-free: add approximately 4 mL of sterile PBS to the open syringe while holding piston 2. Insert piston 1 and push both pistons back and forth whilst checking for leakage. If no leakage occurs, discard the PBS and remove piston 1 again.
  3. Pipette 1 mL of IFA and 50 µg of rMOG1-125 together and adjust the mixture to a final volume of 2 mL with sterile PBS (pH 7.4) in a suitable tube.
    NOTE: Due to losses of emulsion on the tips or walls of syringes during the preparation, prepare a larger volume than intended for the administration. It is similarly more practical to prepare for more than 1 animal at once.
  4. Place the diluted IFA and rMOG1-125 mixture in the open syringe. Insert the piston gently whilst maintaining a loose pressure on the opposite piston (Figure 3A).
  5. Emulsify the inoculum by driving it from one syringe to the other by pushing the pistons back and forth, until it is white and viscous (Figure 3B).
  6. Fix a 1 mL Luer lock syringe to the open short arm of the 3-way stopcock and fill it with inoculum (Figure 3C). Distribute all inoculum to 1 mL syringes. Keep it on ice until the injection. Administer the mixture on the day of the preparation.

7. Immunization

  1. Anaesthetize the rat with isofluorane in a chamber (~2 min, mixed with oxygen 2 L/min) and then sustain anesthesia through a mask (mixed with oxygen 1.5 L/min).
  2. Inject 200 µL of inoculum subcutaneously at the tail base using a 21 G needle.
    NOTE: Administer the injection slowly as the solution is viscous.

8. Determination of Antibody Titers

  1. Withdraw ~200 µL of blood 4 weeks after the immunization in order to determine the anti-MOG antibody titers.
  2. Coat the wells of a 96-well plate with MOG (5 µg/mL in PBS) and incubate them for 1 h at 37 °C.
  3. Block the plate with 1% bovine serum albumin (BSA) in PBS for 1 h at room temperature.
  4. Incubate the plate with rat serum (1:50) and standard it for 2 h at 37 °C. Wash the plate 3x with 200 µL of PBS/Polysorbate 20.
  5. Incubate the plate with horseradish peroxidase-conjugated anti-rat IgG secondary antibody (1:10,000). Wash the plate 3x with 200 µL of PBS/Polysorbate 20.
  6. Add 100 µL of peroxidase substrate solution per well and incubate it for 20 – 30 min in the dark at room temperature.
  7. Measure the optical density at a 405 nm wavelength and calculate the antibody titer from the optical density using a standard curve.

9. Intracerebral Cytokine Injection

  1. Adjust the length of the connector cannula (2 mm). (See Figure 4 for the preparation steps.)
  2. Fill a 1 mL syringe with the cytokine mixture (500 ng/µL of TNF-alpha, 300 U/µL of recombinant rat IFN-gamma in sterile PBS). Connect the syringe to a connector cannula. Fill the cannula with the cytokine mixture. Avoid any bubbles.
  3. Mount the syringe onto the programmable syringe pump and program it to inject 0.2 µL/min (Figure 5A). Start the pump and keep it working in order to avoid an air bubble formation at the tip of the cannula.
    NOTE: The injection speed must take into account the inner diameter of the specific syringe used; thereby, the syringe diameter has to be registered during the pump set up.
  4. Anesthetize the rat with isoflurane in a chamber (~2 min, mixed with 2 L/min of oxygen) and then sustain the anesthesia through a mask (mixed with 1.5 L/min of oxygen) (Figures 5B and 5C). Apply lubricating eye drops as the animal will be anesthetized for at least 30 min.
  5. Remove the catheter cap with the inlet. Insert the connector cannula into the catheter and screw and tighten it (Figures 5D and 5E).
    NOTE: Do not overtighten it, as this will destroy the upper tip of the catheter.
  6. Allow the injection to proceed for 10 min (the total volume of injection being 2 µL). Stop the pump. Leave the cannula inside the catheter for 20 min to allow the injected volume to fully diffuse.
  7. Unscrew the connector cannula and remove it slowly to avoid a vacuum effect.
  8. Reattach the catheter cap with the inlet and screw it. Allow the animal to recover from the anesthesia in a cage.

Rat Model of Widespread Cerebral Cortical Demyelination Induced by an Intracerebral Injection of Pro-Inflammatory Cytokines

Learning Objectives

Cortical demyelination could be assessed at different time points after a cytokine injection by immunohistochemistry for proteolipid protein (PLP) (Figure 6). Figure 6A shows intact PLP immunoreactivity at day 15 in a MOG-immunized control animal that received only sterile PBS through the implanted catheter. On day 1 after the cytokine injection, demyelination could already be detected in MOG-primed animals, albeit only in the close vicinity of the catheterized area (Figure 6B). The PLP immunoreactivity stays intact in the contralateral cortex 1-day post-cytokine injection. On day 3, a gradual increase in the loss of the PLP immunoreactivity, which spreads in the ipsilateral cortex (Figure 6C), could be observed. Contralateral cortical demyelination could also be detected at day 3 (Figure 6D), but it is rather restricted to the area beneath the anchor screws, possibly due to a low-flow area of interstitial fluid caused by the anchor screws43. The absence of a similar observation in the PBS-injected control animals excludes the possibility of trauma-induced demyelination stemming from the anchor screw.

Between days 9 – 15, demyelination affects large parts of the cortex of both hemispheres (Figures 6E, 6F, and 6G). This coincides with an observation of slow behavior, though without a statistically significant decrease in motor skills in a rotarod test43. The cortical demyelination is sustained for up to 30 days post-cytokine injection in both hemispheres (Figures 6H and 6I) with only a partial remyelination. Figure 6J shows a quantification of PLP loss in the cortical grey matter after the intracerebral cytokine injection. It should be noted that PLP immunoreactivity has not yet been assessed after periods longer than 30 days; thereby, the instantaneous resolution of remyelination, if there is any, remains to be assessed by further experimentation. A second administration of cytokine mixture through the implanted catheter 30 days after the first injection results in marked brain atrophy at day 15 (Figure 7).

Figure 1
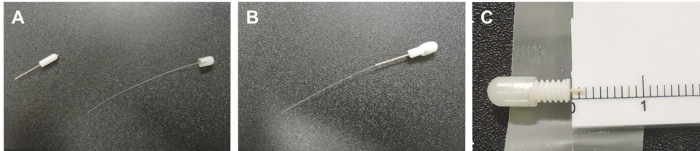
Figure 1: Preparation of the catheter. (A and B) The guide cannula and the dummy cannula (catheter cap with inlet) are assembled and screwed. (C) Then the catheter is cut to 2 mm in size with the help of a scalpel. The microscopic observation showed that the usage of scissors for that purpose distorts the circular shape of the cannula tip, and, thereby, must be avoided. Please click here to view a larger version of this figure.

Figure 2
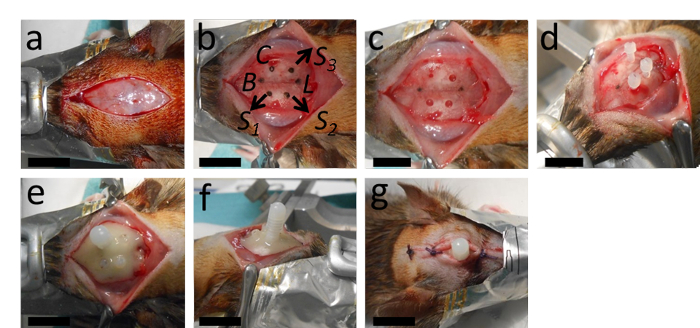
Figure 2: The implantation of the catheter. (A) The surgery starts with a longitudinal incision and removal of the periosteum. (B, C) This panel shows the marking of the place for the catheter at 2 mm posterior from Bregma and 2.4 mm lateral to the right from the sagittal suture; as well as the places for the holes intended for the three anchor screws with an appropriate distance from the catheter and Lambda. (D) After drilling the catheter hole (a 0.5 mm diameter, with a round drill tip) and the holes for the anchor screws (1.3 mm-diameter with a twisted drill tip), the anchor screws are tightened. (E, F) Then the catheter is inserted and the whole setup is stabilized with polymerizing dental cement. (G) The wound is stitched with two or three knots anterior and posterior to the catheter. B = Bregma; L = Lambda; C = Catheter; S1, S2 and S3 = places for the holes for the three anchor screws. The scale bars = 1 cm. Please click here to view a larger version of this figure.

Figure 3
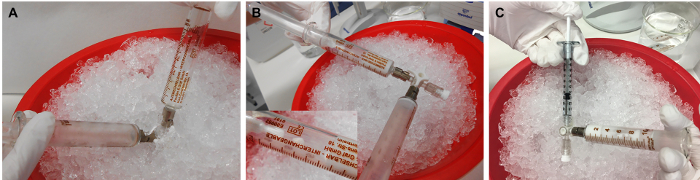
Figure 3: Preparation of rMOG/IFA emulsion. (A) The mixture of rMOG, PBS, and IFA is emulsified by pressing the inoculum from one syringe to another by pushing the pistons back and forth, (B) until it is white and viscous. (C) Subsequently, the inoculum is distributed to 1 mL syringes for the injection. 5 µg of rMOG is used in 200 µL of PBS/IFA mixture to sub clinically immunize one rat; however, due to the losses at the tips and walls of the syringes during the preparation, a larger volume should be prepared. Please click here to view a larger version of this figure.

Figure 4
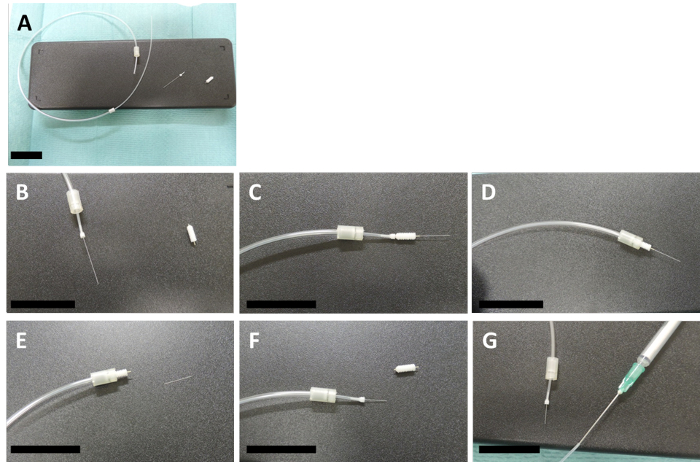
Figure 4: Preparation of the connector cannula. (A D) These panels show how a connector and an internal are assembled with a 2-mm size template guide cannula. (E) The internal is cut to the same size as the guide cannula with the help of a scalpel (F) and the template guide is then unscrewed. (G) The other end of the connector cannula is fixed to a 1 mL syringe, which contains the injection mix, with a 20 G needle. The scale bars = 3 cm. Please click here to view a larger version of this figure.

Figure 5
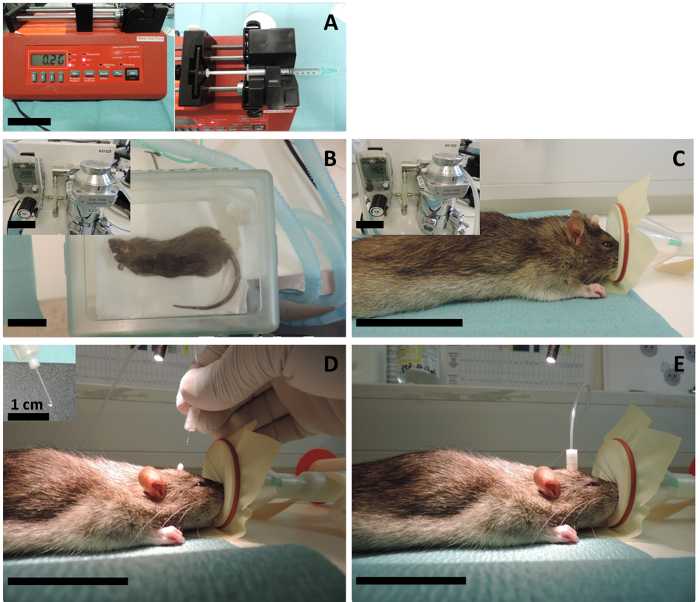
Figure 5: Intracerebral injection. (A) A programmable syringe pump is adjusted for a 2 µL/min injection speed, and the 1 mL syringe filled with cytokine mix (or sterile PBS for the controls) is mounted to the pump. (B) The animal is first anesthetized in the chamber using 5% isoflurane with a 2 L/min oxygen flow and then (C) the anesthesia is sustained through the mask using 2.5% isoflurane with a 1.5 L/min oxygen flow. (D) The catheter cap with the inlet (the dummy cannula) is screwed off and the injection cannula is inserted through the implanted catheter. Since the volume of the injection is very small, the investigator should be cautious to avoid air bubbles at the tip of the cannula. For that reason, it is important to start the insertion while the pump is in operation and only when there is a growing liquid bubble at the tip. The extra volume will not go into the brain anyway, as it breaks down on top of the catheter before the insertion. (E) Then the connector cannula is tightened, and the pump is let to operate for 10 min. After 10 min of injection, the pump is stopped, and the cannula is left inside for 15 – 20 min to allow for the diffusion of the injected volume to the interstitial fluid. The scale bars = 5 cm, unless indicated otherwise. Please click here to view a larger version of this figure.

Figure 6
Figure 6: PLP immunoreactivity in coronal brain sections. (A) This panel shows a control brain (MOG-primed) with a PBS injection (day 15), which does not result in a cortical demyelination. (B) As early as day 1 post-cytokine injection, demyelination is apparent in the catheter area. (C) A broader loss of PLP immunoreactivity is observed in the ipsilateral cortex at day 3, (D) as well as at the contralateral side. Widespread loss of PLP immunoreactivity is observed in both hemispheres at day 15, as (E) this panel shows the ipsilateral cortex and (F) this panel shows the contralateral cortex. (G) An overview of both hemispheres is given in showing the widespread loss of PLP at day 15. At day 30, as (H) this panel shows the ipsilateral cortex and (I) this panel shows for contralateral cortex, there is still remarkable demyelination, but also some remyelinated areas could be observed. (J) This panel shows the quantification of the demyelination (PLP loss in mm2/hemisphere). 1.5 – 2 µm coronal brain sections were used for the PLP detection with MS anti-PLP with a dilution factor of 1:500. The sections were counterstained with hematoxylin for cell nuclei. For detailed information on the immunohistochemistry, see Ucal et al.43. Panel G and J were modified from Ucal et al.43. Please click here to view a larger version of this figure.

Figure 7
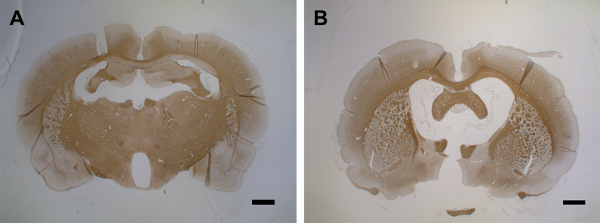
Figure 7: Brain atrophy after second cytokine injection. (A) This panel shows a control brain (MOG-primed) with a PBS injection (day 15). (B) At day 15 after the first cytokine injection, a second injection leads to brain atrophy within 15 days. 1.5 – 2 µm coronal brain sections were used for the PLP detection with MS anti-PLP with a dilution factor of 1:500. The sections were counterstained with hematoxylin for cell nuclei. For detailed information on immunohistochemistry, see Blakemore37. The scale bars = 500 µm. Please click here to view a larger version of this figure.

Figure 8
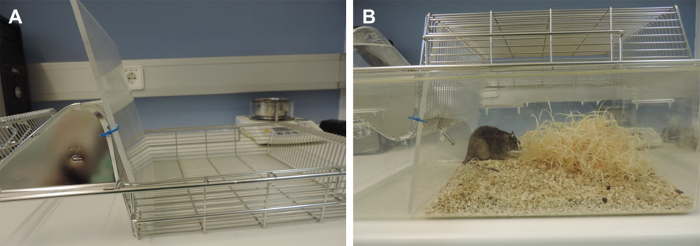
Figure 8: Modified cages to prevent catheter removal by the animal. In the standard cages, the food holder space on the grid is located closer to the cage bottom, creating a risky narrow space that increases the chance of the catheter to tangle with the grid and, thereby, its removal. To avoid this, the cage has to be modified. This narrow space was blocked with a transparent plane, allowing the observance of the animal. The food has to be given inside the cage in these modified cages. Please click here to view a larger version of this figure.

List of Materials

Adult male Dark Agouti rats (300 ±25 g) 
Fentanyl Hameln pharma plus, Germany  as Fentanyl-Citrate, 50 µg/ml
Midazolam ERWO Pharma, Austria 50039017 5 mg/ml
Medetomidin  Orion Pharma, Finland as Medetomidin hydrochloride, 1mg/ml
Flumazenil  Roche, Switzerland 0.1 mg/ml
Atipamezol  Orion Pharma, Finland as Atipamezol hydrochloride, 5 mg/ml
10% povidone-iodine complex  Mundipharma, Austria
Dental cement  Heraeus Kulzer, Germany 6603 7633
Physiological saline solution  Fresenius Kabi, Austria 0.9% NaCl
Phosphate buffered saline (PBS) Sigma-Aldrich, Germany P3813
Isofluorane  AbbVie, Austria
Lubricating eye drops  Thea Pharma, Austria
70% EtOH Merck, Germany 1070172511 Absolute ethanol was diluted in ddH2O for preparation of 70% v/v
2.5% enrofloxacin Bayer, Germany Prophylactic antibiotics 
carprofen Pfizer, USA Painkillers, 50 mg/ml 
Tween-20  Sigma-Aldrich, Germany P9416
Pentobarbital  Richter Pharma, Austria pentobarbital sodium, 400 mg/ml
Interferon gamma  PeproTech, USA  400-20
Tumor necrosis factor alfa R&D Systems, USA 510-RT-050/CF
rMOG1-125 own product at the Centre of Molecular Medicine, Karolinska Institute, Sweden Recombinant rat myelin oligodendrocyte glycoprotein, amino acids 1-125 from the N-terminus, also commercially available: AnaSpec, AS-55152-500, USA
Anti-MOG antibody  Ana Spec/Kaneka Corporation, Japan AS-555157 Standard from ELISA-Kit; Ana Spec/Kaneka  
Incomplete Freund’s adjuvant  Sigma-Aldrich, Germany  F5506
Horse radish peroxidase conjugated anti-rat IgG secondary antibody  Ana Spec/Kaneka Corporation, Japan AS-555157 Secondary Antibody from ELISA-Kit; Ana Spec/Kaneka Corporation
Bovine serum albumin  Sigma-Aldrich, Germany A9576
Peroxidase substrate solution Vector Laboratories, USA SK-45000
Stereotactic frame  David Kopf Instruments, USA
Catheters, MRI suitable  PlasticsOne, USA 8IC315GPKXXC
Dummy cannulas  PlasticsOne, USA 8IC315DCNSPC
Plastic screws, MRI suitable  PlasticsOne, USA 8L080X093N01
Connector cannula  PlasticsOne, USA 8IC313CXSPCC
Screw driver with 2mm tip-size
Drill with flexible shaft extension  Proxxon, Germany NO 28 472, NO 28 706, NO 28 620,  
Drill bit, round, 0.5 mm  Hager & Meisinger, Germany  REF310 104 001 001 009
Drill bit, twisted, 1.3 mm  Hager & Meisinger, Germany  REF350 104 417 364 013
Scalpel  Braun, Germany BB510
Scalpel handle  Fine Science Tools, Germany 91003-12
Cotton tip applicator  Henry Schein Medical, Austria 900-3155
Surgical scissors Fine Science Tools, Germany 14101-14, 14088-10 
Surgical forceps Fine Science Tools, Germany 11002-12, 11251-35
Bulldog clamps  Fine Science Tools, Germany 18050-35
Homoeothermic blanket  TSE systems, Germany
Infrared Lamp Beurer, Germany 616.51
Dental curing light  Guilin Woodpecker Medical, China
Absorbable suture  Johnson & Johnson, Belgium V792E
Programmable syringe pump  World Precision Instruments, USA AL-1000
Exam gloves
Surgical gown
Electric Shaver Aesculap, Germany GT420
Volatile anesthetic vaporizer  Rothacher Medical, Switzerland CV 30-301-D
Oxygen source for volatile anesthetic vaporizer Air Liquide, Austria 19,113
Volatile anesthesia chamber  Rothacher Medical, Switzerland PS-0347
Anesthesia mask for rats  Rothacher Medical, Switzerland PS-0307-A
1 ml syringe  Codan, Denmark REF 62.1612
26 Gauge needle for injection  Braun, Germany 4657683
20 Gauge needle for cytokine injection and immunization  Braun, Germany 4657519
Luer lock tip glass syringes  Poulten & Graf, Germany 7.140-37
3 way stopcock  Becton Dickinson, Sweden 394600
96-well plate  Thermo Fisher Scientific, USA 442404
Plate reader  Cole-Parmer, USA EW-1396-00
37°C incubator Kendro, Germany 50042301
Micropipettes  Gilson, USA F167350

Lab Prep

Multiple sclerosis (MS) is the most common immune-mediated disease of the central nervous system (CNS) and progressively leads to physical disability and death, caused by white matter lesions in the spinal cord and cerebellum, as well as by demyelination in grey matter. Whilst conventional models of experimental allergic encephalomyelitis are suitable for the investigation of the cell-mediated inflammation in the spinal and cerebellar white matter, they fail to address grey matter pathologies. Here, we present the experimental protocol for a novel rat model of cortical demyelination allowing the investigation of the pathological and molecular mechanisms leading to cortical lesions. The demyelination is induced by an immunization with low-dose myelin oligodendrocyte glycoprotein (MOG) in an incomplete Freund's adjuvant followed by a catheter-mediated intracerebral delivery of pro-inflammatory cytokines. The catheter, moreover, enables multiple rounds of demyelination without causing injection-induced trauma, as well as the intracerebral delivery of potential therapeutic drugs undergoing a preclinical investigation. The method is also ethically favorable as animal pain and distress or disability are controlled and relatively minimal. The expected timeframe for the implementation of the entire protocol is around 8 – 10 weeks.

Multiple sclerosis (MS) is the most common immune-mediated disease of the central nervous system (CNS) and progressively leads to physical disability and death, caused by white matter lesions in the spinal cord and cerebellum, as well as by demyelination in grey matter. Whilst conventional models of experimental allergic encephalomyelitis are suitable for the investigation of the cell-mediated inflammation in the spinal and cerebellar white matter, they fail to address grey matter pathologies. Here, we present the experimental protocol for a novel rat model of cortical demyelination allowing the investigation of the pathological and molecular mechanisms leading to cortical lesions. The demyelination is induced by an immunization with low-dose myelin oligodendrocyte glycoprotein (MOG) in an incomplete Freund's adjuvant followed by a catheter-mediated intracerebral delivery of pro-inflammatory cytokines. The catheter, moreover, enables multiple rounds of demyelination without causing injection-induced trauma, as well as the intracerebral delivery of potential therapeutic drugs undergoing a preclinical investigation. The method is also ethically favorable as animal pain and distress or disability are controlled and relatively minimal. The expected timeframe for the implementation of the entire protocol is around 8 – 10 weeks.

Procedure

Multiple sclerosis (MS) is the most common immune-mediated disease of the central nervous system (CNS) and progressively leads to physical disability and death, caused by white matter lesions in the spinal cord and cerebellum, as well as by demyelination in grey matter. Whilst conventional models of experimental allergic encephalomyelitis are suitable for the investigation of the cell-mediated inflammation in the spinal and cerebellar white matter, they fail to address grey matter pathologies. Here, we present the experimental protocol for a novel rat model of cortical demyelination allowing the investigation of the pathological and molecular mechanisms leading to cortical lesions. The demyelination is induced by an immunization with low-dose myelin oligodendrocyte glycoprotein (MOG) in an incomplete Freund's adjuvant followed by a catheter-mediated intracerebral delivery of pro-inflammatory cytokines. The catheter, moreover, enables multiple rounds of demyelination without causing injection-induced trauma, as well as the intracerebral delivery of potential therapeutic drugs undergoing a preclinical investigation. The method is also ethically favorable as animal pain and distress or disability are controlled and relatively minimal. The expected timeframe for the implementation of the entire protocol is around 8 – 10 weeks.

Tags