Science Education
>

Reverse Dissection and DiceCT Reveal Otherwise Hidden Data in the Evolution of the Primate Face

Instructor Prep
concepts
Student Protocol
JoVE Journal
Biology
A subscription to JoVE is required to view this content.  Sign in or start your free trial.
JoVE Journal Biology
Reverse Dissection and DiceCT Reveal Otherwise Hidden Data in the Evolution of the Primate Face

Because these procedures use animals that died from natural causes at zoos or were sacrificed in research labs where they were part of unrelated studies, these protocols do not require IACUC approvals.

1. Reverse Dissection

Note: The protocol for reverse dissection is effective for very small mammals, such as laboratory mice, all the way to large land mammals, such as the domestic horse. The mimetic muscles are often best preserved and best visualized when left with the overlying dermis instead of leaving them behind on the skull. See Figure 1-3.

  1. Disarticulate head from cervical part of the vertebral column prior to dissection procedures. If the cadaver is frozen, allow it to thaw completely before proceeding through this step.
    1. Regardless of the state of preservation, palpate the occipital region of the skull and the spinous process of the second cervical vertebra (C2). Note that the first cervical vertebra (C1) lacks a spinous process, so palpating C2 and the occipital region of the skull will give an approximate location of C1.
    2. Using a scalpel, make horizontal cuts between the occipital region of the skull and C2 in order to begin separating the skull from the vertebral column at C1. Continue to make cuts until the skull is disarticulated from the vertebral column.
    3. If the specimen is fresh and unfixed, steps 1.1.2-1.2 need to be executed in a relatively short time frame. Additionally, if the brain remains intact inside the cranial cavity, necrosis of the neural tissue may proceed rapidly, so it is highly recommended that the brain be removed from the cadaver if the specimen is to remain unfixed.
      ​NOTE: As an optional step, the specimen can be immersed in 10% buffered formalin for 24 hours in order to fix the specimen. This will allow for an unhurried data collection procedure.
    4. If the specimen is already fixed with ethyl alcohol or 10% buffered formalin, rinse for several hours with fresh water.
  2. Make incisions to release facial mask from skull. If the brain and overlying calvaria have been removed during necropsy, make one incision near the glabellar region of the skull and another along the caudal aspect of the skull where the cranial bone is intact.
    1. Once the specimen has been rinsed for several hours, pat dry with paper towels and transfer to work station.
    2. Palpate for the external occipital protuberance at the caudal (or rear) edge of the skull. This marks the area where the skull meets the spinal column. Using a #4 scalpel for large specimens or a #3 scalpel for small specimens, make a mid-line incision beginning at the external occipital protuberance and coming rostrally (or forward) over the parietal and frontal region of the skull, over the orbital region and between the eyes, down the nasal region, all the way through the external nasal area between the nares.
    3. Make a cut on the mandible between the lower, central incisors and move caudally (or backwards) toward the clavicle.
    4. Choose one side of the face mask to remove and leave the other side in place.
  3. Release one side of the facial mask from the skull.
    1. Starting in the occipital region, use the scalpel to cut the facial mask, including mimetic musculature, away from the occipital bone of the skull, pulling the mask rostrally (or forward) and laterally (to the side). Cut the occipitalis muscle away from the skull, leaving a small amount of the muscle behind on the skull so that its attachment can still be visualized once the facial mask has been removed. By leaving some portion of the muscle behind on the bony/cartilaginous skull, attachments can be preserved for recording at a later time.
    2. Once the external ear is hit, locate the auricular muscles. Cut through these so that a small portion of each remains with the skull. Cut through the elastic cartilage attaching the external ear to the skull.
    3. Continue to pull the mask rostrally and release each mimetic muscle from the skull by leaving a small portion of each muscle behind on the skull.
    4. Once there is an intact facial mask from one side of the skull, allow it to sit out, exposed to the air, for an hour (for small specimens like a lab rat) up to three hours (for a large specimen like a domestic horse), with the musculature side facing up. This step desiccates some of the connective tissue on the face mask and increases color contrast between muscle and connective tissue.
  4. Remove sufficient connective tissue to visualize musculature.
    1. Using a #3 scalpel, forceps, and microscissors, pluck away the connective tissue that separates the mimetic musculature from one another.
    2. To access the superficial layer of mimetic musculature in this "reverse dissection", gently lift and separate the deep layer of musculature from the superficial layer and remove the connective tissue surrounding the superficial musculature. The resulting face mask can be returned to formalin, and the procedure can be paused here before moving on to further dissection or to staining (Step 2). At each intervening step in further dissection, allow the facial mask to dry enough so that connective tissue can be easily discerned from muscle tissue.

2. Staining Process for DiceCT

NOTE: Specimens must be fixed in 10% buffered formalin if DiceCT is to be used in order to preserve the tissue during the lengthy staining procedure. If the specimen has not yet been fixed, place it in a container with enough 10% buffered formalin to submerge all tissue and leave it for 48 hours.

  1. Make 1.75% (m/v) Lugol's iodine solution (I2KI) for staining face mask.
    ​NOTE: Make enough I2KI solution to fully submerge the face mask within the chosen container. Make more or less solution by scaling the values of both the solutes and the solvent equally in steps 2.1.1 and 2.1.2.
    1. Under a fume hood, add 3.50 g potassium iodide (KI) to 200 mL distilled water in a large glass beaker. Stir using glass stirring rod until fully dissolved.
      CAUTION: Potassium iodide (KI) can cause eye, skin, and respiratory irritation or damage. Wear protective eyewear and handle under a fume hood.
    2. Slowly add 1.75 g of iodine crystals (I2), stirring until fully dissolved. This will take several minutes.
      CAUTION: Iodine crystals (I2) can cause eye, skin, and respiratory irritation or damage. Wear eye and skin protection and work under a fume hood while handling this chemical.
    3. Filter solution into amber glass bottle using filter paper with 11 micron pore size to remove any undissolved crystals that could produce inconsistent staining.
      CAUTION: This solution is highly toxic to aquatic life. Do not dispose of solution down drain. In case of spill, neutralize aqueous triiodide (I3) into iodide (I) with 5% (m/v) sodium thiosulfate (Na2S2O3). Check institutional waste disposal policies for iodide and dispose of this waste accordingly.
  2. Stain the face mask.
    1. Place the face mask cut side down in an amber glass or blacked out container (to keep out light) large enough to allow the face mask to rest in a natural shape and to be fully submerged.
    2. Pour the Lugol's iodine solution over the face mask until it is completely submerged. A weight may be needed to keep the face mask fully submerged and prevent it from floating to the top of the solution. Seal the container to prevent evaporation and keep out light.
    3. Agitate the container continually on an electric rocker or regularly by hand to facilitate even staining and prevent crystals from settling for at least two weeks. If a longer time is needed to adequately stain the muscle fascicles, replace the Lugol's solution with fresh solution.
    4. After two weeks, remove the face mask from the solution. Pour a small amount of distilled water over both surfaces of the face mask to rinse. Wrap the face mask in damp paper towels and place in a sealed plastic bag for at least 24 hours to allow for slight drying before moving on to the next step.
      NOTE: The protocol can be paused for up to a week. Ensure that the face mask remains slightly damp during this period.

3. DiceCT scanning

  1. Prepare face mask for CT scanning.
    1. Mount the face masks onto a low-density material, such as floral foam, to eliminate any wrinkles in the mask and to limit movement of the mask as the mask dries out slightly during scanning. Secure the face mask to the foam with wooden toothpicks.
  2. Setting the CT scan parameters and scanning.
    1. Use a high resolution for these scans, as the small fascicles will be obscured at lower resolution. Use an inter-slice spacing and inter pixel distance around 0.05 mm.
    2. Scan the mounted face mask on a High-Resolution X-ray Computed Tomography Scanner.
    3. If fascicles are unable to be fully visualized, due to over-staining, place face mask into 10% formalin solution or into 5% sodium thiosulfate to remove some of the stain. If fascicles are not sufficiently stained, return to Lugol's iodine solution. After adjusting the staining, scan the face mask again. Continue to make necessary adjustments and scan until fascicles are able to be fully visualized.

4. Prepare the face mask for long-term preservation.

  1. Chemically neutralize the iodine stain in the face mask, removing discoloration from the staining process.
    1. Place stained face mask into 5% (m/v) sodium thiosulfate solution to chemically neutralize specimen. This may take several hours or days. Agitate regularly during destaining.
    2. Return destained face mask to 10% formalin solution for preservation. If stain continues to leach out of specimen into solution, replace discolored formalin with fresh formalin until it remains clear for long-term preservation.

Reverse Dissection and DiceCT Reveal Otherwise Hidden Data in the Evolution of the Primate Face

Learning Objectives

This section presents examples of results on facial musculature form that can be achieved by using "reverse dissection" in concert with DiceCT scanning. By using "reverse dissection" to create a facial mask, a fuller representation of mimetic (facial) muscle can sometimes be seen than in traditional dissection methodology. This method works on a range of body sizes from the tiny, small-bodied primates, for example the common marmoset Callithrix jacchus (Figure 4), to large-bodied primates such as the chimpanzee Pan troglodytes (Figure 5), and a medium-sized primate such as the rhesus macaque Macaca mulatta (Figure 6). Traditional dissection methodologies may work well on large-bodied primates that have robust mimetic musculature. However, traditional "front approach" dissection methods may not work well with small-bodied primates that have gracile facial muscles. In these cases, some of the facial musculature may be indistinguishable from the surrounding connective tissue and may be lost during dissection.

The iodine stain bound to the mimetic musculature and at least some of the scans are of sufficient quality that we can resolve both individual mimetic muscles (Figure 7) as well as individual muscle fascicles (Figure 8) and, for the first time, obtain whole muscle volumes of these gracile muscles. As shown in Figure 7, some of the very small muscles associated with the external ear are clearly visible in the DiceCT scans. It is not uncommon for these muscles to be missed in some reverse dissection procedures, perhaps due to their small size.

Figure 1
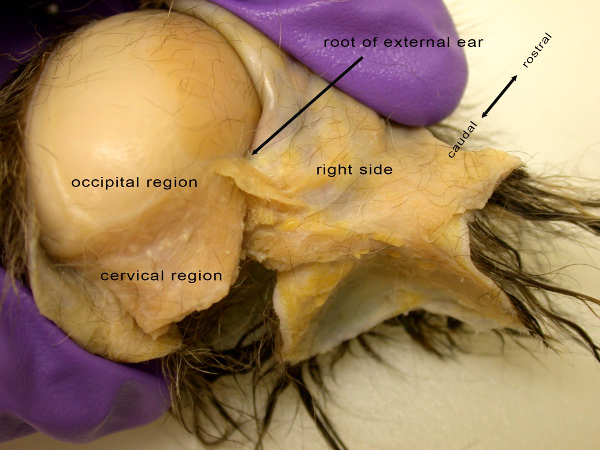
Figure 1: Caudal (or posterior) view of the disarticulated head of a common marmoset (Callithrix jacchus) showing the beginning of the process for creating the facial mask in "reverse dissection". Facial musculature associated with the external ear is shown on the right side of the developing facial mask in shades of orange. Adipose tissue, or fat, is clustered around the musculature in shades of bright yellow. Please click here to view a larger version of this figure.

Figure 2
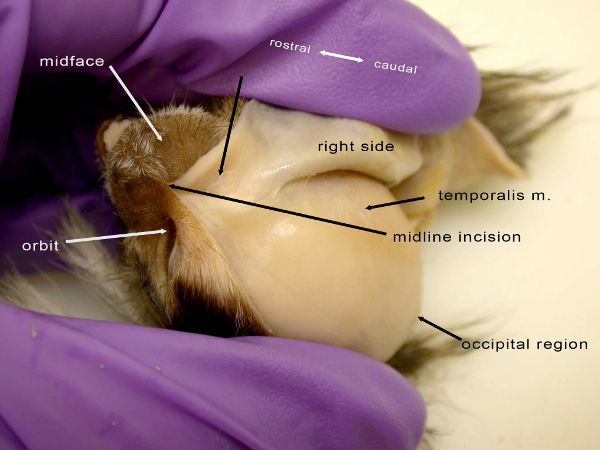
Figure 2: Dorsal view of the disarticulated head of a common marmoset (C. jacchus) showing the middle phase of creating the facial mask in reverse dissection, here removing the mask from the orbital region of the skull. The unlabeled black arrow indicates the area where muscles such as the orbicularis oculi muscle are located, prior to removal of connective tissue. The temporalis muscle is not a facial muscle but is indicated to give an idea of relative location. Please click here to view a larger version of this figure.

Figure 3
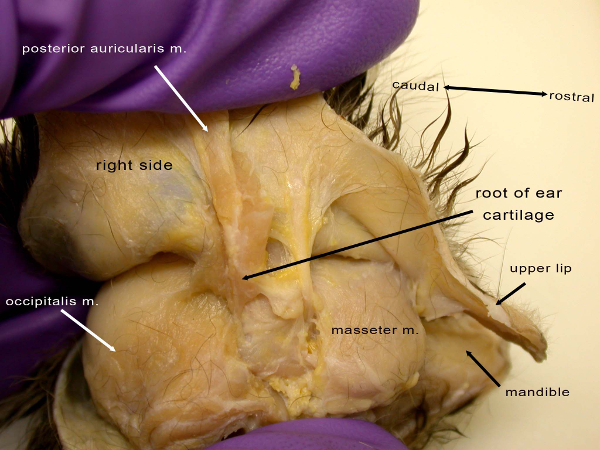
Figure 3: View of the right side of the common marmoset (C. jacchus) showing near the end phase of creating the facial mask in reverse dissection, here removing the mask from the upper and lower lip region of the skull. The masseter muscle is not a facial muscle but is indicated to give an idea of relative location. Please click here to view a larger version of this figure.

Figure 4
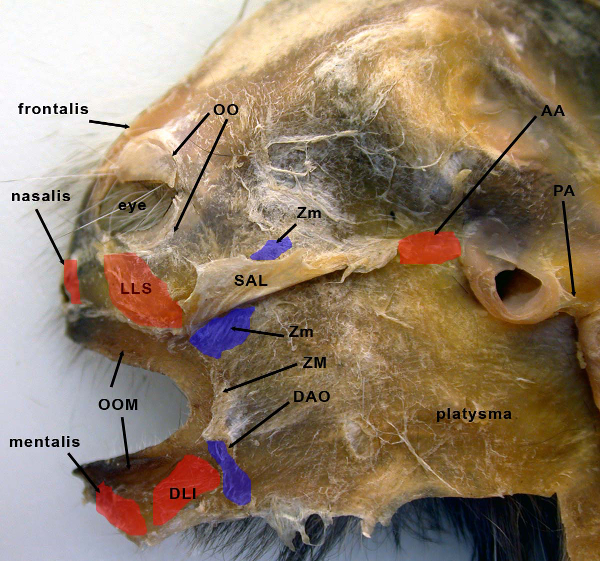
Figure 4: Deep (or inside) view of the entire right side of the facial mask from the common marmoset (C. jacchus), showing the fully dissected facial mask with select muscles indicated. Various muscles are highlighted with color to indicate boundaries. Abbreviations: AA – anterior auricularis muscle; DAO – depressor anguli oris muscle; DLI – depressor labii inferioris muscle; LLS – levator labii superioris muscle; OO – orbicularis oculi muscle; OOM – orbicularis oris muscle; PA – posterior auricularis muscle; SAL – superior auriculolabialis muscle; ZM – zygomaticus major muscle; Zm – zygomaticus minor muscle. This image appeared in Burrows, 20082. Please click here to view a larger version of this figure.

Figure 5
Figure 5: Deep (or inside) view of the entire right side of the facial mask from the common chimpanzee (Pan troglodytes), showing the fully dissected facial mask with select muscles indicated. The risorius muscle is indicated here, a muscle which was previously thought to be present among primates only in humans. This image appeared in Burrows et al., 200615. Please click here to view a larger version of this figure.

Figure 6
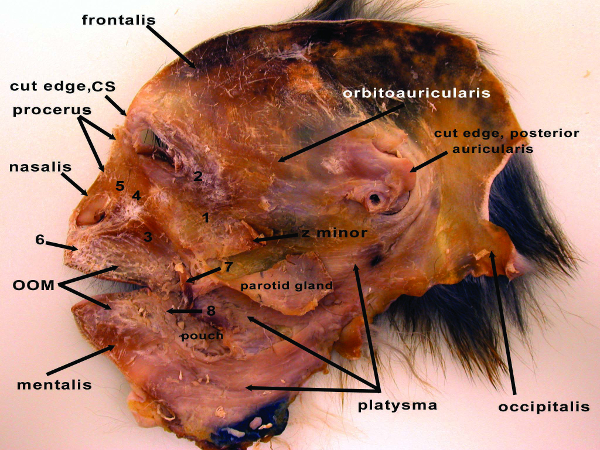
Figure 6: Deep (or inside) view of the entire right side of the facial mask from the rhesus macaque (Macaca mulatta), showing the fully dissected facial mask with select muscles indicated. CS – corrugator supercilli muscle; OOM – orbicularis oris muscle; z minor – zygomaticus minor muscle; 1 – zygomaticus major muscle; 2 – orbicularis oculi muscle; 3 – caninus muscle; 4 – levator labii superioris muscle; 5 – levator labii superioris alaeque nasi muscle; 6 – depressor septi muscle; 7 – cut edge of buccinators muscle; 8 – depressor labii inferioris muscle. This image appeared in Burrows et al., 200916. Please click here to view a larger version of this figure.

Figure 7
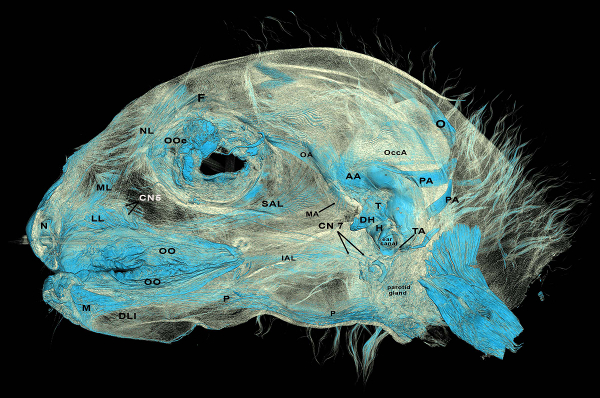
Figure 7: Deep (or inside) view of the entire right side of a DiceCT scan from a Eulemur flavifrons demonstrating the abilities of DiceCT to pick up mimetic muscle fibers. AA: anterior auricularis muscle; CN5: cranial nerve 5; CN7: cranial nerve 7; DH: depressor helicis muscle; DLI: depressor labii inferioris muscle; F: frontalis portion of occipitofrontalis muscle; H: helicis muscle; IAL: inferior auriculolabialis muscle; LL: levator labialis muscle; M: mentalis muscle; MA: mandibuloauricularis muscle; ML: maxillolabialis muscle; N: nasalis muscle; NL: nasolabialis muscle; O: occipitalis portion of occipitofrontalis muscle; OccA: occipitoauricularis muscle; OO: orbicularis oris muscle; OOc: orbicularis occuli muscle; P: platysma muscle; PA: posterior auricularis muscle; SAL: superior auriculolabialis muscle; T: tragicus muscle; TA: tragoantitragus muscle Please click here to view a larger version of this figure.

Figure 8
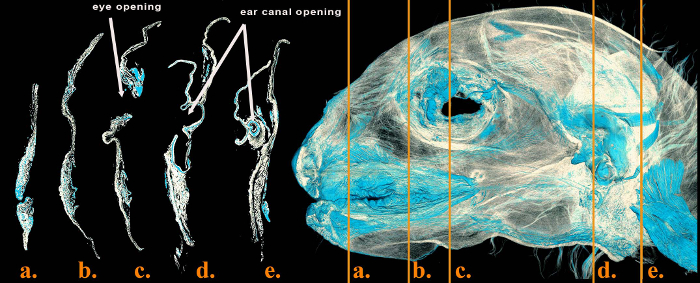
Figure 8: Deep (or inside) view of the entire left side of a DiceCT scan from a Eulemur flavifrons demonstrating serial sections at various points. Deepest blue stain is from areas where there is a heavy presence of mimetic muscle fibers (e.g., around the opening of the external ear, sections a. and b., and the upper orbital region, section c.). Lightest blue stain is from areas where there is less mimetic muscle fiber (e.g., the region of the upper lip, section d.). Please click here to view a larger version of this figure.

List of Materials

Nikon XTH 225 ST Nikon no catalog numbers
10% buffered formalin Fisher Scientific SF98-4
Iodine, ACS Grade Lab Chem, Inc. LC155901
Sodium thiosulfate Acros Organics AC450620010
Potassium Iodide Alfa Aesar A1270430

Lab Prep

Facial expressions, or facial displays, of social or emotional intent are produced by many mammalian taxa as a means of visually communicating with conspecifics at a close range. These displays are achieved by contraction of the mimetic muscles, which are skeletal muscle attached to the dermis of the face. Reverse dissection, removing the full facial mask from the skull and approaching mimetic muscles in reverse, is an effective but destructive way of revealing the morphology of mimetic muscles but it is destructive. DiceCT is a novel mechanism for visualizing skeletal muscles, including mimetic muscles, and isolating individual muscle fascicles for quantitative measurement. Additionally, DiceCT provides a non-destructive mechanism for visualizing muscles. The combined techniques of reverse dissection and DiceCT can be used to assess the evolutionary morphology of mimetic musculature as well as potential contraction strength and velocity in these muscles. This study further demonstrates that DiceCT can be used to accurately and reliably visualize mimetic muscles as well as reverse dissection and provide a non-destructive method for sampling mimetic muscles.

Facial expressions, or facial displays, of social or emotional intent are produced by many mammalian taxa as a means of visually communicating with conspecifics at a close range. These displays are achieved by contraction of the mimetic muscles, which are skeletal muscle attached to the dermis of the face. Reverse dissection, removing the full facial mask from the skull and approaching mimetic muscles in reverse, is an effective but destructive way of revealing the morphology of mimetic muscles but it is destructive. DiceCT is a novel mechanism for visualizing skeletal muscles, including mimetic muscles, and isolating individual muscle fascicles for quantitative measurement. Additionally, DiceCT provides a non-destructive mechanism for visualizing muscles. The combined techniques of reverse dissection and DiceCT can be used to assess the evolutionary morphology of mimetic musculature as well as potential contraction strength and velocity in these muscles. This study further demonstrates that DiceCT can be used to accurately and reliably visualize mimetic muscles as well as reverse dissection and provide a non-destructive method for sampling mimetic muscles.

Procedure

Facial expressions, or facial displays, of social or emotional intent are produced by many mammalian taxa as a means of visually communicating with conspecifics at a close range. These displays are achieved by contraction of the mimetic muscles, which are skeletal muscle attached to the dermis of the face. Reverse dissection, removing the full facial mask from the skull and approaching mimetic muscles in reverse, is an effective but destructive way of revealing the morphology of mimetic muscles but it is destructive. DiceCT is a novel mechanism for visualizing skeletal muscles, including mimetic muscles, and isolating individual muscle fascicles for quantitative measurement. Additionally, DiceCT provides a non-destructive mechanism for visualizing muscles. The combined techniques of reverse dissection and DiceCT can be used to assess the evolutionary morphology of mimetic musculature as well as potential contraction strength and velocity in these muscles. This study further demonstrates that DiceCT can be used to accurately and reliably visualize mimetic muscles as well as reverse dissection and provide a non-destructive method for sampling mimetic muscles.

Tags