Science Education
>

Photostimulation by Femtosecond Laser Activates Extracellular-signal-regulated Kinase (ERK) Signaling or Mitochondrial Events in Target Cells

Instructor Prep
concepts
Student Protocol
JoVE Journal
Biology
A subscription to JoVE is required to view this content.  Sign in or start your free trial.
JoVE Journal Biology
Photostimulation by Femtosecond Laser Activates Extracellular-signal-regulated Kinase (ERK) Signaling or Mitochondrial Events in Target Cells

CAUTION: The protocol presented below involves using NIR femtosecond laser and toxic chemicals. Please pay attention to all possible damages induced by experiment procedures. Please read safety data sheets of all relevant chemicals or other materials before use. Please follow the safety instructions of the laser facilities or consult professionals for guidance before operate laser source.

1. Experimental Preparation

  1. Setting up the photostimulation system
    NOTE: The system consists of a femtosecond laser and a laser (at visible range for fluorescence excitation) scanning confocal microscope. In Figure 1, a fiber femtosecond laser (1,040 nm, 50 MHz, 120 fs, 1 W) is used for coupling. The parameters are not fixed or necessary. It can be replaced by a Ti: Sapphire laser or other commercial femtosecond oscillators in the NIR range.
    1. Tune on the femtosecond laser and the confocal microscope.
      NOTE: Please set femtosecond laser power at a low level (~50 mW) in the process of adjusting the optical path.
    2. Use reflective mirrors (RM1 and RM2 showed in Figure 1B) to direct femtosecond laser beam through a mechanical shutter. Open the shutter.
    3. Set a 50/50 beam splitter (BS, Figure 1B) to split the femtosecond laser beam into two separate beams (transmission beam and reflection beam). Steer RM2 and BS to make the femtosecond laser beam coincide with the scanning laser beam.
      NOTE: (1) A reference iris (Iris 1, Figure 1B) behind the long-pass dichroic mirror (DM, 700 nm cut-on wavelength, Figure 1B) is used for positioning scanning laser path. (2) The system can only work at Stim-A or Stim-B mode, respectively. For Stim-A mode, the BS can be removed. For Stim-B, the BS can be replaced by a RM.
    4. Set a relay telescope consisting of a pair of lenses to expand the transmission beam width, which is consist with the back aperture of the objective.
      NOTE: (1) The reference iris 2 and 3 (Figure 1B) are set to collimate the femtosecond laser beam (Figure 1B). (2) The magnification of the relay telescope depends on the original diameter of femtosecond laser beam and the diameter of back aperture of the objective.
    5. Steer RMs (RM 3-5, Figure 1B) to align the expanded beam into microscope. Steer RM 4 and RM 5 to tune the focus of femtosecond laser to the center of FOV.
    6. Measure the transmission efficiency of the objective of the femtosecond laser.
      NOTE: Please measure the laser power at Stim-A and Stim-B respectively due to the different penetration paths of the laser in those two modes. It will use the power at specimen to illustrate related experiment procedures below.
    7. Tune off the shutter, femtosecond laser and confocal microscope until experiments start.
      NOTE: In the following experiments, Stim-A and Stim-B do not work together. If using Stim-A, the femtosecond laser beam of Stim-B needs to be blocked. On the other hand, the beam of Stim-A should be blocked if the system works at Stim-B mode.
  2. Prepare the culture medium: Dulbecco's modified Eagle's medium (DMEM) high glucose with 10% fetal bovine serum (FBS).
  3. Prepare the ERK2-GFP DNA plasmid, Mito-GFP DNA plasmid and mitochondrial matrix-targeting circularly permuted yellow fluorescent protein (mt-cpYFP) DNA plasmid. Keep the plasmids at -20 °C until use.
  4. Prepare tetramethylrhodamine (TMRM, 100 μM), and polyethylenimine (PEI 1 mg/mL). Keep them at -20 °C until use.
  5. Prepare 5% paraformaldehyde, 0.5% Triton X-100, anti-eIF4E (eukaryotic translation initiation factor 4E), antibody (phosphor S209, 1 mg/mL), anti-Bax antibody (1 mg/mL), anti-cytochrome C antibody (1 mg/mL), secondary antibody (anti-Rabbit IgG H&L, Alexa Fluor 488, 1 mg/mL), and 1% BSA with 0.1% Tween20. Keep these reagents at 4 °C until use.
  6. Prepare sterile materials: cell culture bottles, Petri dishes with glass slide bottom (Figure 3A), dishes with a glass bottom, an imprinted 500 µm cell location grid (Figure 3B, to localize the photostimulated cells), 1.5 mL and 10 mL tubes, and 1 mL, 100 μL and 10 μL pipettes and tips.
  7. Prepare standard cell culture laboratory equipment: a cell culture incubator set at 5% CO2 and 37 °C, and a biological safety cabinet.

2. Cell Culture and Transfection

NOTE: Hela cell (cell line derived from cervical cancer cells taken on February 8, 1951 from Henrietta Lacks)26 is used as an example in this protocol.

  1. Cell passage
    1. Remove the culture medium from cell culture bottle containing enough cells.
    2. Wash the bottle with 2 mL of phosphate-buffered saline (PBS). Remove the PBS.
    3. Add 1 mL of trypsin slowly and tap the bottle slightly. Put the bottle back in the incubator and incubate the cells 3 min at 37 °C.
    4. Remove the trypsin. Add 2-3 mL of culture medium. Pipette the medium several times to help the cells to detach. Transfer the medium with cells to a 10 mL tube.
    5. Take 10 μL of the sample from the tube for cell counting.
    6. Seed ~25,000 cells into a Petri dish (Figure 3A) and add culture medium up to 1 mL.
    7. Put the dish contained cells back in the incubator. Incubate the cells 24 h at 37 °C before transfection.
  2. Cell transfection
    1. Use 0.5 μg of DNA plasmid (ERK2-GFP, Mito-GFP or mt-cpYFP) for transfection per dish. Add 0.5 μg of plasmid and 2.5 μg of PEI into 50 μL of DMEM in a 1.5 mL tube. Incubate mixed media 10 min at room temperature.
    2. Take the dish with the cells from incubator. Replace culture medium with 1 mL of DMEM.
    3. Add DNA/PEI mixed media into the cells drop by drop. Put the cells back in the incubator.
    4. Incubate the cells 3 h at 37 °C and replace DMEM DNA/PEI mixed media with 1 mL of culture medium.
    5. Incubate transfected cells 24 h at 37 °C before photostimulation experiments.

3. Activation of ERK2 by Photostimulation of Femtosecond Laser

  1. Turn on femtosecond laser and ensure the shutter is closed.
  2. Turn on the laser-scanning confocal microscope and open the microscope software. Set the excitation laser at 488 nm. Set the power level of 488 nm laser at 0.1 mW. Set imaging size as 512 x 512 pixels. Set interval time of each pixel as 2.4 μs. Set the interval time between two frames at 6 s to minimize photobleaching and photodamage to cells. Set total imaging frames at around 300 frames to provide ~30 min continuous microscopy in an individual experiment.
    NOTE: The interval of two adjacent frames, total imaging frames and imaging time of continuous microscopy can be adjusted according to experimental requirements. If an individual experiment lasts over 2 h, please set the CO2 incubation system (shown in Figure 4) for microscope as present in step 3.3 to provide the environment of 5% CO2 and 37 °C for maintaining cell viability. If an individual experiment is limited within 2 h, the CO2 incubation system is not necessary.
  3. Turn on the CO2 incubation system, turn on all heater and set working temperature at 37 °C. Wait until the temperature goes up to 37 °C and concentration of CO2 up to 5%. Put the incubator stage on the microscope stage as shown in Figure 4A.
  4. Prepare Hela cells transfected with ERK2-GFP as described in step 2.
    NOTE: In an individual experiment, the scheme Stim-A or Stim-B is applied to deliver photostimulation to cells. Step 3.5 and 3.6 present detailed steps under Stim-A and Stim-B respectively.
  5. Delivering femtosecond laser stimulation into target cells using Stim-A mode
    NOTE: Before photostimulation procedure, please ensure that the diameter of the focus is around 2 μm. This process is described in step 3.5.1 and 3.5.2.
    1. Take the dish containing cells transfected with ERK2-GFP from incubator and put the dish on the microscope stage.
    2. Start fast scanning mode through the microscope operating software. Tune the objective to acquire clear fluorescent images of cells. Stop fast scanning. Switch to bright-field imaging mode by the CCD camera (Figure 2A). Open the shutter and adjust the distance between two lenses of the relay telescope to ensure the diameter of femtosecond laser focus to be ~ 2 μm (Figure 2B). Close the shutter to complete adjustment.
      NOTE: A reference arrow can be labeled to indicate the laser focus (Figure 2). In the meantime, a reference arrow can also set at the center of the fluorescent imaging window to indicate the position of the focus of femtosecond laser.
    3. Set the power of femtosecond laser at 15-40 mW (810 nm, 65 fs, 80 MHz), or 20-60 mW (1040 nm, 120 fs, 50 MHz) at the specimen. Set opening time of the shutter at 0.05-0.2 s.
    4. Use fast scanning mode to select a target cell well expressed ERK2-GFP.
    5. Move the stage in order to localize the cytosol area of the selected target cell at the center of FOV under bright-field imaging of the CCD camera (Figure 2A).
    6. Click the Start bottom to start continuous microscopy imaging progress.
    7. Open the shutter at any pre-defined time slot to deliver the femtosecond laser stimulation designed in step 3.5.3 into the target cell.
      NOTE: (1) The photostimulation can be performed at any time in the confocal microscopy sequence controlled by the shutter. (2) The photostimulation can be delivered for multiple times in the same position during the confocal microscopy sequence.
    8. Wait until the imaging process is complete. Save the imaging data for further data analysis.
  6. Delivering femtosecond laser stimulation into target cells using Stim-B mode
    1. Set the power of femtosecond laser at 15-40 mW (810 nm), 20-60 mW (1040 nm) at the specimen.
    2. Take the dish containing cells transfected with ERK2-GFP from the incubator and put it on the microscope stage.
    3. Use fast scanning mode to select a target cell well expressed ERK2-GFP.
    4. Set the confocal imaging process as step 3.2. Define a special scanning frame as the stimulation frame in the imaging process. Define the parameter of the simulation frame.
      1. Set a scanning region (2 x 2-3 x 3 μm2) at the cytosol area close to the nucleus in the target cell.
      2. Set total scanning time at 0.1-0.2 s. Synchronize the shutter of femtosecond laser with the confocal scanning according to the predefined photostimulation area, which is only open when the laser scanning drops in the stimulation frame and close immediately when it goes out.
        NOTE: (1) The photostimulaion region can be set to any size. (2) The photostimulation can be performed at any predefined time slot in the confocal microscopy sequence. (3) The photostimulation can be performed for multiple times on the same or different pre-defined areas in the FOV in that confocal microscopy sequence.
    5. Click the Start bottom to start continuous microscopy imaging progress.
    6. Wait until the imaging process is complete. Save the imaging data for further data analysis.
  7. Turn off the femtosecond laser and confocal microscope after the experiment.

4. Activation of eIF4E (Substrate of ERK) by Femtosecond Laser Simulation

  1. Hela cell preparation
    1. Follow steps 2.1.1-2.1.5.
    2. Seed ~20,000 cells into a Petri dish with cell location grids (Figure 3B) to localize the photostimulated cells. Add culture medium up to 1 mL.
    3. Put the dish with the cells back in the incubator. Incubate the cells 24 h at 37 °C before femtosecond laser treatment.
  2. Turn on the femtosecond laser and ensure the shutter is closed.
  3. Turn on the laser-scanning confocal microscope and open the microscope software.
  4. Prepare the CO2 incubation system as statement in step 3.3.
  5. Delivering femtosecond laser stimulation into target cells using Stim-A mode
    1. Set the power of femtosecond laser at 15-40 mW (810 nm), 20-60 mW (1,040 nm) at the specimen. Set opening time of the shutter at 0.05-0.2 s.
    2. Take the dish with cells from the incubator and mount it in the CO2 incubator on the stage of microscope.
    3. Move the objective in vertical direction to locate the imaging plane under bright-field imaging of the CCD camera. Move the specimen stage in horizontal direction to ensure that no cell locates in the center of FOV. Open the shutter and adjust the distance between two lenses of the relay telescope to ensure the diameter of femtosecond laser focus at ~2 μm. Close the shutter to complete adjustment.
    4. Move the microscope stage to randomly select 5~10 grids. It can be indicated and localized by the grids in the bottom of the Petri dishes under bright-field imaging of the CCD camera. Mark/record the coordinates of selected grids in the dish.
    5. Stimulate all cells located in the selected grids one by one manually under bright-field imaging of the CCD camera.
  6. Put the dish back in the incubator. Incubate the cells 24 h at 37 °C before immunofluorescence microscopy. Turn off the femtosecond laser and confocal microscope after the photostimualtion procedure.
  7. Immunofluorescence microscopy of phosphorylated eIF4E in cells with photostimulation for the confirmation of ERK activation
    1. Take the dish containing cells with photostimulation treatment in step 4.5 out of the incubator. Remove the culture medium. Wash the cells with PBS once. Remove PBS.
    2. Add 1 mL of 5% paraformaldehyde (4 °C) into the dish. Fix the cells with 5% paraformaldehyde for 10 min. Remove the paraformaldehyde buffer. Wash the cells with PBS for 5 min twice. Remove PBS.
    3. Add 1 mL of 0.5% Triton X-100 into the dish. Incubate the cells 15 min at room temperature. Remove the Triton X-100 buffer. Wash the cells with PBS for 5 min twice. Remove PBS.
    4. Add 1 mL of 1% BSA buffer into the dish. Incubate the cells 30 min at room temperature. Remove the BSA buffer.
    5. Dilute anti-eIF4E antibody (phosphor S209) in 1 mL of PBS with 1% BSA to a final concentration of 1 μg/mL. Add the buffer into the dish. Incubate the cells for 10-12 h at 4 °C. Remove the buffer.
    6. Wash the cells with PBS for 5 min twice. Remove PBS.
    7. Dilute the secondary antibody anti-Rabbit IgG H&L in 1 mL of PBS with 1% BSA to a final concentration of 2 μg/mL. Add the buffer into the dish. Incubate the cells 2 h at room temperature. Remove the buffer.
    8. Wash the cells with PBS. Remove PBS.
    9. Add 1 mL of PBS into the dish.
    10. Turn on the laser scanning confocal microscope. Open the microscope software. Set excitation laser at 488 nm. Set the power level of 488 nm laser at 0.1 mW. Set imaging size as 512 x 512 pixels. Set interval time of each pixel as 2.4 μs.
    11. Put the dish with immunofluorescent staining cells on the microscope stage. Locate the selected boxes under bright-field imaging of the CCD camera.
    12. Start single frame confocal scanning. Save the fluorescent pictures of photostimulation cells.
    13. Move the stage randomly to locate areas with no femtosecond laser stimulation. Start single frame confocal scanning. Save the fluorescent pictures of no stimulation cells as control data.
  8. Turn off the confocal microscope after the experiment.

5. Activation of Mitoflashes and Other Mitochondrial Events by Photostimulation

NOTE: To observe mitochondrial morphological dynamics, Hela cells are transfected with Mito-GFP in step 5.1 to fluorescently indicate mitochondria. To observe mitoflashes, Hela cells are transfected with mt-cpYFP in step 5.1.

  1. Prepare Hela cells transfected with Mito-GFP or mt-cpYFP following step 2.
  2. Turn on femtosecond laser and ensure the shutter is closed.
  3. Turn on the laser-scanning confocal microscope. Set excitation laser at 488 nm. Set the power level of 488 nm laser at 0.1 mW. Set imaging size as 512 x 512 pixels. Set total imaging time of each frame as 2.2 s. Set the interval time between two frames at 0 s. Set total imaging frames as 200 frames to provide ~440 s continuous microscopy in an individual experiment.
    NOTE: The interval of two adjacent frames, total imaging frames and imaging time of continuous microscopy can be adjusted according to experimental requirements.
  4. Prepare the CO2 incubation system as described in step 3.3 if needed.
  5. Delivering femtosecond laser stimulation into the target mitochondrion using Stim-A mode
    1. Take the dish containing cells transfected with Mito-GFP or mt-cpYFP from incubator and put the dish on the microscope stage.
    2. Check the status of femtosecond laser as step 3.5.2. Ensure that the focus of femtosecond laser is located in the center of FOV. Set a reference arrow at the center of the fluorescent imaging window to indicate the position of the focus.
    3. Set the power of femtosecond laser at 5-30 mW (810 nm), 10-40 mW (1040 nm) at the specimen. Set opening time of the shutter at 0.05-0.1 s.
    4. Use fast scanning mode to select a target cell well expressed Mito-GFP or mt-cpYFP.
    5. Select one mitochondrion randomly in the target cell as the experimental subject. Move the microscope stage in order to localize the target mitochondrial tubular structure at the center of FOV (indicate by the reference arrow) by fast scanning mode.
    6. Click the Start bottom to start continuous microscopy imaging progress.
    7. Open the shutter at any pre-defined time to deliver the femtosecond laser stimulation designed in step 5.5.3 into the target mitochondrial tubular structure.
      NOTE: (1) The femtosecond laser exposure on the mitochondrial tubular structure can be controlled by the shutter at any time during the confocal microscopy. (2) Perform only one femtosecond-laser exposure in one experiment because one femtosecond laser stimulation may perturb the mitochondrial status over a long period.
    8. Wait until the imaging process is complete. Save the imaging data for further data analysis.
  6. Turn off the femtosecond laser and confocal microscope after the experiment.

6. Oscillation of Mitochondrial Membrane Potential on Target Mitochondria in Hela Cells by Femtosecond Laser Stimulation

  1. Prepare Hela cells following the steps 2.1.1-2.1.6.
  2. Incubate the cells for 24 h at 37 °C before experiment.
  3. Prepare the TMRM staining solution: dilute the TMRM in 1 mL of DMEM with 10% FBS to a final concentration of 100 nM.
  4. Take the dish with cells prepared in step 5.2.1 and 5.2.2 out of the incubator. Remove the culture medium. Add the TMRM staining solution prepared in step 6.3 into the dish. Stain for 15-20 min at 37 °C in the incubator. Remove the staining solution. Wash the cells with PBS once. Add 1 mL of culture medium into the dish.
  5. Turn on femtosecond laser and ensure the shutter is closed.
  6. Turn on the laser-scanning confocal microscope. Open the microscope software. Set excitation laser at 532 nm. Set the power level of 532 nm laser at 0.1 mW. Set imaging size as 512 x 512 pixels and frame generation time at 2.2 s. Set the interval time between two frames at 0 s. Set total imaging frames as 200 frames to provide ~440 s continuous microscopy in an individual experiment.
    NOTE: The interval of two adjacent frames, total imaging frames and imaging time of continuous microscopy can be adjusted according to experimental requirements.
  7. Prepare the CO2 incubation system described in step 3.3 if needed.
  8. Use Stim-A mode to deliver femtosecond laser stimulation into the target mitochondrion. Follow steps 5.5.1-5.5.8 to complete experiment.
    NOTE: In step 6.8, select a mitochondrion which is well stained with TMRM as the target mitochondrion.
  9. Turn off the femtosecond laser and confocal microscope after the experiment.

7. Changes of Bax and Cytochrome C on the Target Mitochondria in Hela Cells by Femtosecond Laser Stimulation

NOTE: In this experiment, seed the cells in Petri dishes with cell location grids (Figure 3B) to localize the cell which is treated by femtosecond laser. Stain the cells with TMRM to localize the mitochondrion which is selected to be stimulated by femtosecond laser.

  1. Prepare Hela cells in a Petri dish with cell location grids (Figure 3B) as described in step 4.1.
  2. Stain the cells with TMRM as described in steps 6.3 and 6.4.
  3. Turn on femtosecond laser and ensure the shutter is closed.
  4. Turn on the laser-scanning confocal microscope. Open the microscope software. Set excitation laser at 532 nm. Set the power level of 532 nm laser at 0.1 mW. Set imaging size as 512 x 512 pixels and frame generation time at 2.2 s. Set the interval time between two frames at 0 s. Set total imaging frames as 50 frames to provide ~110 s continuous microscopy in an individual experiment.
  5. Delivering femtosecond laser stimulation into the target mitochondrion using Stim-A mode
    1. Set the power of femtosecond laser at 5-30 mW (810 nm), 10-40 mW (1040 nm) at the specimen. Set opening time of the shutter at 0.05-0.1 s.
    2. Take the dish containing cells stained with from the incubator and put the dish on the microscope stage.
    3. Use fast scanning mode to select the target cell which is well stained with TMRM.
    4. Move the stage in order to localize the target mitochondrial tubular structure at the center of FOV by using fast scanning mode. Mark the coordinate of the grid which the selected cell is located under bright-field imaging.
    5. Click the Start bottom to start continuous microscopy imaging progress.
    6. Open the shutter at any pre-defined time of microscopy imaging progress manually to deliver the femtosecond laser stimulation designed in step 7.5.1 into the target mitochondrial tubular structure.
    7. Wait until the imaging process is complete. Mark the selected mitochondrion which is simulated by femtosecond laser. Save the imaging data for further data analysis.
    8. Turn off the femtosecond laser and confocal microscope after the experiment. Prepare immunofluorescence microscopy of Bax or cytochrome C on the experiment cells.
  6. Immunofluorescence microscopy of Bax or cytochrome C on the femtosecond laser treated mitochondrion.
    1. Take the dish from the microscope stage.
    2. Complete immunofluorescent staining of Bax or cytochrome C follow steps 4.7.1-4.7.9.
      NOTE: Use anti-Bax or anti-cytochrome C instead of anti-eIF4E in step 4.7.5 to finish immunofluorescent staining of Bax or cytochrome C in step 7.6.2.
    3. Turn on the laser-scanning confocal microscope and open the microscope software. Set excitation laser at 488 nm and 532 nm. Set the power level of 488 nm and 532 nm laser at 0.1 mW. Set imaging size as 512 x 512 pixels and frame generation time at 2.2 s.
    4. Put the dish with immunofluorescent staining cells on the microscope stage. Locate the selected grid under bright-field imaging of the CCD camera. Locate the cell which is treated by femtosecond laser.
    5. Start single frame confocal scanning. Locate the mitochondrion which is stimulated by femtosecond laser. Save the fluorescent picture of photostimulation cell for further data analysis.
  7. Turn off the confocal microscope after the experiment.

Photostimulation by Femtosecond Laser Activates Extracellular-signal-regulated Kinase (ERK) Signaling or Mitochondrial Events in Target Cells

Learning Objectives

The photostimulation can be performed simultaneously along with continuous confocal scanning microscopy. The photostimulation can start at any pre-defined time slot in the time-lapse confocal microscopy sequence. The confocal microscopy can monitor cellular molecules by fluorescent imaging. The molecular responses to photostimulation and other dynamics can be identified in this way. Theoretically, if ERK is activated, it will be phosphorylated move from the cytoplasm to cell nucleus27. The specific cell fate can be regulated by the certain patterns of this ERK signal28. In recent studies, optical modulation based on optogentics has provided a high precise control of the ERK signal in duration and magnitude and revealed that perturbed ERK signal transmission dynamics drives improper proliferation in cancer cells7,8. Here, we demonstrate the ERK2 translocation into nucleus after treating cell with a short flash of femtosecond laser by using the method presented in this protocol. As shown in Figure 5A, ERK2-GFP fluorescence reaches the maximum after several minutes of femtosecond laser simulation. The ERK2 molecules will be dephosphorylated after activating downstream substrates in the nucleus, and then the ERK2 comes back to the cytoplasm indicated by decreasing of nuclear GFP fluorescence. ERK2 can be activated for multiple times by multiple photostimulations (Figure 5B). Therefore, it is able to manipulate the ERK2 signal pattern precisely by controlling interval time between multiple stimuli. In addition, ERK2 can be activated in adjacent cells around the stimulated cell occasionally (Figure 5C). This observation indicates that some diffusible molecules may be released by the cell treated with femtosecond laser to activate ERK2 in the adjacent cells. Phosphorylation of ERK2 downstream protein eIF4E can be confirmed and visualized by immunofluorescence microscopy (Figure 5D). This result indicates that femtosecond laser stimulation can successfully activate ERK signaling pathway. More detailed results are in Wang S., et al.22.

Mitochondrial oxidative flashes (mitoflashes) are oxidative bursts in mitochondria that root from complex mitochondrial molecular dynamics. In last past decade, mitoflashes are realized to be an elemental mitochondria signaling event and take an important part in multitudinous cell functions29,30,31. Traditionally, mitoflashes are usually observed by chance when treating cells with chemicals to provide indirect stress to mitochondria29,30. By implementing this photostimulation scheme, we achieve a controllable and precise manner to excite mitoflashes at single mitochondrial tubular level. The successful mitoflash excitation is shown in Figure 6A. Interestingly, the properties of mitoflashes such as pulse peak, width and response durations32 are closely related to the femtosecond laser power. More detailed quantitative analysis of mitoflashes excited by femtosecond laser stimulation is in Wang S., et al.32. This photostimulation to mitochondria also shows varieties of mitochondrial molecular dynamics, including fragmentation and restoration of mitochondrial morphology (Figure 6B), and oscillation of mitochondrial membrane potential (Figure 6C). Similar to photo-activated mitoflashes, these mitochondria events have different performance with different power intensities of photostimulation. It is different from activation of ERK signaling pathway. The influence of femtosecond laser is highly restricted on a single mitochondrial tube. More detailed results are in Wang Y., et al.24 and Shi F., et al.25.

Figure 1
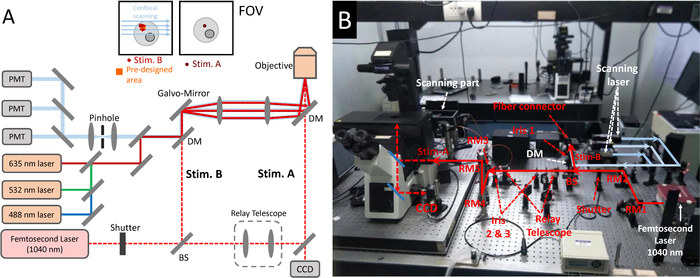
Figure 1: The photostimulation scheme established on a femtosecond laser coupling into a confocal microscope. (A) Optical paths of (B) the photostimulation and confocal imaging system. The femtosecond laser is at first split by a 50/50 beam splitter into two beams. The transmission is expanded by a relay telescope and then reflected into the objective to form Stim-A. The reflection beam is aligned through the microscope scanning system to form Stim-B. A CCD camera is used to provide a bright-felid imaging to monitor cells and focus of femtosecond laser in Stim-A mode. Stim-A = a fixed focus in the center of FOV; Stim-B = a special scanning frame at pre-designed area. DM = dichroic mirror, BS = beam splitter, RM = reflective mirror. The wavelength of confocal scanning laser is 488 nm/532 nm/635 nm, and the typical collection wavelength interval of fluorescence is <560 nm/560-625 nm/> 625 nm. The fiber femtosecond laser (1,040 nm, 120 fs, 50 MHz, 1 W) can be replaced by a Ti = Sapphire laser (810 nm, 80 MHz, 65 fs, 1 W) or other commercial femtosecond laser oscillators. Please click here to view a larger version of this figure.

Figure 2
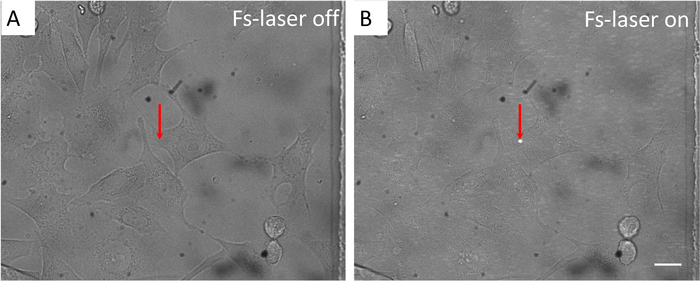
Figure 2: In Stim-A mode, the localization and size of femtosecond laser focus on the target cell at confocal imaging plane under bright-felid imaging. (A) Femtosecond laser is blocked by the shutter. (B) Femtosecond laser is on. Arrow: the reference arrow is set at the center of FOV to confirm that the femtosecond laser focus locates the correct position. Scale bar = 10 µm. Please click here to view a larger version of this figure.

Figure 3
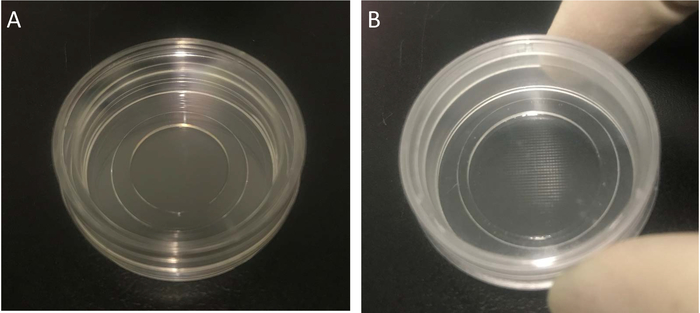
Figure 3: The Petri dish used for cell culture, transfection and photostimulation experiments. (A) The 35 mm Petri dish with a 15 mm diameter and 0.17 mm thickness glass bottom. (B) The 35 mm Petri dish with a glass bottom and an imprinted 500 µm cell location grid. Please click here to view a larger version of this figure.

Figure 4
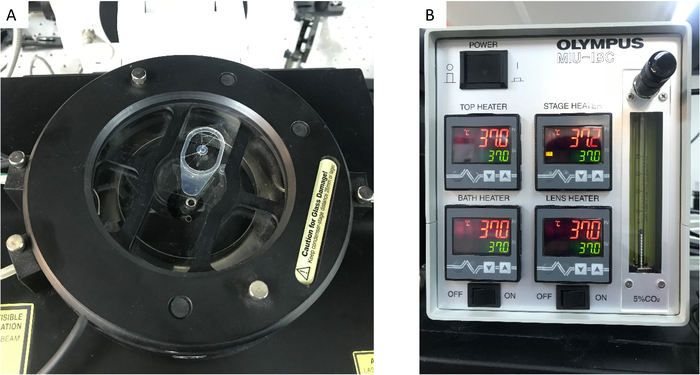
Figure 4: The CO2 incubation system. (A) The CO2 incubator stage and (B) the control panel. Please click here to view a larger version of this figure.

Figure 5
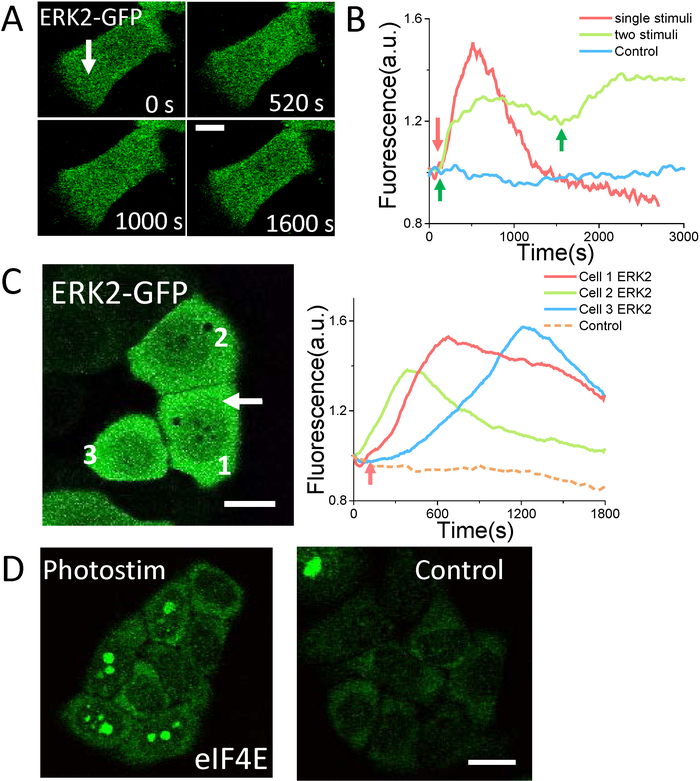
Figure 5: ERK photoactivation by using Stim-A mode. (A) Single photo stimulus (1,040 nm, 40 mW, 0.1 s) induces ERK2-GFP translocation into nucleus and then back to cytoplasm. (B) ERK2 signal pattern mediated by single femtosecond laser exposure (red arrow, 1,040 nm, 40 mW, 0.1 s) and two photostimulations (green arrows, 810 nm, 30 mW, 0.1 s). (C) ERK activation in surrounding cells by single short femtosecond laser exposure in target cell (white arrow, 810 nm, 24 mW, 0.2 s). (D) The Immunofluorescence of eIF4E-P shows a significant increase 24 h after single photosimulation (810 nm, 25 mW, 0.2 s). Scale bar = 10 µm (A), and 20 µm (B, C). The fluorescence of ERK2-GFP and eIF4E-P is excited by 488 nm excitation laser and collected in <560 nm channel. Please click here to view a larger version of this figure.

Figure 6
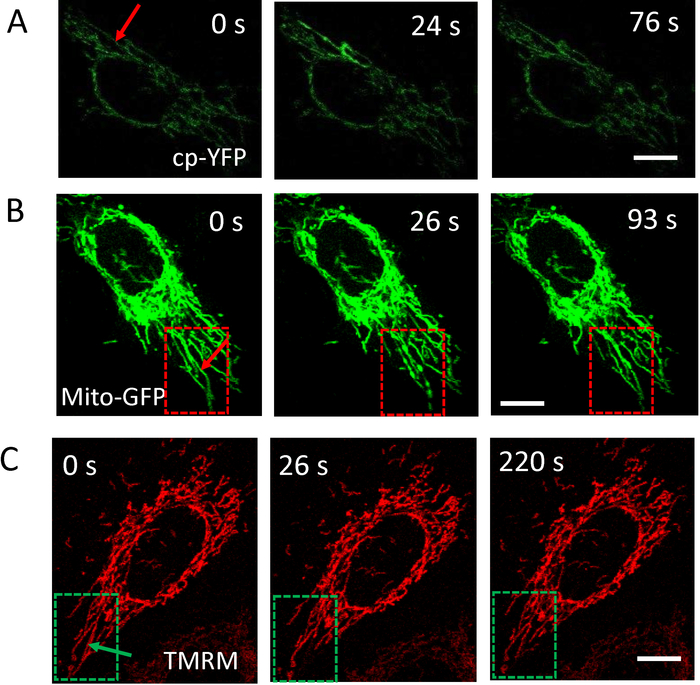
Figure 6: Multiple mitochondria events induced by photostimulation under Stim-A mode. (A) Excitation of mitoflash on the stimulated mitochondrial tubule by single stimulus (810 nm, 16 mW, 0.1 s). (B) Mitochondria morphological fragmentation and restoration induced by single photostimulation (1,040 nm, 30 mW, 0.1 s). (C) Oscillation of mitochondrial membrane potential by single femtosecond laser stimulation (1040 nm, 20 mW, 0.1 s). Arrows in (A) (B) and (C) indicate the position of photostimulations.Scale bar = 10 µm. The fluorescence of Mito-GFP or mt-cpYFP is excited by 488 nm excitation laser and collected in <560 nm channel. The fluorescence of TMRM is excited by 532 nm excitation laser and collected in 560-625 nm channel. Please click here to view a larger version of this figure.

0.05 s 0.1 s 0.2 s 0.5 s
810 nm, 65 fs, 80 MHz 20 – 65 mW 10 – 60 mW 5 – 50 mW 5 – 40 mW
1040 nm, 120 fs, 50 MHz 30 – 100 mW 20 – 80 mW 15 – 70 mW 10 – 60 mW

Table 1: Recommended stimulation duration and average power of femtosecond laser in Stim-A mode.

0.05 s 0.1 s 0.2 s 0.5 s
810 nm, 65 fs, 80 MHz 25 – 40 mW 20 – 30 mW 15 – 25 mW 10 – 25 mW
1040 nm, 120 fs, 50 MHz 40 – 60 mW 30 – 50 mW 25 – 40 mW 20 – 30 mW

Table 2: Recommended stimulation duration and average power of femtosecond laser in Stim-A mode at 2 x 2-3 x 3 µm2 in cell.

List of Materials

inverted microscope Olympus
femtosecond laser Fianium
CO2 incubation system Olympus MIU-IBC
petri dish NEST 801002
petri dish with imprinted grid Ibidi 81148
ERK-GFP addgene 37145 A gift from Rony Seger's lab
mt-cpYFP A gift from Heping Cheng's lab
mito-GFP Invitrogen C10508
Tetramethylrhodamine (TMRM) Invitrogen T668 Dilute in DMSO
polyethylenimine (PEI) Sigma-Aldrich 9002-98-6 Dilute in PBS
paraformaldehyde Solarbio P8430 Dilute in PBS
Triton X-100 Solarbio T8200 Dilute in PBS
Bovine Serum Albumin (BSA) Sigma-Aldrich 9048-46-8 Dilute in PBS
Tween20 Sigma-Aldrich 9005-64-5
anti-eIF4E antibody abcam ab76256
anti-Bax antibody abcam ab53154
anti-cytochrome C antibody abcam ab90529
secondary antibody (anti-Rabbit IgG H&L, Alexa Fluor 488) abcam ab150077

Lab Prep

Direct control of cellular defined molecular events is important to life science. Recently, studies have demonstrated that femtosecond laser stimulation can simultaneously activate multiple cellular molecular signaling pathways. In this protocol, we show that through coupling femtosecond laser into a confocal microscope, cells can be stimulated precisely by the tightly-focused laser. Some molecular processes that can be simultaneously observed are subsequently activated. We present detailed protocols of the photostimulation to activate extracellular signal regulated kinase (ERK) signaling pathway in Hela cells. Mitochondrial flashes of reactive oxygen species (ROS) and other mitochondrial events can be also stimulated if focusing the femtosecond laser pulse on a certain mitochondrial tubular structure. This protocol includes pretreating cells before photostimulation, delivering the photostimulation by a femtosecond laser flash onto the target, and observing/identifying molecular changes afterwards. This protocol represents an all-optical tool for related biological researches.

Direct control of cellular defined molecular events is important to life science. Recently, studies have demonstrated that femtosecond laser stimulation can simultaneously activate multiple cellular molecular signaling pathways. In this protocol, we show that through coupling femtosecond laser into a confocal microscope, cells can be stimulated precisely by the tightly-focused laser. Some molecular processes that can be simultaneously observed are subsequently activated. We present detailed protocols of the photostimulation to activate extracellular signal regulated kinase (ERK) signaling pathway in Hela cells. Mitochondrial flashes of reactive oxygen species (ROS) and other mitochondrial events can be also stimulated if focusing the femtosecond laser pulse on a certain mitochondrial tubular structure. This protocol includes pretreating cells before photostimulation, delivering the photostimulation by a femtosecond laser flash onto the target, and observing/identifying molecular changes afterwards. This protocol represents an all-optical tool for related biological researches.

Procedure

Direct control of cellular defined molecular events is important to life science. Recently, studies have demonstrated that femtosecond laser stimulation can simultaneously activate multiple cellular molecular signaling pathways. In this protocol, we show that through coupling femtosecond laser into a confocal microscope, cells can be stimulated precisely by the tightly-focused laser. Some molecular processes that can be simultaneously observed are subsequently activated. We present detailed protocols of the photostimulation to activate extracellular signal regulated kinase (ERK) signaling pathway in Hela cells. Mitochondrial flashes of reactive oxygen species (ROS) and other mitochondrial events can be also stimulated if focusing the femtosecond laser pulse on a certain mitochondrial tubular structure. This protocol includes pretreating cells before photostimulation, delivering the photostimulation by a femtosecond laser flash onto the target, and observing/identifying molecular changes afterwards. This protocol represents an all-optical tool for related biological researches.

Tags