Genetically modified foods are products which contain an ingredient or ingredients whose DNA has been specifically altered. Presence of these modifications can be detected using a technique called the polymerase chain reaction.
Genetic modification of foods has been a controversial issue due to debated concerns over health and environmental safety. The ability to detect genetically altered DNA in food samples of interest allows for educated decision-making about the safety and potential dangers of using genetically modified organisms, or GMO’s, in food supplies.
The polymerase chain reaction, or PCR, is used to amplify food DNA to determine the presence or absence of genetically modified sequences. Gel electrophoresis then pulls the amplified DNA through an agarose gel matrix and separates DNA bands of different sizes that correspond to modified or non-modified markers. These are then compared to control bands from foods known to contain GMO’s, or known to be modification free.
This video will illustrate the principles behind detecting genetically modified DNA from food samples, how to extract DNA and amplify markers used in the genetic modification process, and how the presence or absence of GMO’s in food samples can be established.
Polymerase chain reaction identifies sequences of DNA that have been inserted into the genetically modified food. DNA is a relatively stable molecule, so viable DNA fragments suitable for amplification can be isolated even from highly processed goods, like corn chips or vegetable burgers.
A small number of regulatory DNA sequences are used to control the expression of inserted genes, so these sequences are present in the majority of GM crops. This procedure identifies two of the most commonly used, the 35S promoter gene and the nopaline synthase terminator gene. The 35S sequence is a strong promoter, and when attached to an inserted gene will drive constant, high levels of expression. The nopaline synthase terminator is included to stop transcription of the inserted gene at the desired endpoint.
PCR involves repetitive heating and cooling cycles in a thermal cycler, a machine that tightly controls the temperature of PCR reaction tubes. Heating the sample to 94 °C causes DNA strands to denature and separate. Rapid cooling to between 45 and 65 °C allows primers to anneal to the separated DNA strands. Finally, reheating to 72 °C allows the Taq polymerase enzyme to extend the primers and complete duplication of the target region.
Purchased plant primer is added to each sample, and will amplify in samples containing plant DNA. GMO positive templates for 35S and NOS are used to provide a positive control for GMOs. A certified non-GMO is used as a negative control. If any of these control reactions show unexpected bands, the results of test samples cannot be trusted.
Amplified DNA is run through an agarose gel by electrophoresis. PCR products are mixed with a dye and loaded into wells. DNA is negatively charged, and when loaded into the gel at the cathode end of the chamber will move toward the anode end when current is applied. Larger DNA fragments cannot move as easily through the gel matrix so will stay closer to the cathode, while smaller sequences move toward the anode end, resulting in separation of differently sized DNA into distinct bands.
After electrophoresis, gel staining helps visualize separated DNA bands.
Now that we are familiar with the principles behind GMO detection and the use of PCR and electrophoresis for GMO identification, let’s take a look at how this can be carried out in the laboratory.
Once the food products of interest have been identified, analysis can begin. To extract the DNA, take two clean screwcap tubes, and into each of these transfer 500 μL of purchased DNA isolation reagent, making sure to pipette the mix up and down between aliquots to evenly mix the reagent. Label one of the tubes “non-GMO”, and the other “Test”.
Next, weigh out 0.5 g of certified non-GMO food, and place into a clean mortar. Add 2.5 mL of distilled water, and grind with the pestle for 2 min to form a slurry. Add another 2.5 mL distilled water and continue grinding the slurry until it becomes smooth enough to pipette.
Pipette 50 μL of the known non-GMO slurry to the “non-GMO” labeled screwcap tube containing the DNA isolation reagent. Now add 50 μL of the test food sample slurry to the screwcap tube marked “Test”. Vortex the two tubes containing the food samples and DNA reagent for 1 min. Next, place the tubes in a water bath at 95 °C for 5 min. Finally, place the tubes in a centrifuge for 5 min. Upon examination, a solid pellet should be formed at the bottom of the tube. If a pellet is not formed after 5 min, centrifuge again for 2-min intervals until a pellet forms. Samples can now be used immediately for PCR, or stored in a refrigerator for up to 1 week.
First, number six PCR tubes. These numbers will correspond to the tube contents listed in the Table. Place each of the labeled PCR tubes in a microtube holder with caps open.
Using a fresh tip for each addition, add 20 μL primer indicated in the Table to each PCR tube. Next, add 20 μL of the DNA samples indicated in the Table to each PCR tube. Pipette up and down to mix. For pelleted samples, be sure to pipette only from the supernatant, and avoid the solid pellet at the bottom of the tubes. Finally, place the PCR tubes into a thermal cycler and program it to cycle through the heating and cooling steps indicated in the table.
Place a 3% agarose gel into the electrophoresis chamber with the wells closest to the cathode end. Add TAE buffer into the chamber to cover 2 mm above the gel tray. Collect the PCR tubes from the thermocycler and place them in a microtube holder. Using a fresh pipette tip each time, add 10 μL of purchased DNA loading dye to each sample and mix well.
Using a fresh tip each time, load the wells of the agarose gel with 20 μL of molecular weight ruler into one well, and 20 μL of each sample into subsequent wells, as indicated in this table. Set the electrophoresis chamber to run at 100 V for 30 min.
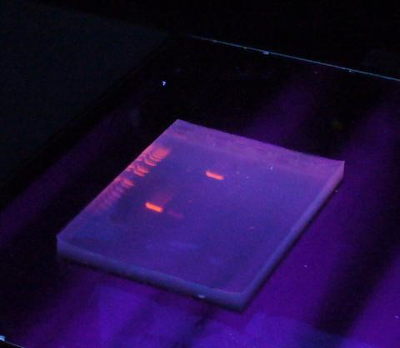
Once the gel has finished running, carefully unplug the gel chamber, remove the tray, and slide the gel into a staining tray. Immerse the gel in purchased 100x gel stain for 5 min shaking the tray gently to distribute the stain. Once stained, transfer the gel into a washing container and rinse with tap water for approximately 10 s. Destain by washing three times in warm tap water for 3 min each, each with gentle shaking for best results. If necessary, continue destaining in warm water until the desired contrast is reached.
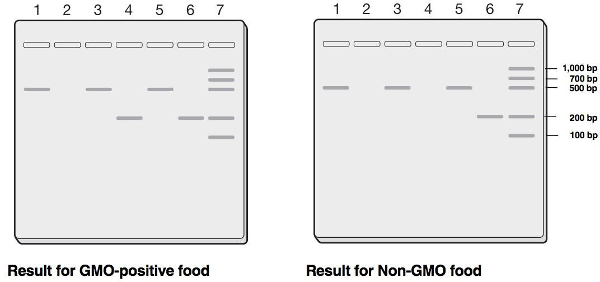
The presence or absence of a 200 bp band in lane 4 indicates whether the test food contains GMOs. The plant primers determine whether plant DNA was successfully extracted from the sample. The non-GMO food control is an indicator of false positive results, should they occur. If the non-GMO food control comes out as positive, it means the PCR was contaminated at some point. The GMO-positive template control is an indicator of false negatives. If the GMO-positive template control does not amplify, there is a problem with the PCR reaction and a GMO-negative result from the test food can’t be trusted.
Gels can be placed on a white or yellow paper to provide contrasting background to highlight DNA bands, or increased contrast can be achieved using a UV light box.
The ability to test foodstuffs or products for genetically modified ingredients is pertinent to a number of scientific or regulatory applications.
There is some evidence that transgenic DNA from genetically modified crops can become introgressed into the genomes of wild crop populations. For example, pollinators may facilitate this transfer by fertilizing wild-type plants with pollen from a genetically modified source. This is a concern, as the impacts of the spread of these inserted genes on ecosystems as a whole are not well understood. PCR testing of wild populations can provide data on the potential spread, or successful containment, of genetic inserts.
Lack of labeling, or incorrect labeling of genetically modified ingredients can be a consumer concern. This may be due to the consumer’s preference of consumption, or potential introduction of allergens during the GM process, though the latter is controversial. In some countries, genetically modified ingredients are required to be listed on food packaging. Regulatory boards in such countries may use PCR testing to check the accuracy of food labeling.
Where the genetic modification introduced to a crop confers pesticide resistance, some studies have raised concerns about the production of “super-weeds”. Essentially, these can be any plant not initially targeted for modification that obtains the resistance to pesticide through mechanisms such as introgression or hybridization. These plants may then be able to spread more successfully, and be harder to control than those without the insert. PCR testing for genetic modification can help to highlight and track such potential populations to determine if this spread could prove problematic.
You’ve just watched JoVE’s introduction to Testing for GMO Foods. You should now understand the principles behind identifying genetically modified foods using PCR, how to extract and amplify DNA from food, and how to determine if your food sample has been genetically modified. Thanks for watching!