- 00:07Panoramica
- 01:09Principles of Near-infrared Fluorescence Imaging
- 03:08Imaging Set-up
- 03:55In Vivo Sample Preparation and Image Acquisition
- 05:55Ex Vivo Sample Preparation and Image Acquisition
- 06:46Risultati
- 08:17Applications
- 09:44Summary
腹部大動脈瘤の近赤外蛍光イメージング
English
Condividere
Panoramica
出典:アービン・H・ソエプリアートナ1、ケルシー・A・ブレンス2、クレイグ・J・ゲーゲン1
1インディアナ州パデュー大学、ウェストラファイエット大学ウェルドンバイオメディカルエンジニアリングスクール
2インディアナ州ウェストラファイエット校パデュー大学生化学科
近赤外蛍光(NIRF)イメージングは、蛍光プローブを利用して組織の複雑な生体分子アセンブリを可視化するエキサイティングな光学技術です。NIRFイメージングは、疾患の非侵襲的イメージングのための従来のイメージング方法に対して多くの利点を有する。単一光子放出コンピュータ断層撮影(SPECT)や陽電子放射断層撮影(PET)とは異なり、NIRFイメージングは高速で高スループットであり、電離放射線を伴いません。さらに、工学的標的特異的および活性化可能な蛍光プローブの最近の発展は、NIRFに高い特異性と感度を提供し、癌および心血管疾患の研究において魅力的なモダリティとなっています。提示された手順は、NIRFイメージングの背後にある原理と、様々な疾患を研究するために、小動物の生体内およびex vivo実験を行う方法を実証するように設計されています。ここに示す具体例は、マトリックスメタロプロテイナーゼ-2(MMP2)の活性化可能な蛍光プローブを用いて、腹部大動脈瘤(AAA)の2つの異なるげっ歯類モデルにおける取り込みを研究する。
Principi
Procedura
Risultati
Representative in vivo and ex vivo NIRF images taken from rodents with abdominal aortic aneurysms (AAAs) are shown in Figures 1-2. An activatable fluorescent probe was injected systemically via the tail vein to visualize matrix metalloproteinase-2 (MMP2) activity. MMP2 is an elastolytic enzyme involved in the degradation of the extracellular matrix that plays a major role in the initiation and progression of AAA. All images were acquired using a 625 nm excitation filter, a 700 nm emission filter, and 60 seconds exposure time.
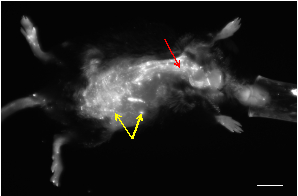
Figure 1: A representative in vivo NIRF image of an apolipoprotein E-deficient mouse that developed an AAA following infusion of angiotensin-II. Most of the small spots showing high signal are from skin autofluorescence (yellow arrows). The vasculature can be visualized as tubular structures with high fluorescence signals (red arrow). Scalebar: 1 cm.
Figure 2 shows an increase in MMP2 activity in the aneurysmal region of the abdominal aorta, as seen by the observed increase in signal intensity relative to healthy regions of the abdominal aorta. This result is consistent with results in the literature that show elevated MMP2 levels within AAAs. Excess fluorescent probes were filtered and accumulated in the kidneys, leading to bright fluorescent signals.
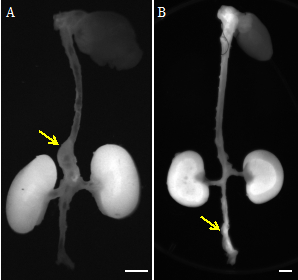
Figure 2: NIRF images of AAAs from two different animal models: (A) a suprarenal AAA in angiotensin II-infused apolipoprotein-E deficient mouse and (B) an infrarenal AAA in rat infused with porcine pancreatic elastase. Yellow arrows point to the AAAs. Scalebars: 3 mm.
Applications and Summary
NIRF imaging relies on fluorescent probes to quantify and visualize biomolecular assemblies in tissues. Absorbed photon energy from near-infrared light excites fluorescent molecules to a higher energy state, and the emitted light with a longer characteristic wavelength is captured by a fluorescence imaging system. Here, the application of NIRF imaging to study MMP2 activity in abdominal aortic aneurysms was demonstrated in vivo and ex vivo. Unlike SPECT or PET, which are considered to be the gold standards in studying metabolic processes in the body noninvasively, NIRF imaging is a rapid and high-throughput imaging technique that does not involve ionizing radiation. One of the limitations of this modality is its relatively small penetration depth. Although this limitation makes clinical imaging of deep tissues challenging, NIRF imaging plays an important role studying tumors and cardiovascular diseases in small animals.
Given the appropriate fluorescent probe, many molecular structures can be visualized using the presented NIRF imaging procedures to study both disease initiation and progression in small animal models. Specific ex vivo and in vivo applications include 1) evaluation of MMP activity in rodent vasculature, 2) early tumor detection in different types of cancers, and 3) assessment of nanoparticle pharmacokinetics and biodistribution for therapeutic applications. In addition to increased MMP2 activity within AAAs, other MMP fluorescent probes have been utilized to study atherosclerosis progression and to characterize cardiac extracellular matrix composition following a myocardial infarction. Furthermore, the fluorophore indocyanine green has been used to study tissue perfusion in murine models of hindlimb ischemia. To elaborate more on the application of NIRF imaging on early cancer detection, tumor-targeting NIRF dyes can be used to assess tumor margins and assist in resection procedures. The integration of near-infrared fluorophores into nanoparticles developed for drug delivery allows scientists to develop more effective nanoparticle-based therapeutics for a variety of diseases. Lastly, the ability to spatially localize the fluorescent signal in whole animals or intact tissue is a clear advantage over other conventional enzymatic assays (gel zymography) and protein analysis (western blot) that requires animals to be sacrificed and tissues to be homogenized.
Trascrizione
Near-infrared fluorescence imaging is an optical technique that utilizes fluorescent probes to visualize complex biomolecular assemblies in tissues. This noninvasive imaging technique, which is also known as NIRF, is rapid and does not require ionizing radiation.
In NIRF, fluorescent probes can be conjugated with small molecules for higher specificity to study cancer and cardiovascular disease progression. They are excited by near-infrared light which penetrates deep into tissue and may be used to delineate healthy tissue from diseased tissue that alter the concentration of these target molecules.
This video will illustrate the principles behind near-infrared fluorescence imaging as well as how to perform in vivo and ex vivo experiments in small animals to study a variety of diseases.
As the name suggests, near-infrared fluorescence imaging utilizes light within the first near-infrared window which ranges from 650 nanometers to 900 nanometers to deliver photons into tissue. Target-specific fluorescent molecules called fluorophores are typically introduced into an animal through either genetic engineering or injection prior to imaging.
These fluorophores absorb photon energy which raises the energy of the molecules from the ground state S0 to the unstable excited state S1 prime. Because this state is unstable, the molecules will relax to the lowest vibrational energy level within the excited state releasing their energy in the form of heat. The fluorophores, now in the relaxed excited state S1, then return to the ground state, emitting light of a specific wavelength.
This light has a longer wavelength than the light originally introduced into the fluorophore due to the energy that dissipates in the form of heat as the molecule relaxes to the lowest vibrational energy level. The emitted light is then captured and recorded using a fluorescence imaging system.
A graph of the absorption and emission spectra for the fluorophore shows the range of wavelengths the fluorophore can absorb and emit respectively. This fundamental shift, which is the difference in nanometers between the peak absorption and the peak emission wavelengths, is called the Stokes shift. Each fluorophore has a distinct Stokes shift which allows the emission light to be distinguished from the exciting light and makes imaging techniques such as NIRF possible.
Having reviewed the main principles of near-infrared fluorescence imaging, let’s now walk through the step-by-step procedure to prepare and image an animal.
First, use a fiber-optic light guide to connect a fiber-optic light source to the fluorescence imaging system. Select the excitation filter that matches the excitation spectrum of the fluorescence to be introduced into the sample to ensure that the correct wavelength of light is delivered.
Next, select the appropriate emission filter to match the emission spectrum of the fluorophore which will block undesired spectral components that may be attributed to autofluorescence.
To begin preparing for in vivo imaging, use isoflurane to anesthetize the animal in a knockdown chamber. Transfer the animal to a nose cone that is fixed on the imaging stage. Secure the animal’s paws to minimize motion artifacts. Apply a depilatory cream to remove the hair from the area of interest. Then, apply ophthalmic ointment to the animal’s eyes to prevent the corneas from drying.
After this, inject the activatable fluorescent molecular probe into the animal. To begin image acquisition, open the molecular imaging software. Turn on both the fiber-optic light source and the fluorescence imaging system.
Next, open the acquisition window and specify the type of exposure appropriate for the study. Available exposures include standard exposure to capture a single image, time lapse exposure to capture a series of images over a fixed time interval, and progressive exposure to capture a continuous sequence of exposures at different exposure times.
Then, select UV Transillumination as the illumination source. Using the preview image as a reference, adjust the focus, field of view, and F-stop in the capture system chamber to optimize the sampled image quality. Adjust the exposure time and position of the sample as needed. After this, close the preview window. Ensure that all of the parameters on the acquisition window match the camera and filter settings. Click “Expose” to acquire and save the image.
To prepare for ex vivo imaging, euthanize the animal in a humane fashion following the injection of the fluorescent probe. Using forceps, carefully remove any excess periaortic fat. Next, surgically extract the tissue or organ of interest. Rinse the tissue in phosphate buffered saline to remove residual blood. Then, place the sample directly on the imaging stage.
Image the ex vivo tissue following the same protocol as described for in vivo imaging. When complete, remove the sample from the stage. Turn off the system and clean the imaging stage.
Now that we have completed the protocol for obtaining near-infrared field images, let’s review the results of those scans.
In these representative images, an activatable fluorescent probe is injected systemically via the tail vein to visualize the Matrix Metalloproteinase or MMP2. Here we see an in vivo NIRF image of an apolipoprotein-E deficient mouse that developed an abdominal aortic aneurysm following infusion of angiotensin II. While most of the small high signal spots are from skin autofluorescence, the vasculature presents visually as tubular structures with high fluorescent signals.
The second representative image compares NIRF images of abdominal aortic aneurysms from two different animal models. One, a suprarenal abdominal aortic aneurysm in an angiotensin II-infused apolipoprotein-E deficient mouse. And two, an infrarenal abdominal aortic aneurysm in a rat infused with porcine pancreatic elastase.
In each, we see an increase in MMP2 activity in the aneurysmal region of the abdominal aorta. Excess fluorescent probes are filtered and accumulated in the kidneys, explaining the bright fluorescent signals observed there.
Let us now look at some other applications of near-infrared field imaging. First, NIRF imaging can be used to study cardiovascular disease in murine models.
In this study, knockout mice are injected with two different near-infrared fluorescent probes. The aortas are harvested 24 hours later and assessed via NIRF imaging. The results show significant NIRF response, indicating the presence of extensive calcification that co-locates with macrophage accumulation.
NIRF imaging can also be used to locate and evaluate tumors in vivo. In this study, tissue simulating breast phantoms containing fluorescent tumor simulating inclusions are created. The applications of NIRF imaging during breast conservation surgery are then simulated.
The results show that tumor-like inclusions are detectable by NIRF up to a depth of approximately two centimeters. Inclusions deeper than this are detectable after incisions are made into the overlaying phantom tissue. After the inclusions are removed, the surgeon evaluates the NIRF images. Any remaining fluorescence, which indicates the presence of tumors, indicates incomplete removal and is then excised.
You’ve just watched JoVE’s introduction to near-infrared imaging. You should now understand the principles of fluorophore excitation and emission, how to prepare an animal for in vivo and ex vivo NIRF imaging, and some biomedical applications. Thanks for watching!