JoVE 과학 교육
Physical Examinations II
JoVE 비디오를 활용하시려면 도서관을 통한 기관 구독이 필요합니다.  전체 비디오를 보시려면 로그인하거나 무료 트라이얼을 시작하세요.
JoVE 과학 교육 Physical Examinations II
Abdominal Exam I: Inspection and Auscultation
  • 00:00개요
  • 00:58Surface Landmarks, Anatomy, and Topography
  • 02:26Preparatory Steps
  • 03:42Abdominal Inspection Procedure
  • 05:19Abdominal Auscultation Procedure
  • 07:19Summary

Examen abdominal I: Inspection et auscultation

English

소셜에 공유하기

개요

Source : Alexander Goldfarb, MD, professeur de médecine, Beth Israel Deaconess Medical Center, MA

Maladies gastro-intestinales représentent chaque année des millions de visites et d’admissions à l’hôpital. L’examen physique de l’abdomen est un outil essentiel dans le diagnostic des maladies de l’appareil digestif ; en outre, il peut aider à identifier des processus pathologiques dans les systèmes cardiovasculaires, urinaires et autres. L’examen physique en général, l’examen de la région abdominale est important pour établir un contact médecin-patient, pour aboutir au diagnostic préliminaire sélection ultérieure en laboratoire et tests d’imagerie et déterminer l’urgence des soins.

Comme avec les autres parties de l’examen physique, une inspection visuelle et l’auscultation de l’abdomen sont faites de façon systématique afin qu’aucun résultats potentiels ne sont manquées. Devrait être une attention particulière aux problèmes déjà identifiés par les antécédents du patient. Ici, nous supposons que le patient a déjà été identifié et a avait pris l’histoire, les symptômes discutés et secteurs préoccupants identifiés. Dans cette vidéo, nous n’examinerons pas les antécédents du patient ; au lieu de cela, nous irons directement à l’examen physique.

Avant de passer à l’examen, revoyons brièvement surfaces monuments de la région abdominale, anatomie abdominale et la topographie. Voici une liste des points de repère utiles : marges costales, processus xiphoïde, muscles abdominaux rectus, linea alba, ombilic, crête iliaque, ligament inguinal et la symphyse pubienne. L’examen abdominal étend vers le bas des marges xiphoid et costales supérieurement à la symphyse pubienne inférieurement.

À des fins diagnostiques et descriptives, l’abdomen est divisé en quatre quadrants : quadrant supérieur droit (souvent dénommée dans le QSD), laissa l’hypocondre (LUQ), quadrant inférieur droit (RLQ) et quadrant inférieur gauche (LLQ) (Figure 1). La topographie plus détaillée de l’abdomen divise en 9 régions : hypocondriaque droit et gauche, lombaire droite et gauche, droite et iliaque gauche et aussi des régions hypogastrique, ombilicales et épigastriques au milieu (Figure 2).

N’oubliez pas les organes en général du projet dans chaque région abdominale ()Figure 3). Il est essentiel de connaître l’anatomie de la région et la topographie bien de bien documenter et interpréter un patient plaintes et symptômes, ainsi que les signes physiques lors de l’examen.

Figure 1
La figure 1. Quatre quadrants abdominaux. L’abdomen peut être divisé en quatre régions par deux lignes imaginaires qui se croisent à l’ombilic : quadrant supérieur droit (souvent dénommée dans le QSD), laissé l’hypocondre (LUQ), quadrant inférieur droit (RLQ) et gauche quadrant inférieur droit (LLQ) sont indiquées.

Figure 2
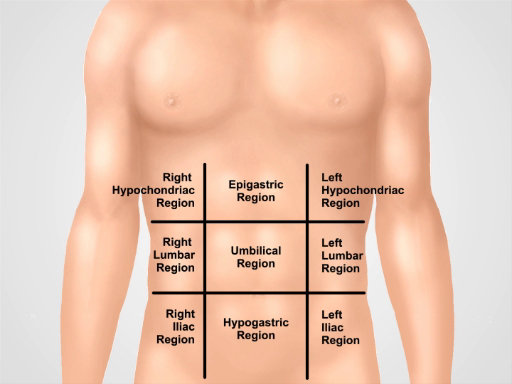
Figure 2. Neuf régions abdominales. Claviculaire lignes et plans sous-costales et intertubercular diviser l’abdomen en neuf régions : région épigastrique, région droite hypocondriaque, région hypocondriaque gauche, région ombilicale, région lombaire droite, région lombaire gauche, région hypogastrique, région inguinale droite et gauche région inguinale. Termes pour hypogastrique, ombilicale et épigastrique et régions sus-pubiennes sont les plus couramment utilisées en pratique clinique.

Figure 3
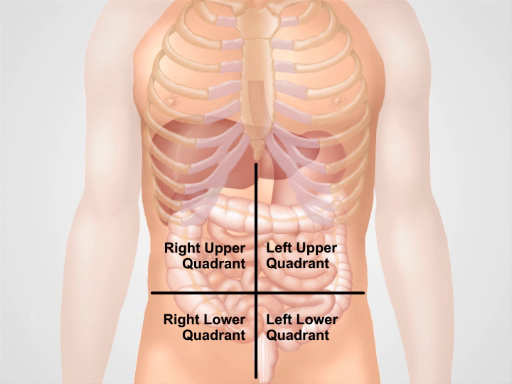
Figure 3. Localisation des différents organes dans les quatre régions abdominales. Organes dans la cavité abdominale et leur position en ce qui concerne les quatre quadrants abdominaux.

Procedure

1. préparation Avant de commencer l’examen physique de l’abdomen, s’assurer que le patient est confortable et a vidé sa vessie. Confortablement installer le patient en décubitus dorsal, éventuellement avec du patient pris en charge par un coussin de tête et genoux légèrement fléchis. Les bras du patient devraient être sur le côté et pas plié derrière la tête, comme ce temps la paroi abdominale. Demander la permission d’exposer la région abdominale du patient (« est…

Applications and Summary

In this video we reviewed the anatomy of the abdomen and learned how to perform the first two steps of the abdominal examination: inspection and auscultation. Before starting the exam, make sure that the patient is comfortable, well positioned, and adequately draped. Never examine a patient through a gown. Make sure that your hands are washed and warm. Always ask a patient for permission to perform the examination and explain every step of the procedure. Start with a visual inspection of the abdomen. Make note of abdominal contour and symmetry, skin rashes, scars from previous surgeries and injuries, distended veins, and visible peristalses and pulsations. If the presence of ascites, hernias, or masses are suspected, confirm these findings via additional maneuvers that are addressed later on in this video collection.

Omitting visual inspection and/or auscultation steps are common mistakes during an abdominal examination, and can negatively affect a physician’s ability to reach a correct diagnosis. Careful inspection of the abdominal area is especially important. Often times an experienced physician can make a preliminary diagnosis based on a patient’s history and inspection alone. A combination of different pathological signs is of particular diagnostic value. For example, jaundice, ascites, spider angiomas, and caput medusae (distended veins surrounding the umbilicus) can be simultaneously present in a patient with liver cirrhosis.

Once visual inspection is completed, auscultation follows. Auscultate separately for bowel sounds and for bruits. Always perform auscultation before abdominal percussion and palpation. Abdominal auscultation is of clinical significance, especially in a symptomatic patient. The findings should be interpreted in the context of the patient’s history: for example, the absence of bowel sounds in a patient with abdominal pain suggests an abdominal catastrophe (such as peritonitis or the later stages of an intestinal obstruction), but is normal in postoperative patients for a few days following abdominal surgery.

내레이션 대본

Gastrointestinal disease accounts for millions of office visits and hospital admissions annually, which makes the abdominal physical exam one of the most commonly performed assessments. A thorough physical examination not only helps in diagnosing diseases of the gastrointestinal tract, but also aids in identification of pathological processes in cardiovascular, urinary, and other systems. As with the other parts of a physical examination, the assessment of the abdomen also proceeds in a systematic fashion.

This video will begin with a review of the surface landmarks of the abdomen. It will then go on to demonstrate correct patient positioning followed by proper inspection of the abdomen, and precise auscultation techniques. We will also discuss the possible symptoms and their clinical significance.

Before we get to the examination let’s briefly review the surface landmarks of the abdominal region, abdominal anatomy, and topography necessary for interpreting the findings of this exam. The illustration shown here highlights the costal margins, xiphoid process, rectus abdominal muscle, linea alba, umbilicus, ileac crest, inguinal ligament, and symphysis pubis. The abdominal exam covers the area from the xiphoid and costal margins superiorly to the symphysis pubis inferiorly.

For diagnostic and descriptive purposes, the abdomen is subdivided into four quadrants: right and left upper quadrants, and right and left lower quadrants.

The more detailed topography of the abdomen divides it into nine regions: right and left hypochondriac, right and left lumbar, right and left iliac, with epigastric, umbilical, and hypogastric regions in the middle. One should remember which organs typically project into each abdominal region. It is essential to know the region’s anatomy and topography well to adequately document and interpret a patient’s complaints and symptoms, as well as physical findings during the examination.

After taking the history, discussing the symptoms and identifying the potential areas of concern, one can start preparing for the abdominal exam. First step is to ensure that the patient is comfortable and has emptied his or her bladder. Request the patient to lie down supine at about 30-45° angle with the knees slightly flexed. The patient’s arms should be at their side and not folded behind their head, as this tenses the abdominal wall.

Ask the patient for permission to expose their abdominal area… Drape the patient in a way that maintains modesty on one hand, but doesn’t compromise the exam on the other. The abdomen is exposed from above the xiphoid to the suprapubic region. Make sure there is enough light and that noise is minimized. Before approaching the patient wash your hands thoroughly. Then warm your hands and the stethoscope. As with other parts of a physical examination, take a position on the patient’s right side, and explain each step of the exam to them as it progresses.

Start with a visual inspection of the abdomen. Before starting the examination explain to the patient that their abdomen is going to be inspected… Visually inspect the skin looking for rashes, ecchymoses, jaundice, dilated veins, striae, lesions, bruises, and scars. If scars are present, ask the patient about them and document them in the patient’s history.

Examine the shape of the abdomen. Is it flat, protuberant, or scaphoid? Scaphoid abdomen can be seen in cachectic patients, whereas global abdominal protuberance can result from gas, fluid, or fat. Check whether the abdomen looks symmetric or not. Asymmetry is a warning sign and can suggest masses or organomegaly. On the other hand, overall bulging may be sign of fluid accumulation-a condition called ascites. Check for visible hernias and abdominal masses. Pay attention to the presence of visible pulsation or peristalsis, which usually represent a serious problem, for example, abdominal aortic aneurysm. Sometimes visible peristalsis can be seen in intestinal obstruction. Lastly, presence of purplish skin discoloration around the umbilical area indicates a subcutaneous intraperitoneal bleed and is associated with acute hemorrhagic pancreatitis.

Auscultation for abdominal sounds is performed in two or three cycles, each time listening for a particular sound, rather than trying to listen for all the sounds at once.

To begin auscultation, explain the procedure to the patient… After pre-warming the stethoscope, use the diaphragm of the stethoscope to listen for bowel sounds over each of the four abdominal quadrants for 30-40 seconds. Note their frequency and character. Gurgling sounds occurring at a frequency of 5-34 per minute should be heard.

The absence of bowel sounds in an asymptomatic patient shout prompt the physician to listen for longer duration-at least three full minutes-before confirming that the sounds are in fact absent. On the contrary, the absence of bowel sounds in a patient with abdominal pain is a warning sign and might indicate paralytic ileus. Hyperactive, or increased and high-pitched sounds are also abnormal and may be associated with initial stages of bowel obstruction.

Next, listen to different vascular structures at seven different locations, including above the right renal artery, the aorta, the left renal artery, the common iliac arteries, and the femoral arteries for at least five seconds each. While auscultating these arteries, one should listen for bruits, which are the audible vascular “swishing” sounds caused by turbulent flow in large arteries. Their presence can indicate stenosis in renal, iliac and femoral arteries, or suggest abdominal aortic aneurism. Finally, listen for friction rubs over the liver and spleen. This is a rare finding that suggests inflammation of the peritoneal surface of the organ from infection, tumor, or infarct.

You’ve just watched JoVE’s presentation on the first two parts of the physical abdominal examination. Now you should have a good understanding of the surface landmarks of the abdomen and know how to conduct the inspection and auscultation steps of this exam. The following two videos will discuss: abdominal percussion, and light and deep palpation steps of abdominal assessment. As always, thanks for watching!

Tags

Cite This
JoVE Science Education Database. JoVE Science Education. Abdominal Exam I: Inspection and Auscultation. JoVE, Cambridge, MA, (2023).