- 00:00Overview
- 00:53Principles Behind the Continuous Wave HHD Device
- 05:00Lower Extremity Arterial Assessment
- 06:51Determining Ankle Brachial Pulse Index (ABPI)
- 10:18Testing Venous insufficiency
- 11:53Summary
用连续波多普勒的外围血管考试
English
Share
Overview
资料来源: 约瑟夫 Donroe,MD、 内科、 儿科,耶鲁大学医学院,纽黑文,康涅狄格
周围血管病 (PVD) 是一种常见的疾病,影响老年人,包括外周动脉和静脉疾病。虽然历史和物理考试提供其诊断的线索,多普勒超声已成为常规的床头血管检查。题为”外围血管考试”的视频给了外围的动脉和静脉系统体检详细的审查。这个视频专门评论床边评估慢性静脉功能不全使用手持的连续波多普勒与外周动脉疾病 (PAD)。
手持多普勒 (HHD) 是超声波的一种简单的仪器,它利用连续的传输和接收 (也称为连续波多普勒) 来检测中血流速度的变化,当它流经一艘船。多普勒探测器包含发出超声发射元素和一个接收元素,检测超声波 (图 1)。发出的超声波被反映从血液回频率直接关系到血流速度的探测器。被反射的信号检测到并可听到的声音频率直接关系到它接收到的多普勒信号转导 (所以,血流速度产生更高频率的声音)。
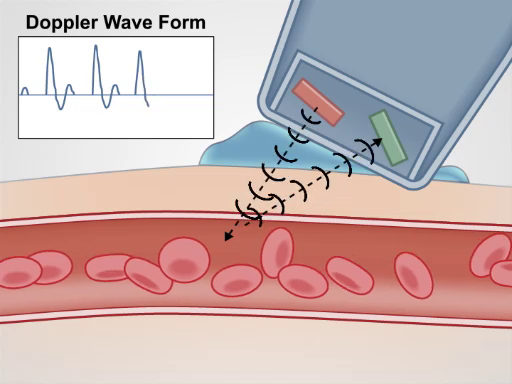
图 1。一代的多普勒信号。手持多普勒发出超声波信号,然后反射回血液,并最后收到的多普勒探针。
HHD 容易在办公室或医院设置用来探测脉冲,屏幕为垫使用踝臂压力指数 (肱) 和本地化静脉功能不全。这个视频回顾这些程序;然而,它不是要全面检讨的无创性血管检查。
Procedure
Applications and Summary
A careful history and physical exam are important for anyone suspected of peripheral vascular disease based on symptoms or risk factors. The HHD has become part of the routine bedside vascular examination and should be used to complement the physical exam, if PVD is suspected. It is not a technically difficult tool to use, and the maneuvers described in the video can be performed by general physicians. Just like for the physical exam, knowledge of the vascular anatomy is critical to the success of the HHD exam.
Vascular assessment by HHD has some important limitations. A false positive Doppler signal may occur over an artery distal to a total occlusion, if sufficient collateral flow has developed, leading to the inaccurate belief that PAD is not present. Additionally, the ABI may be falsely high in calcified vessels as they become less compressible. This is particularly relevant to diabetic patients. Venous testing by HHD is far more accurate for localizing valvular reflux than physical exam maneuvers, such as the Brodie-Trendelenburg test, cough test, and Perthes test; however, it is still less accurate than color duplex scanning. Finally, while there is some literature describing HHD testing for deep vein thrombosis, this is not considered standard of care, and thus, it is not reviewed here. If clinical suspicion for peripheral vascular disease persists despite reassuring physical exam and HHD testing, more formal vascular testing should be performed by a vascular specialist.
Transcript
The use of continuous wave Doppler ultrasound has become a routine part of the bedside vascular assessment, complementing the patient’s history and physical examination.
This assessment is performed with a simple, non-invasive instrument called the handheld Doppler device or HHD. This device consists of a probe, which is placed on the patient’s skin to detect changes in the velocity of the blood flow as it courses through a vessel. In this presentation, we will review the principles behind the HHD device functioning, followed by a review of how to use this device to detect pulses, measure ankle brachial pressure index, and localize venous insufficiency.
Before discussing the steps of this exam, let’s briefly review the basic principles behind the functioning of the HHD device. This instrument works on the principle related to the frequency of sound waves, which was proposed almost one and a half century ago in 1842 by an Austrian physicist Christian Doppler. The principle was thus called the Doppler effect. So, what is the Doppler effect? The example commonly used to explain this phenomenon involves an observer and a sound-emitting object, like an ambulance, which produces sound waves at a constant frequency denoted by ft. Initially, when the ambulance approaches, the frequency of the sound perceived by the observer, or fr, is greater compared to ft. And, when it recedes, fr drops below ft. This difference between the perceived sound frequency and transmitted sound frequency at any given point in time is called the Doppler effect or the Doppler shift. Therefore, when the ambulance is approaching the observer the shift is positive and when it recedes the shift is negative.
The same principle applies to the continuous wave HHD device. In this case, the probe contains a transmitting element that continuously emits ultrasound waves at a constant frequency, which then reflect off of the blood cells and are detected by the receiving element in the probe. So here, a blood cell is analogous to the moving ambulance and the receiving element is analogous to the observer. Thus, the Doppler shift in the frequency experienced by the receiving element depends on two parameters: the velocity of the blood flow and the angle of the probe to the blood flow.
The velocity effect is evident when you think of the ambulance example. The faster the ambulance passes by, the greater is the change in sound frequency experienced. The angle to the blood flow is equally important, because if the probe is placed at a 45° angle to the blood flow, then the flow is towards the receiving element and hence there is a positive Doppler shift. If the probe were perpendicular, the flow would be neither towards nor away relative to the probe, therefore the Doppler shift would be zero. And if it were placed at an obtuse angle, then the flow would be actually away from the probe, which would yield in a negative Doppler shift.
Normally, one places the probe at a 45° angle to the direction of blood flow in a peripheral artery and this produces a Doppler waveform, which is triphasic in nature. First component of this wave occurs in systole and reflects the rapid blood flow toward the probe, which generates a high frequency wave. At the end of systole and beginning of diastole, blood flow slows and reverses direction, resulting in a second, lower frequency wave on the negative side. Finally, forward flow returns at the end of diastole, producing the low frequency third wave on the positive side before the process is repeated for the next cardiac cycle.
Since the triphasic waveform represents normal, deviation from it provides valuable diagnostic clues. For example, a partial arterial stenosis progressively dampens the amplitude of the waveform distally and there is loss of flow reversal resulting in a monophasic waveform. And a complete occlusion without collateral flow leads to no signal generation.
Some of the HHD devices are equipped with a screen or a printer that displays these waveforms. Others come with a built in processor that convert this waveform into audible sounds, and a triphasic wave on such a device sounds like this…
Now we will demonstrate how to use the HHD to assess the blood flow in leg arteries. You should perform this test if your patient’s symptoms and risk factors are consistent with peripheral arterial disease or if they have weak or absent peripheral pulses by palpation.
Before starting the exam have the patient wear a gown and ask them to lie on the exam table in supine position. Here, we will demonstrate how to use the Doppler device to evaluate the dorsal pedal artery, but the same principle is applicable for the assessment of other leg and arm arteries as well, including posterior tibial, popliteal, femoral, ulnar, radial and brachial arteries.
First try to find the dorsal pedal pulse by palpating just laterally to the tendon of extensor hallucis longus. After you find the pulse, apply ultrasound gel on the skin over the area. Next, place the probe over the gel at a 45° angle to the skin pointing cephalad.
Slowly move the probe both medially and laterally until you hear the signal. Remember that a small percentage of people may have a congenitally absent dorsalis pedal artery. Note the character of the sound wave. Recall-a normal arterial waveform in the lower extremity is triphasic. If your patient needs frequent reassessment of their pulses, mark the location where the arterial pulse is found with a skin marker.Use the same approach to assess peripheral arteries in both lower extremities and record the findings.
Now let’s discuss how to utilize the HHD device for measuring ankle brachial pressure index or ABPI. Since the HHD is more sensitive than auscultation, it allows for more precise measuring of blood pressure in distal arteries. And ABPI is nothing but the fraction of the systolic blood pressure in legs to the systolic blood pressure in arms. It is a way to assess the distal perfusion.
Prior to this test, have the patient lie supine and relax for 10 minutes with their upper and lower extremities positioned at the level of the heart. Obtain a sphygmomanometer attached to an appropriately sized blood pressure cuff and place the cuff on the patient’s upper arm. Identify the brachial pulse in the antecubital fossa by palpating medially to the biceps tendon. Apply the gel on the skin over the brachial pulse and then place the probe at a 45° angle to the skin pointing cephalad. Move the probe until you obtain the signal…
Now measure the systolic pressure in the brachial artery. Inflate the cuff until the Doppler signal disappears, and then continue to inflate for additional 20 mmHg above that point. Then deflate the cuff slowly, while watching the readings on the manometer. The first Doppler signal heard signifies the systolic pressure in the brachial artery. Record this manometer reading and repeat the procedure in the other arm.
Now use the same approach to measure the systolic pressure in dorsal pedal artery and tibialis posterior artery in each leg. Place the appropriately sized blood pressure cuff on the lower extremity, just proximal to the ankle. Apply gel to the dorsum of the foot, lateral to the extensor hallucis longus tendon and use the probe to find the dorsal pedal artery as shown earlier. Once you found the pulse, start inflating the cuff until the Doppler signal cannot be heard anymore. Deflate the cuff slowly and record the pressure at which the Doppler signal reappears. Then, measure the systolic pressure in the posterior tibial artery on the same side. Using the same approach, obtain systolic pressure measurements in the dorsal pedal and posterior tibial arteries of the other leg.
Calculate the ABPI for each leg separately by dividing the higher systolic pressure of the dorsal pedal or posterior tibial artery in that leg by the higher of the two brachial artery systolic pressures. The generally accepted normal range of ABPI is from 1 to 1.4. Values below 1 indicate the presence of peripheral artery disease, ranging in severity depending on the actual value. On the other end, if the value exceeds 1.4, it suggests presence of non-compressible, calcified arteries in that leg.
Finally, let’s learn how to use the HHD device for the assessment of leg veins by performing compression test for localizing valvular reflux.
Before starting this test, ask the patient to stand up and relax the leg to be examined with their weight shifted onto the other leg. Apply a generous amount of gel and place the probe over the femoral artery, just below the inguinal ligament. Then, move the probe medially, while squeezing and releasing the ipsilateral calf muscle to generate audible flow through venous system. Once the device transmits this signal clearly, the probe is in the vicinity of the saphenofemoral junction. Now, move the probe slightly medial and inferior to the junction to assess the great saphenous vein.Squeeze and release the calf muscle and listen for normal augmentation of flow. Re-augmentation of flow lasting more than one second is abnormal and represents retrograde flow through an incompetent valve at the saphenofemoral junction.
Repeat the same procedure for testing the great saphenous vein in the medial thigh, 10 cm above the knee and then for testing the popliteal vein located posteriorly in the popliteal fossa. The interpretation of the findings is described in the associated text manuscript.
You’ve just watched JoVE’s video on the peripheral vascular exam using a continuous wave Doppler device. This video demonstrated the principles behind the Doppler device, showed how to perform bedside assessment of peripheral vascular system using this simple, portable device and explained how to interpret the results obtained. As always, thanks for watching!