JoVE Science Education
Physical Examinations II
A subscription to JoVE is required to view this content.  Sign in or start your free trial.
JoVE Science Education Physical Examinations II
Pelvic Exam II: Speculum Exam
  • 00:00Overview
  • 00:54Preparatory Steps and Inspection Considerations
  • 06:11Collection of Samples for the Pap Test
  • 10:32Summary

Gynäkologische Untersuchung II: Spekulumuntersuchung

English

Share

Overview

Quelle:

Alexandra Duncan, GTA, Praxis Klinik, New Haven, CT

Tiffany Cook, GTA, Praxis Klinik, New Haven, CT

Jaideep S. Talwalkar, MD, Innere Medizin und Pädiatrie, Yale School of Medicine, New Haven, CT

Komfortable Spekulum Platzierung ist eine wichtige Fähigkeit für Anbieter, da das Spekulum ein notwendiges Werkzeug in vielen gynäkologischen Verfahren ist zu entwickeln. Patienten und Anbieter sind oft besorgt, die Spekulum-Untersuchung, aber es ist durchaus möglich, ein Spekulum ohne Patienten zu platzieren. Es ist wichtig für den Arzt über die Rolle der Sprache in einer angenehmen Umgebung zu schaffen; Beispielsweise sollte ein Anbieter auf das Spekulum “Rechnungen” statt “Messer” zu vermeiden, stören den Patienten beziehen.

Es gibt zwei Arten von Spekulum: Metall und Kunststoff (Abbildung 1). Diese Demonstration nutzt Kunststoff, wie Plastik-Spekulum in Kliniken für Routinetests am häufigsten verwendet werden. Bei der Verwendung von Metall Spekulum hat es ein Graves Spekulum, wenn der Patient vaginal geboren hat und ein Spekulum Pederson verwenden, wenn der Patient nicht empfohlen. Pederson und Graves Spekulum sind verschiedene Formen, und beide kommen in vielen verschiedenen Größen (Medium wird am häufigsten verwendet). Vor dem Einbau ein Metall Spekulum, ist es hilfreich, eine digitale zervikale Untersuchung für die entsprechenden Spekulum Größe bewerten durchführen. Die Tiefe und die Richtung des Gebärmutterhalses wird geschätzt, indem man einen Finger in die Scheide. Falls der Patient Zervix gefunden werden kann, während der Patient sitzt, ist es wahrscheinlich, dass der Patient eine flache Vagina hat, und daher sollte am bequemsten mit einem kurzen Metall Spekulum.

Figure 1
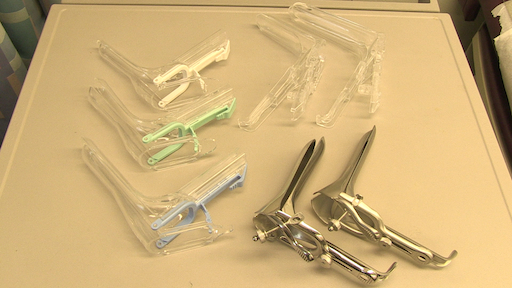
Abbildung 1. Ein Foto von im Handel erhältlichen Spekulum in verschiedenen Größen.

Kunststoff Spekulas sind geformt wie Pederson Spekulum Metall und sind in verschiedenen Größen. Um die richtige Größe für ein Kunststoff Spekulum zu beurteilen, der Prüfer legt zwei Finger in der Vagina der Patientin, Handfläche nach unten, und versucht, die Finger zu trennen: Es gibt kein Leerzeichen zwischen den Fingern, eine kleine Plastik-Spekulum sollte verwendet werden; Wenn zwischen den Fingern Platz vorhanden ist, sollte ein Medium ein verwendet werden. Die Prüfung sollte nie mit einem grossen Spekulum durchgeführt werden, (wie es wesentlich länger) ohne Bestimmung der Länge des vaginalen Kanals.

Das Spekulum wird verwendet, um die Papanicolaou-Test im Rahmen von Gebärmutterhalskrebs-screening-Untersuchungen durchführen. Gebärmutterhalskrebs war einst die Hauptursache für Todesfälle durch Krebs für Frauen in den Vereinigten Staaten, aber in den letzten Jahrzehnten hat die Zahl der Krankheits- und Todesfälle erheblich1abgelehnt. Diese Änderung wird gutgeschrieben, um die Entdeckung von Georgios Papanicolaou 1928, dass Gebärmutterhalskrebs durch vaginale und zervikalem Abstrichen diagnostiziert werden konnte. Der Pap-Test, erkennt wie es jetzt genannt wird, abnorme Zellen in der Zervix, Krebs und präkanzerösen. Aktuelle Richtlinien für empfohlene Screening Intervalle finden Sie durch die US-präventive Services Task Force (USPSTF) Website2.

Der Test kann mit entweder (1) einen konventionellen Objektträger durchgeführt werden und Fixativ mit einem Spatel und endozervikalen Pinsel (der traditionelle “Pap-Abstrich”) oder (2) die häufiger verwendete Flüssigkeit-basierten Zytologie mit zervikalem Besen oder einem Spatel und endozervikalen Pinsel (Abbildung 2). Egal welche Tools verwendet werden sind die Proben gleich hinter dem äußeren Muttermund und die Squamocolumnar Kreuzung oder Übergangszone rund um das Betriebssystem (Abbildung 3) entnommen. Dieses Video demonstriert die Spachtel endozervikale Bürste mit Liquid-basierter Zytologie, als flüssige Zubereitung ist eine effektivere Technik zum Nachweis von zervikalen Läsionen und der Spatel und endozervikalen Pinsel verbessern Probenentnahme.

Figure 2
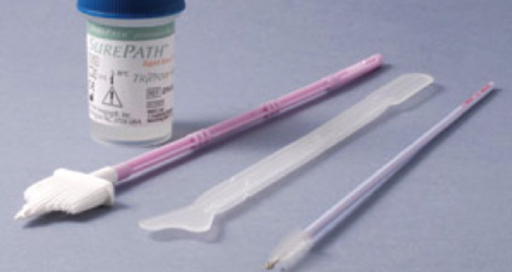
Abbildung 2: Pap-Abstrich Werkzeuge. Nacheinander gezeigt werden: eine flüssige Zytologie Kanister, zervikale Besen, Spachtel und endozervikalen Pinsel.

Figure 3
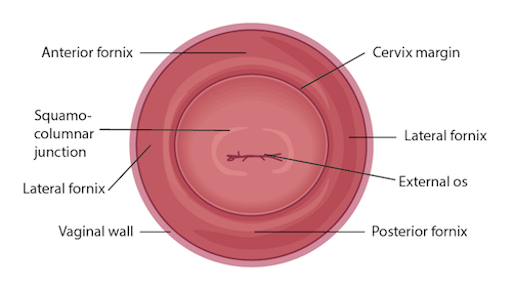
Abbildung 3. Diagramm des Gebärmutterhalses mitrelevanten Strukturen gekennzeichnet.

Procedure

Die Spekulum-Prüfung beginnt unmittelbar nach dem Ende der äußeren Genitalien Prüfung; Daher hat der Patient bereits eine Geschichte und ist in der Lage modifizierte Steinschnittlage. Stellen Sie sicher, dass der Patient am Ende des Tisches sitzt, wie das Spekulum vollständig anders eingefügt werden kann. 1. Vorbereitung Legen Sie die Lieferungen für den Pap-Test. Beschriften Sie die flüssige Zytologie-Kanister mit Daten des Patienten. Schrauben Sie den …

Applications and Summary

This video reviewed the techniques for performing a comfortable speculum exam and collecting the samples for a Pap test. Before the exam is started, the examiner should ensure all supplies are prepared and let the patient know what to expect. Being able to perform a comfortable speculum exam is an important skill for any practitioner, as it is used in a wide variety of gynecological procedures and can provide a wealth of information. When the speculum is inserted, it is possible to observe the cervix and vaginal walls for a variety of signs including tone, color, discharge, lesions, polyps, ulcerations, and more-all of which may be clinically significant and can help with the process of diagnosis. A well-inserted speculum also allows easy access to the cervical os, at which point samples may be taken for the Pap test (as well as for other screenings, like chlamydia and gonorrhea). It's necessary to use a speculum to access the cervix for many other procedures, including inserting or removing an intrauterine device (IUD), a loop electrosurgical excision procedure (LEEP), and more.

Many patients may feel anxiety about the speculum and experience it as the most invasive part of the gynecological exam. The provider can offer the patient general support and empathy, along with specific tools to make the exam more comfortable for themselves. Asking the patient to take a deep breath and then bear down as if having a bowel movement before insertion can open the vaginal introitus and greatly aid comfort. The examiner may offer a particularly anxious patient the opportunity to insert the speculum themselves by placing it upside-down with the handle pointing toward the ceiling as the provider talks them through opening it3. It is often easier to get a clear view of the cervix with an upside-down insertion, but it is not a technique practitioners should employ, because it places the examiner's hand directly against the patient's clitoris.

There are many things the practitioner can do to ensure the exam is comfortable. The speculum should be inserted at an oblique angle to avoid putting too much direct pressure on the urethra. When the speculum is inserted fully, the bills should be angled below where the cervix was located during the digital exam. The practitioner can then apply enough posterior pressure to the speculum, so there is space visible in the vagina over the bills; this allows the bills to be opened without putting pressure on the delicate anterior structures. The most important thing is to never insert or remove a speculum while the bills are open. This is very painful and risks injuring the patient. The examiner should not touch the thumb lever until the speculum is positioned fully and ready to be opened. The lock on the speculum should be released fully before removal, and any pressure maintained manually. Once the cervix is free, the thumb lever should be completely released and the speculum smoothly removed the rest of the way, allowing the vaginal walls to close the bills on the way out.

References

  1. Cervical Cancer Statistics. U.S. Preventive Services Task Force. Centers for Disease Control and Prevention (2014).
  2. Cervical Cancer: Screening. Recommendation Summary. U.S. Preventive Services Task Force (2012).
  3. Wright, D., Fenwick, J., Stephenson, P., Monterosso, L. Speculum 'self-insertion': a pilot study. Journal of Clinical Nursing. 14(9): 1098-1111 (2005).

Transcript

The speculum exam is used in a wide variety of gynecological procedures and can provide a wealth of diagnostic information. The speculum is a bivalve instrument, which is utilized for separating the walls of the vaginal canal. This not only allows for visual inspection of the cervix, but also provides an access to this region for specimen collection during diagnostic procedures such as the Papanicolau, or Pap test, which is performed to check for any precancerous changes. This video will illustrate the proper technique of using the speculum for cervical inspection, and the appropriate method for collection of samples for the Pap test.

Let’s begin with the review of the steps involved in prepping for the speculum exam and the Pap test, followed by a discussion of what a physician should look for while inspecting the cervix through the speculum. There are different types of commercially available specula. Some are made up of disposable plastic, while the metal ones are reusable. In this demonstration, we will use a plastic speculum.

Before starting the exam, it is essential to familiarize yourself with the instrument to be used and understand how it functions. After that you shall begin with the exam. Remember, this procedure usually comes after the external pelvic inspection, so at this point the patient history has been obtained, and they are already in the modified lithotomy position.

Make sure that the patient is seated at the end of the table to allow compete insertion of the speculum. Also lay out the supplies for the Pap test, including a cytology canister; lubricant squeezed onto a clean tray with a liner, and a spatula and endocervical brush OR just a cervical broom to collect the cell sample.Label the liquid cytology canister with the patient’s information. Then unscrew the lid of the canister until it is resting on top such that it can be easily lifted off.

It is essential to understand how to hold a speculum. In case you’re using a plastic speculum, place it in your non-dominant hand and position your index finger above the bills, your middle finger below the bills, and your thumb on the back of the speculum, avoiding the thumb lever as that would open the speculum. Using your dominant hand spread the water-based lubricant on the outside of the bills. Show the speculum to the patient without pointing it directly at them, and let them know what to expect during the exam, “Dialogue”.

Start by letting the patient know that you will first place the back of your hand on their thigh. This is done to prepare the patient for the exam by establishing a non-invasive contact first. Now separate the labia minora with the dominant index and middle finger pads to get a clear view of the vaginal introitus. Next, explain the relaxation technique to the patient, “Dialogue”. The vaginal introitus should open up as the patient bears down. Let the patient know that you are about to insert the speculum, “Dialogue” and place it halfway into the vaginal canal, keeping the bills at about 45° angle. Next, bring your non-dominant hand to the bottom handle and rotate the speculum flat, while simultaneously clearing the labia on both sides. Then angle the tip of the bills toward the floor and insert fully, such that the tip ends up below the cervix. Stop when the speculum is flushed against the patient’s pelvis.

Next place one of the dominant fingers inside the bills and apply strong posterior pressure while pulling down on the handle with the other hand until it is perpendicular to the floor. Make sure you apply enough pressure to see the space above the speculum. Now, while maintaining posterior pressure with the finger inside the speculum, you can smoothly depress the thumb lever to open the bills. Stop once resistance is met. Then engage the lock by pushing the thumb lever up one or two clicks and remove the finger from inside the speculum. Hold the speculum steady and, using a light source, check if the cervix is visible. Note the tone, color, and position of the cervix and observe for discharge, lesions, polyps, ulcerations, and masses.

You can visually inspect the lower intravaginal part of the cervix. This includes the exocervix, which is normally 2-3 cm in diameter, pink in color, and has a smooth surface; the external os, which is the opening of the endocervix into the vagina; and the four fornices, which are the recesses between the cervix margin and the vaginal wall.

After the visual inspection of the cervix, proceed to collecting samples for the Pap test. With the speculum still in place, insert the spatula into the vagina, being careful not to touch the walls. Position the spatula with its long end in the os, and the short end pressed against the junction. Now rotate it 360°, while maintaining consistent pressure and contact with the exocervix. Carefully remove the spatula avoiding the vaginal walls. Place the spatula into the open cytology canister and thoroughly rinse it by vigorous swirling in the liquid following the manufacturer’s instructions. Next, insert the endocervical brush into the vagina avoiding contact with the walls. Push the brush into the os until only the bottom bristles are exposed and then slowly rotate it 180° in one direction. Do not over rotate. Carefully remove the brush avoiding the walls, and place it into the cytology canister. Thoroughly rinse the brush by vigorous swirling and press it repeatedly against the sides of the canister to release material. Instead of using both spatula and brush, one can use just the endocervical broom, which has different sizes of bristles forming a triangular pattern. If using this, then you would insert it so the longer bristles rest in the os and the shorter rest on the transition zone and rotate it about five to ten times, depending on manufacturer’s instructions. The release of the sample is same as for that for the endocervical brush.

After sample collection is complete, release the locking mechanism by pressing down on the thumb lever, and while holding the lever down and bills open, remove the speculum about two to three inches out, to ensure that the cervix is cleared off the tip of the bills. Remove your thumb from the lever and place it on the handle. Finally, rotate the speculum by 45° while smoothly removing it all the way out. Have your hand underneath the speculum to catch any possible discharge, and discard the speculum, if disposable. At the end, replace the canister lid. Now the sample is ready for subsequent cytological analysis.

“Examiner explaining different types of specula-the similarities and differences”

You’ve just watched JoVE’s illustration of the speculum exam and the Pap test. You should now understand how to use the vaginal speculum and how to collect cervical cell sample for diagnostic evaluation. As always, thanks for watching!

Tags

Cite This
JoVE Science Education Database. JoVE Science Education. Pelvic Exam II: Speculum Exam. JoVE, Cambridge, MA, (2023).