聴診
English
Share
Overview
ソース:先週 S Talwalkar、モルドバ、内科・小児科、エール大学医学部、ニューヘブン、CT
聴診、臨床医が「体の仕組みについて盗聴”することが診断の重要な情報を得るために。1歴史的に、用語「聴診」「即時聴診、「審査官の耳が患者の皮膚に直接に配置されたと同義だった。これは何世紀にも標準的な方法は、メソッドを社会規範と準最適診断率のための 19 世紀フランスの不十分な証明しました。これは導いた René Laënnec 1816 年 (図 1)、近代的な臨床練習で聴診から切っても切れないのでなっているツールに最初の聴診器を発明して患者は名誉およびそれらを運ぶ人間信頼性の記号としてそれを保持します。2

図 1。René Laënnec によって発明された最初の聴診器の代表的なイラスト。
聴診器は Laënnec の初期木製中空からオーストリッチは多くの進歩を遂げています。実質的に言えば、プロバイダーは、現代の聴診器のチェスト ピースの 2 つの側面の違いを理解する必要があります。 ダイヤフラムおよび鐘 (図 2)。
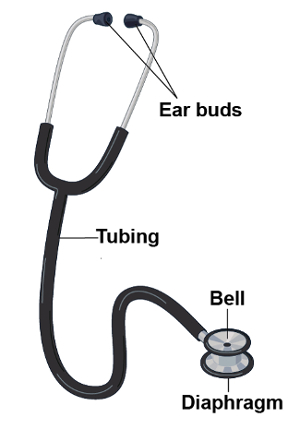
図 2。現代の聴診器のパーツ。
しっかりと患者さんの皮膚に適用されると、横隔膜は、高い周波数の音を送信します。患者の体内からの音は、横隔膜の膜を振動させます。これらの振動は、審査官の耳に聴診器内空気のコラムを通して音の伝播の結果します。逆に、軽く適用されると、ベルは低周波音を送信します。ベルは、聴診器のチューブを介して患者内からの音を直接送信カップとして機能します。ベルをもっとしっかりと押しては、本質的にダイヤフラムにそれを回す、基になる肌を伸ばすことができます。聴診は、さまざまな臨床設定で使用されます。最も一般的、胸部、心臓、腹部、血管系の検査の役割を果たしています。
Procedure
Applications and Summary
This video covered the general considerations related to auscultation during the physical examination. Auscultation is typically done with the aid of a stethoscope, though certain findings, especially on the respiratory examination, may be evident to the un-aided ear. While specific stethoscope techniques vary based on each individual portion of the exam, in all circumstances, the clinician must hold the stethoscope properly and recognize the difference between the bell and the diaphragm in order to optimize the diagnostic utility of auscultation. Additionally, in the interest of reducing nosocomial spread of infection, stethoscopes should be decontaminated regularly. Making meaning out of the variety of sounds that one appreciates with the stethoscope can seem daunting to the early learner. Through deliberate practice, with consideration of anatomy and physiology of the structures being examined, and possibly the use of visual representation of sound, auscultation becomes a powerful diagnostic tool for the clinician.
References
- Markel, H. The Stethoscope and the Art of Listening. New England Journal of Medicine. 354: 551-553 (2006)
- Jiwa, M., Millett, S., Meng, X., and Hewitt, V.M. Impact of the Presence of Medical Equipment in Images on Viewers' Perceptions of the Trustworthiness of an Individual On-Screen. Journal of medical Internet research. 14 (4), e100 (2012).
- Makim, D.G. Stethoscopes and Health Care-Associated Infection. Mayo Clinic Proceedings. 89: 277-280 (2014).
Transcript
Auscultation refers to the act of listening to the sounds produced by the body during a physical examination.
Historically, the term “auscultation” was synonymous with “immediate auscultation,” in which the examiner’s ear was placed directly against the patient’s skin. Although this was standard practice for centuries, the method proved inadequate in nineteenth-century France, due to social norms and suboptimal diagnostic yield. Therefore, in 1816, René Laënnec invented the first stethoscope. This was a hollow wooden tube with a flat surface on one end-to be placed on the patient’s skin, and an opening at the other end-to listen to the sounds transmitted. Since then, stethoscope has undergone many technologic advances, but it still remains a tool that is inseparable from clinical practice.
This video will illustrate the parts of the stethoscope and demonstrate how to use this instrument during any physical examination.
First, let’s review what are the different parts of a stethoscope and what is their function. The basic parts include the ear buds, the tubing and the chest piece. Now-a-days commonly used stethoscopes have two flat surfaces on the chest piece-one is the diaphragm and other is the bell.
Usually, the diaphragm is applied firmly against the skin to listen to the high frequency sounds such as S1 and S2. The firm application is necessary as this allows the high frequency sounds from within the patient vibrate to the membrane of the diaphragm, which in turn results in propagation of sound through the column of air inside the stethoscope and into the examiner’s ears. Conversely, when applied lightly, the bell transmits low frequency sounds such as S3 or S4. The open bell acts as a cup that directly transmits sounds from within the patient through the tubing. Pressing more firmly with the bell can stretch the underlying skin, essentially turning it into a diaphragm. Certain stethoscopes have only one side to the chest piece, which can be used as a diaphragm and a bell; firm pressure makes the chest piece a diaphragm, while light pressure makes it a bell.
Now, let’s go over some important steps related to auscultation that can be applied to any physical examination. Throughout the entirety of the patient encounter, use your unaided sense of hearing to identify findings that may be diagnostically useful, like hoarse voice or grunting respirations.
Before patient contact, decontaminate the stethoscope with any of the standardly available agents. Place the stethoscope ear buds in your ears with the tips pointing forward in order to create a seal that drowns out ambient noise. By gently tapping on both surfaces, confirm which side of the chest piece is active. To switch between the two sides, rotate the piece until you hear a click, and then tap to confirm.
Hold the chest piece in your dominant hand. There are two commonly used handgrips for this. One way is to support the piece between the middle phalanges of your second and third fingers with your thumb tucked under the tubing to keep the tube off the patient’s skin, which can potentially reduce some noise artifacts. Another way is to support it between the distal phalanges of your thumb and second finger. When using this grip, you should normally tuck the remaining fingers under the tubing. Except, in certain maneuvers where these fingers need to be held in slight extension to keep the fingers themselves off the patient’s skin. For example, during auscultation at the base of the heart.
There are specific techniques of auscultation for pulmonary, cardiac, abdominal, and vascular examinations, which will be covered in the respective videos of these collections. As you listen, consider the physiology and mentally picture the anatomy, which may help to parse the variety of sounds that are heard simultaneously. Train the mind to form a visual representation of the sounds being heard, as this may help in better clinical characterization of the underlying pathology. Certain electronic stethoscopes allow examiners to record sounds and actually create visual representations of the findings.
You’ve just watched JoVE’s video on general approach to auscultation during a physical examination. You should now understand the different parts of a stethoscope, and how to use this instrument effectively.
Making meaning out of the variety of sounds that one appreciates with the stethoscope can seem daunting to the early learner. Through deliberate practice, with consideration of anatomy and physiology of the structures being examined, and possibly the use of visual representation of sound, auscultation becomes a powerful diagnostic tool for the clinician. As always, thanks for watching!