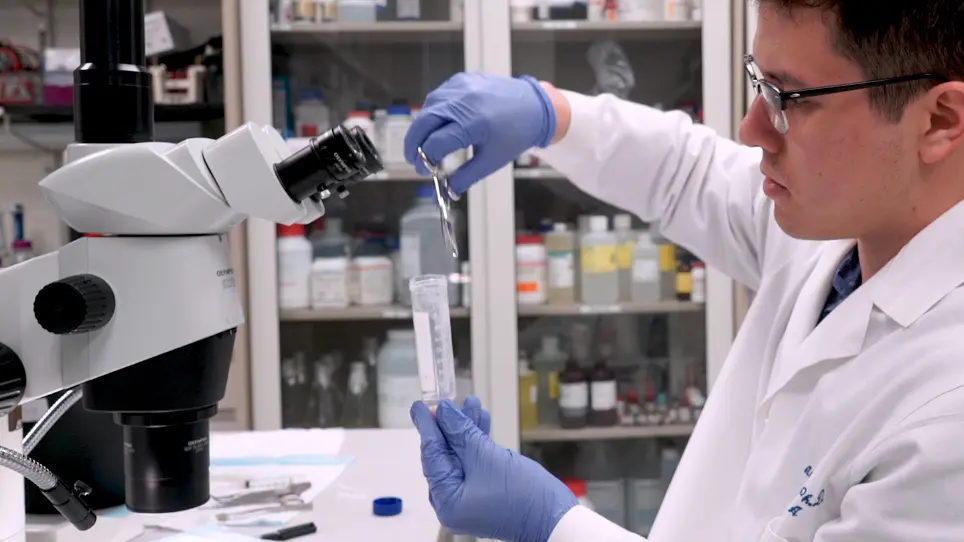
This islet isolation protocol described a novel route of collagenase injection to digest the exocrine tissue and a simplified gradient procedure to purify the islets from mice. It involves enzymatic digestion, gradient separation/purification, and islet hand-picking. Successful isolation can yield 250–350 high quality and fully functional islets per mouse.
Method Article
A Simple High Efficiency Protocol for Pancreatic Islet Isolation from Mice
In This Article
Summary
Abstract
Pancreatic islets, also called the Islets of Langerhans, are a cluster of endocrine cells which produces hormones for glucose regulation and other important biological functions. The islets primarily consist of five types of hormone-secreting cells: α cells secrete glucagon, β cells secrete insulin, δ cells secrete somatostatin, ε cells secrete ghrelin, and PP cells secrete pancreatic polypeptide. Sixty to 80% of the cells in the islets are β cells, which are the most important cell population to study insulin secretion. Pancreatic islets are a crucial model system to study ex vivo insulin secretion. Acquiring high quality islets is of great importance for diabetes research. Most islet isolation procedures require technically difficult to access site of collagenase injection, harsh and complex digestion procedures, and multiple density gradient purification steps. This paper features a simple high yield mouse islet isolation method with detailed descriptions and realistic demonstrations, showing the following specific steps: 1) injection of collagenase P at the ampulla of Vater, a small area joining the pancreatic duct and the common bile duct, 2) enzymatic digestion and mechanical separation of the exocrine pancreas, and 3) a single gradient purification step. The advantages of this method are the injection of digestive enzyme using the more accessible ampulla of Vater, more complete digestion using combination of enzymatic and mechanical approaches, and a simpler single gradient purification step. This protocol produces approximately 250—350 islets per mouse; and islets are suitable for various ex vivo studies. Possible caveats of this procedure are potentially damaged islets due to enzymatic digestion and/or prolonged gradient incubation, all of which can be largely avoided by careful ad justification of incubation time.
Introduction
There are two common methods in the literature for pancreatic islet isolation. One requires excising the pancreas and dicing it into small pieces using surgical scissors, and then digesting it in a collagenase solution1,2,3. Another more precise method is to use the network of ducts present in the pancreas to introduce digestive enzyme. The following sites have been used for digestive enzyme injection: the junction of the bile and cystic duct, the gallbladder into the common bile duct, or the common bile duct itself1,4,5. It is known that islets are not evenly distributed in the pancreas; the splenic region contains the most islets6. While the second method using anatomical routes to deliver digestive enzymes allows for a more complete perfusion of the pancreas, including the splenic region, this procedure often requires clamping or suturing of the ampulla of Vater that is technically challenging. In terms of islet purification, multiple density gradients, as well as cell strainers and magnetic retraction have been used to purify the islets3,7. The utilization of these gradients can be time consuming and the Ficoll gradients can result in toxic damage of islets8.
The current protocol is built on the method described by Li et al.7, with additional modifications added based on the experience of ourselves and others1,4. The most critical steps of our protocol are clamping of the common bile duct near the liver end, injecting collagenase P via the ampulla of Vater to digest the exocrine tissue, and then using a shaking water bath to expedite the digestion mechanically1,4,7. Subsequently, a 'STOP' solution is applied to inhibit further digestion of the islets; HBSS is used to wash off the remaining collagenase P and STOP solution. When the Ficoll method was used to purify human islets, yield was reported to be twice the islets with greater functional capability (e.g., insulin secretion) as compared to the use of Percoll gradients9. However, studies have questioned the use of Ficoll gradient due to its toxic effect on the islets1,10. It has been reported that the Histopaque gradient provides optimal purification kinetics for mouse islet isolation, which produces good yield of high quality islets with simpler steps and lower cost1. In our protocol, Histopaque-1077 is used to purify islets from other residual tissue8,11. The harvested islets can be cultured in complete RPMI-1640 media, or directly utilized in RNA/protein quantitation.
Our protocol, using a combination of collagenase P digestion and a single gradient purification step, is simpler than other published protocols. Our method does not require demanding surgical procedures and has just a few simple steps. More importantly, this protocol consistently produces a good yield of high quality functional islets (250-350/mouse) as we reported12.
Protocol
All methods described here have been approved by the Animal Care and Use Committee (ACUC) of Texas A&M University. The surgical tools need is shown in Figure 1 and the schematic diagram of the procedure is shown in Figure 2.
1. Solutions
- Prepare Hank’s Balanced Salt Solution (HBSS) by adding 100 mL of 10X HBSS (from stock) to 900 mL of distilled water to make 1 L HBSS (1X).
- Prepare STOP solution (must be made fresh and should be used within 1 h) by adding 50 mL of 100X fetal bovine serum (FBS) to 450 mL of ice cold 1X HBSS; this makes 500 mL STOP solution. Keep the STOP solution at 4 °C.
- Prepare collagenase P solution (must be made fresh within 1 h of being used) by adding 1 mg/mL of collagenase P to ice cold 1X HBSS; use 6 mL/mouse.
- Add 0.05% (w/v) bovine serum albumin (BSA) to collagenase P solution (this provides nutrients to the isolated islets). For example, use 3 mg BSA in 6 mL collagenase P solution. Keep on ice.
- Calculate and prepare the amount of collagenase P needed for all mice in one 50 mL tube.
- Prepare complete RPMI 1640 medium by adding 10% FBS, 100 U/mL penicillin, 100 µg/mL streptomycin, INS-1 cell supplement (10 mM HEPES, 2 mM L-glutamine, 1 mM sodium pyruvate, and 0.05 mM 2-mercaptoethanol) to 500 mL RPMI 1640 media containing 5.5 mM glucose to be used for overnight culture and incubation.
2. Preparation
- Fill three 50 mL tubes of 25 mL RNase inhibiting solution, 70% ethanol or distilled H2O. These solutions will be used for cleaning surgical tools prior and during the procedure.
- Soak the tips of the tools in RNase inhibiting solution for 30 min before starting the protocol; this eliminates any potential RNase on the tools.
- Pre-cut absorbent pads to 6 in x 6 in size for use during surgery.
- Prepare 1X HBSS solution in advance and store at 4 °C. Prepare STOP solution prior to surgery. Store at 4 °C.
- Prepare collagenase P solution immediately prior to surgery and store on ice.
NOTE: This should be used within 2 h of preparation. - Label 50 mL tubes for digestion and purification; prepare 2 tubes for each mouse, one for digestion and the other for islet purification. Ensure that the animal ID is on both tubes.
- Add 3 mL of collagenase P solution into the first 50 mL tube. The remaining 3 mL of collagenase P will be injected.
- Draw the remaining 3 mL of collagenase solution into a 3 mL syringe mounted with 30 G ½ in needle. Place the syringe on ice.
3. Procedure
- Remove all the tools from RNase inhibiting solution, then dip them first in the tube with 70% ethanol, then in the tube containing distilled H2O, then air-dry on clean paper towel.
- Place the mouse in a chamber containing 0.5 mL of isoflurane until mouse is deeply anaesthetized.
- Remove mouse from the chamber and check the state of anesthesia by pinching a foot pad with forceps. Deep anesthetization is based on the observation that breathing become steadily slow and mouse is unreactive to foot pinching. After confirming that the mouse is deeply anaesthetized, euthanize the mouse with cervical dislocation, and then place the mouse on the absorbent pad.
- Place anaesthetized mouse on its stomach, applying pressure to the neck and dislocating the spinal column from the brain by pulling tail.
- Tape the limbs of the mouse in supine position to the absorbent pad, spray the body with 70% ethanol, and wipe excess off the excess ethanol.
- Use cover glass forceps and curved surgical scissors to make incisions. First make a horizontal incision on the skin of the abdominal area (~3 cm), pull the skin wide open to expose the abdominal wall. Then make a vertical incision (~3–4cm) on the abdominal peritoneum to fully expose the pancreas in abdominal cavity (Figure 3).
- Push the lobes of the liver superiorly to expose the bile duct, it will appear as a pale pink tube (Figure 3).
- Carefully move the intestines from the right lumbar/iliac region of the abdominal cavity to the right, exposing the bile duct and hepatic artery (Figure 3).
- Carefully clamp the common bile duct using the Schwartz micro serrefines (Figure 1) as close to the liver as possible.
- Identify the ampulla of Vater, which is located at the duodenal papilla, formed by the union of the pancreatic duct and the common bile duct. The ampulla of Vater appears swollen when viewed under a dissection microscope which is the entry point to the common bile duct (Figure 4).
NOTE: Adjusting intensity/angle of light of the dissection microscope can make it easier to locate. - Insert the syringe with 3 mL of the collagenase P solution into the ampulla of Vater. Push the needle into the duct for about 1/4 of the length of the common bile duct (ampulla leads into duct) as shown in Figure 5.
- Once the needle is in the ampulla, ensure that the orientation of the needle is such that it is parallel with the duct.
- Stabilize the needle by clamping with micro Adson forceps to prevent it from puncturing the duct (Figure 5).
- Slowly and steadily inject 3 mL of the collagenase P solution from the syringe into the common bile duct (enough to feel resistance) as shown in Figure 6. The goal is to create backflow pressure to force the collagenase to enter the pancreatic duct. Injection is considered successful if the head, neck, body and tail region of the pancreas are all fully inflated.
NOTE: Islet yield will be low if either the pancreas is not fully inflated, or the splenic area is not fully inflated. The splenic area contains the highest number of islets6. Inflation can be confirmed by the appearance of open spaces between pancreatic tissue that are filled with solution. - Carefully dissect out the inflated pancreas and place it in a 50 mL digestion tube containing 3 mL of ice-cold collagenase P solution.
- Remove the pancreas using 2 forceps (curved and Micro Adson; See Figure 1): (starting from the spleen, pull the pancreas away from spleen and continue removing from the stomach and along the duodenum.
NOTE: No incisions required. - Chop pancreas for 3–5 s in the digestion tube with 3 mL of ice-cold collagenase P solution using fine surgical scissors (Figure 7A).
- Remove the pancreas using 2 forceps (curved and Micro Adson; See Figure 1): (starting from the spleen, pull the pancreas away from spleen and continue removing from the stomach and along the duodenum.
- Secure the tube to a rack in 37 °C water bath and shake at 100–120 rpm for approximately 12–13 min.
- After incubation, gently shake the tubes by hand to disrupt the tissue until the collagenase P digestion solution becomes homogenous (Figure 7B). Homogeneity is confirmed by a sand-like appearance of fine particles of pancreas. About 30 s of gentle hand-shaking is usually enough. Hold the tube up to light to examine if the tissue is well homogenized; shake for another ~15 s if needed.
- Once digested, immediately place the tubes on ice and add 40 mL of ice-cold STOP solution to terminate the enzymatic digestion.
NOTE: At this point digestion tubes can be left on ice up to 2 h, if working on multiple mice. - Centrifuge the tube in a swinging-bucket centrifuge at 300 x g for 30 s (temperature of centrifuge is flexible).
NOTE: Use a swinging-bucket centrifuge so that the tissue pellet is formed at the bottom of the 50 mL tube and not on the wall of the tube; this is critical for better islet yield. - Decant and repeat the centrifugation with STOP solution 2 more times, decanting the solution after each spin. Use 20 mL of STOP solution for each subsequent wash.
- Before each spin, disrupt the pellet by gently shaking the tissue pellet in the 50 mL tube in 20 mL STOP solution.
- Re-suspend the tissue pellet with 40 mL of ice cold HBSS and centrifuge at 300 x g for 30 s.
- Decant and repeat the centrifugation using a swinging-bucket centrifuge with HBSS solution two more times, decanting the solution after each spin. Use 20 mL of HBSS for each wash.
- Before each spin, disrupt the pellet, to detach it from the bottom of the tube by gently shaking the tube containing 20 mL HBSS solution.
- After the last centrifugation remove all HBSS.
- Then add 5 mL of room temperature density gradient to the 50 mL tube containing the pellet. Vortex briefly at low speed until homogenized.
- Add another 5 mL of the room temperature density gradient to the 50 mL tube. Do not vortex/mix.
NOTE: It is critical to remain steady and still so as to allow better gradient to form without disruption. - Pipette 10 mL of room temperature HBSS buffer into the tube (containing the density gradient), drop-by-drop gently and slowly to allow a gradient to form. Use a pipette gun with a 10 mL pipette to add HBSS dropwise.
- Using a swinging-bucket centrifuge, spin tubes at 1700 x g for 15 min. Make sure to change the speed of both acceleration/deceleration to the lowest setting to maintain the gradient (Figure 7C).
- After the spin, carefully remove the tubes without disturbing the gradient. Using a pipette gun pre-wetted with cold HBSS (pipette HBSS up and down), pipette out the layer of islets (5–10 mL) formed between the density gradient and HBSS into the new 50 mL islet collection tube.
NOTE: It is helpful to wet the pipette with cold HBSS prior to pipetting the islets to prevent the islets from sticking to the inner walls of the pipette.- In case the separation is incomplete, islets would be visible in the density gradient layer, pipette out the entire 10 mL of the density gradient (bottom layer) along with the islet layer formed at the interface (only to leave about 8–10 mL of the HBSS top layer behind).
NOTE: Collecting both the islet layer and the density gradient layer (bottom layer) can result in the collection of debris which may lengthen the islet picking time, but no other steps will be altered. Collecting both these layers is not necessary when islet layer is well formed.
- In case the separation is incomplete, islets would be visible in the density gradient layer, pipette out the entire 10 mL of the density gradient (bottom layer) along with the islet layer formed at the interface (only to leave about 8–10 mL of the HBSS top layer behind).
- Add 20 mL of ice cold HBSS to the new 50 mL tube containing islets, then centrifuge at 350 x g for 3 min in a swinging-bucket centrifuge.
- After the spin, carefully pipette (do not decant) out the supernatant (leave ~3 mL at the bottom) without disturbing the pellet containing the islets at the bottom. Discard the supernatant.
- Repeat washing and centrifuging at least 3 times. Add 20 mL of HBSS each time, and be sure to suspend the pellet before each spin.
- Warm the RPMI-1640 complete media bottle in a water bath at 37 °C prior to use. After the last centrifugation, remove all of the HBSS and add 4 mL of previously prepared complete RPMI-1640 media (containing FBS, INS-1 cell supplement and penicillin/streptomycin) to the pellet.
- Dislodge the pellet by gently swirling the tube and immediately pour the RPMI-1640 media into a 100 mm Petri dish. Add another 5 mL of RPMI-1640 media to the tube and gently swirl it to wash off any remaining islets, then also pour the media into the same Petri dish.
- Under a dissection microscope, pick healthy islets from the Petri dish using a 20 µL pipette, and put them in a new Petri dish containing 10 mL of complete RPMI 1640 media. When viewed under a dissection microscope, islets should appear spherical/oblong and golden-brown color with a smooth surface compared to the relatively transparent, wispy exocrine tissue.
NOTE: Magnification of dissection microscope is usually set at 12.5–16x. Islet yield will vary depending on various factors including strain, age and sex of mouse. This protocol usually yields 250–350 healthy islets from healthy C57BL/6J mouse age 4–10 months old.
- Under a dissection microscope, pick healthy islets from the Petri dish using a 20 µL pipette, and put them in a new Petri dish containing 10 mL of complete RPMI 1640 media. When viewed under a dissection microscope, islets should appear spherical/oblong and golden-brown color with a smooth surface compared to the relatively transparent, wispy exocrine tissue.
- Incubate the islets in a sterile incubator at 37 °C with 5% CO2 infusion and 95% humidified air overnight for experiments the next day, or freeze the islets for desired analysis at a later time.
- Once islets are frozen, they cannot be used for secretion assays, only RNA or protein quantification. To collect cells to freeze, place them in HBSS buffer, collect all islets in 200–500 µL of buffer, transfer to 1.5 mL tube, centrifuge 350 x g for 1–2 min, remove the supernatant leaving no more than 30–40 µL solution, place in -20 °C for short term storage (several days) or -80 °C for long term storage.
Results
Proper completion of this procedure requires some understanding of mouse anatomy in the abdominal cavity. This allows for proper identification of the ampulla of Vater and clamping of the common bile duct. The entire procedure normally takes 1–2 h. It is more efficient to isolate islets from 4–6 mice at the same time, so several samples can be centrifuged together. The time for islet-picking varies, depending on the number of islets and the efficiency of digestion; it may take roughly an hour to pick 250–350 islets from 1 mouse.
In this paper, a number of very realistic images are included: Figure 3 shows the abdominal cavity of the mouse, exposing the common bile duct and hepatic artery. Figure 4 shows the entire length of common bile duct, which appears to be a lighter color, as well as the ampulla of Vater, which is bigger and shinier near the juncture (where the needle will be inserted) between the pancreas and duodenum. A clamp is placed at the common bile duct and hepatic artery bundle close to the liver to block off the flow of collagenase P into liver. Failure to clamp the bile duct correctly or tight enough will result in leakage and incomplete perfusion of the pancreas. Figure 5 shows the needle inserted at the ampulla of Vater into the common bile duct. Once the needle is in the common duct, forceps are used to stabilize the needle to prevent it from puncturing the duct while injecting. Once the injection begins, the pancreas will begin to swell from proximal end to distal end; the splenic region should begin to inflate after about 1 mL of collagenase injection. Backflow into the intestines can lead to an undesirable inflation of the duodenum; this can be remedied by readjusting the placement of the needle (pull it out a little, or reinsert slightly deeper) and by properly stabilizing the needle using forceps. The injection is considered a success if all regions of the pancreas are inflated (duodenal, gastric, and splenic lobes) as shown in Figure 6. Removal of the pancreas should begin from the splenic region. The inflated pancreas is chopped into chunks using fine surgical scissors (Figure 7A). After the 12–13 min digestion and mixing by hand-shaking, the tissue-containing suspension appears more homogeneous (Figure 7B). Subsequently, the islets are purified by the density gradient after centrifugation. Figure 7C shows that an islet suspension layer is formed between HBSS and the density gradient after centrifugation. Good/healthy islets appear as smooth round-shaped; bad/damaged islets show rough edges, and undigested exocrine tissue shows irregular shape and appears more translucent as shown in Figure 8.
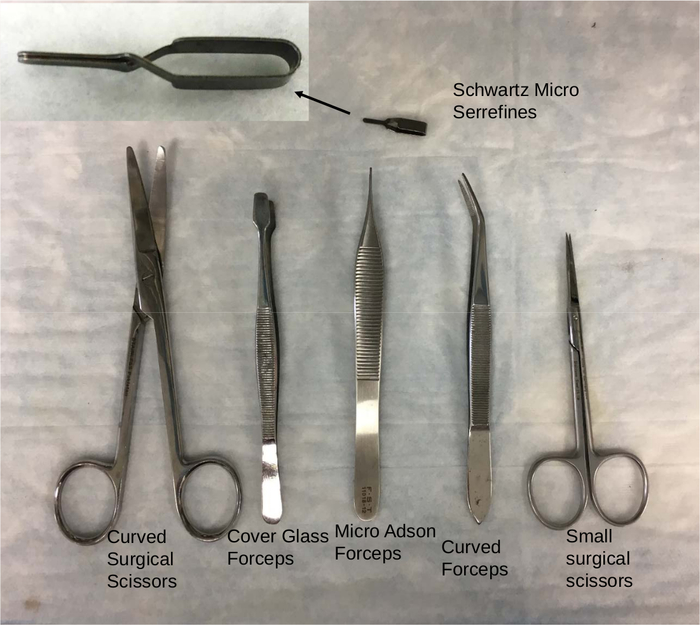
Figure 1: Surgical tools.
Curved surgical scissors, cover glass forceps, micro Adson forceps, curved forceps, small surgical scissors, and Schwartz micro serrefines (microvascular clamp) are shown. Please click here to view a larger version of this figure.
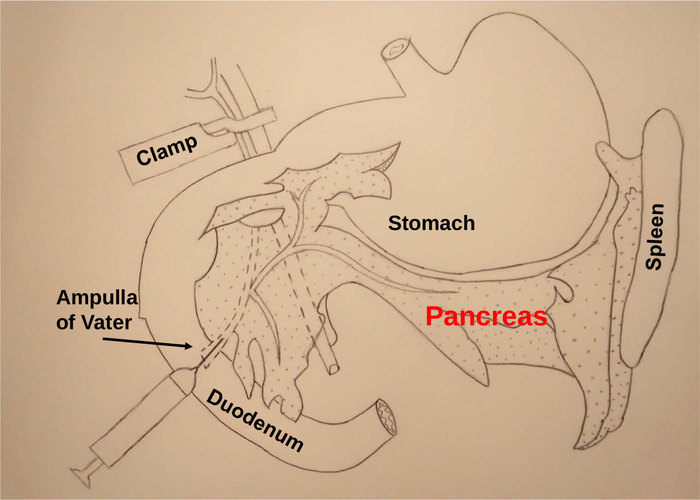
Figure 2: Schematic illustration of the protocol.
The most critical steps of this procedure are the clamping of the common bile duct near the liver, and injecting collagenase P via the ampulla of Vater into common bile duct to digest the pancreas. Please click here to view a larger version of this figure.
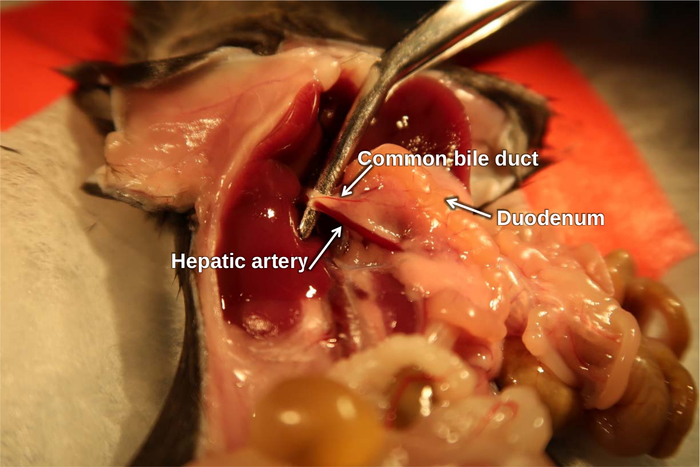
Figure 3: Location of common bile duct.
Forceps hold up the common bile duct and hepatic artery bundle. Please click here to view a larger version of this figure.
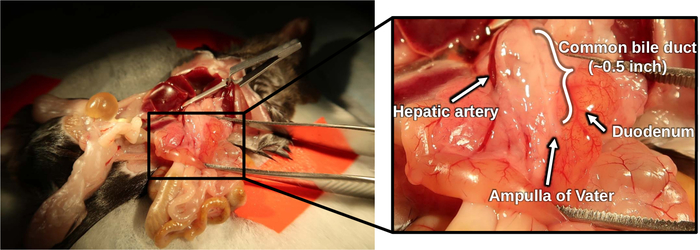
Figure 4: Illustration of common bile duct and ampulla of Vater.
A clamp is placed on the common bile duct and hepatic artery bundle near the liver. The black arrows point to the ampulla of Vater where the needle will be inserted. Please click here to view a larger version of this figure.
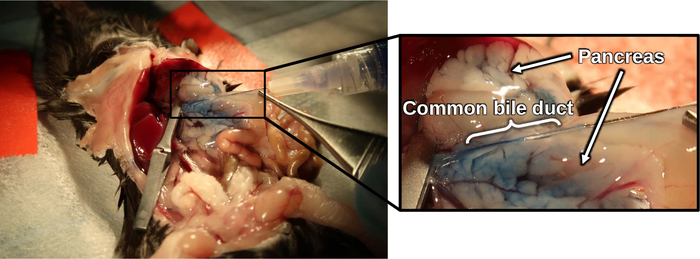
Figure 5: Cannulation of common bile duct.
After proper cannulation of the common bile duct, the ampulla of Vater is injected with trypan blue (for demonstration purpose only) to better emphasize the placement of the common bile duct. Please click here to view a larger version of this figure.
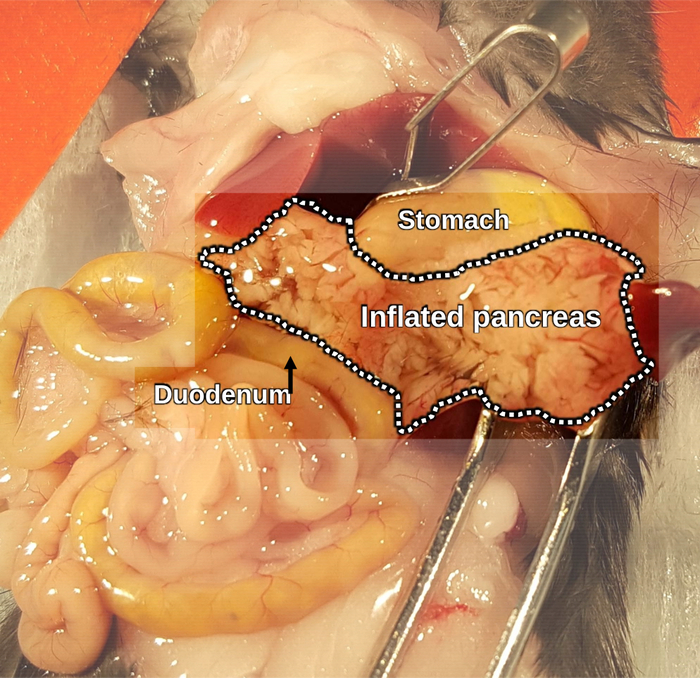
Figure 6: Fully inflated pancreas.
The dotted line shows the boundary of the fully perfused pancreas. Forceps hold up the splenic region where islets are most concentrated. Please click here to view a larger version of this figure.
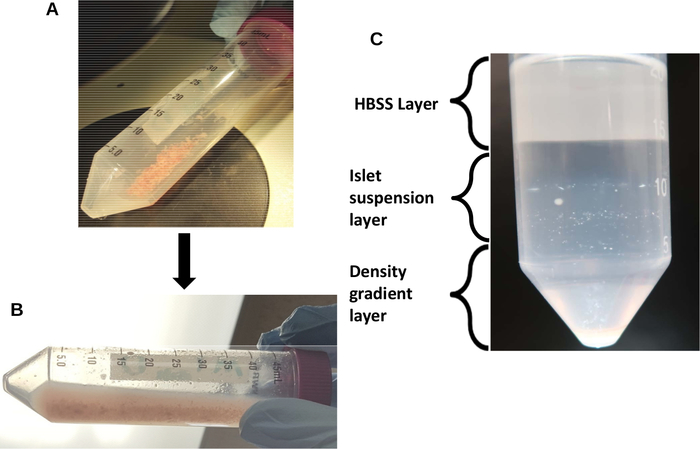
Figure 7: Islet isolation and purification steps.
(A) Mechanically chopped tissue pieces of pancreas before digestion. (B) Digested pancreas—homogeneous tissue suspension of collagenase-perfused pancreas after 13 min of incubation in a shaking water bath at 37 °C, followed by 30 s of mixing by hand. (C) Islet suspension layer is formed between the HBSS and the density gradient after centrifugation. Please click here to view a larger version of this figure.
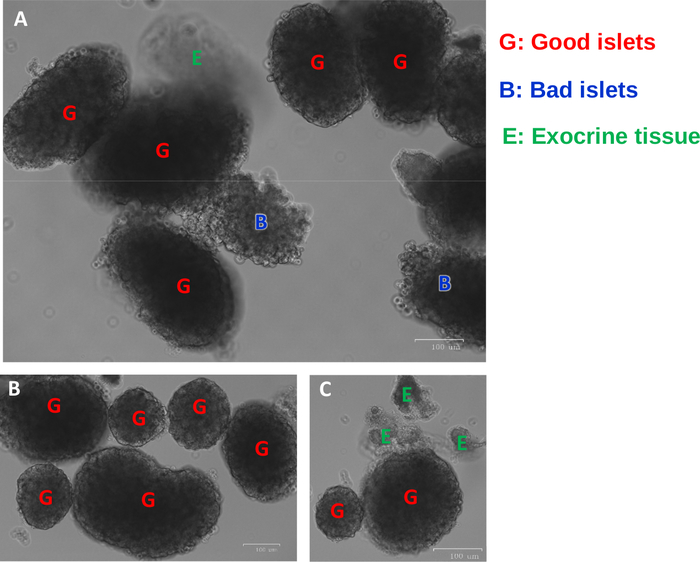
Figure 8: Representative islet images from Fluorescence Cell-Imager.
(A) Good islets, bad islets and exocrine tissue are seen. (B) A cluster of good islets is shown. (C) Panel shows undigested exocrine tissue attached to a good islet. Good/healthy islets show smooth round edges, indicated by the red letter “G”; bad/damaged islets show irregular shape and rough edges, and are indicated by blue letter “B”. Undigested exocrine tissues appear translucent, often attached to islets, and are indicated by green letter “E”. Please click here to view a larger version of this figure.
Discussion
This protocol includes collagenase perfusion and digestion, followed by purification of islets. The most critical steps of this protocol are effective injection and complete perfusion of the pancreas1,4,7. The delivery method of this protocol allows the enzyme to traverse the anatomical routes to better digest the exocrine tissue surrounding the islets1. In addition, this technique is well suited for complete digestion of the splenic region, which has the highest concentration of islets4,6. This protocol, with well-controlled digestion time and carefully executed purification steps, can produce 250–350 healthy islets. The islets isolated from this protocol have been used successfully to study glucose-stimulated insulin secretion ex vivo12. From our experience, insulin secretion increased 4-fold upon high glucose stimulation (22.2 mM) compared to baseline (3.3 mM) after overnight incubation in 5.5 mM glucose-containing RPMI-1640 complete media. The survivability/functionality of the islets under prolonged incubation (2–7 days) has not been tested.
Even though the presented protocol includes detailed notes and visual demonstrations, some adjustments are needed to achieve the optimal conditions for high yield and high-quality islets. Two most common problems that may impede the success are improper cannulation of the ampulla of Vater or accidental puncture of the duct. To avoid these, one should ensure that the site of penetration is precisely where the ampulla meets with the duodenum. This area is bigger and relatively easy to identify, which allows for multiple punctures without seriously compromising the integrity of the duct. Once within the ampulla, the orientation of the needle should be parallel with the duct rather than angled. At this point, push the needle into the duct for about 1/4 of the duct’s length, and then stabilize the needle with forceps while slowly injecting collagenase; this will help to prevent the needle from bending under the pressure and accidentally puncturing the duct. Other problems may include over- or under-digestion of the pancreas; this may require modification based on age, strain and sex of the mice. Damaged islets due to over-digestion (enzymatic and mechanical) or prolonged exposure to the density gradient may occur. These are common problems that exist for similar methods; some minor adjustments should yield significant improvements. A suggestion when dealing with these types of issues is to choose one variable to modify at a time (e.g., time of digestion or concentration of collagenase).
The main advantage of this protocol is the route of enzyme delivery: having collagenase P to directly digest the exocrine pancreas using an easier anatomical route which increases digestion efficiency1. This method has been reported to yield a 50% increase in number of islets compared to the method of excising the pancreas, chopping it, and exposing it to collagenase13. This protocol only requires the use of a single density gradient, making it significantly less labor-intensive and more cost-effective, as compared to other methods which require the preparation of multiple gradients at different densities, or the complex Percoll method that requires additional time1,8,11. The gradient method employed in this protocol has also be used in islet isolation by others4. This method of islet isolation provides the scientist with an improved tool for studying pancreatic islets. Future applications of this protocol include alteration to enhance the efficacy when dealing with diabetic mice. As Do et al. have observed, diabetic mice, depending on glucose levels, yield fewer islets (less than 100), with reduced size and appearance of islets4. We have observed this phenomenon and believe that diabetic islets are more vulnerable to enzymatic and mechanical digestion which require special care. Additionally, islet density may alter its appearance in the density gradient, further optimization of the protocol would help to increase the yield of diabetic islets.
Disclosures
The authors have nothing to disclose.
Acknowledgements
We are extremely grateful to Ms. Jennifer Munguia for her artistic illustration of the schematic diagram. We thank Mr. Michael R. Honig at Houston’s Community Public Radio Station KPFT for his editorial assistance. This study was supported by American Diabetes Association #1-15-BS-177 (YS), and NIH R56DK118334/R01DK118334 (YS). This work was also supported by the USDA National Institute of Food and Agriculture, Hatch project 1010840 (YS) and R01 DK095118 (SG).
Materials
| Name | Company | Catalog Number | Comments |
|---|---|---|---|
| 3 mL syringe | BD | 309657 | Hoding collagenase P |
| Coverglass forceps | VWR | 82027-396 | Holding skin of mouse to aid incision procedure |
| Curved forceps | Sigma-Aldrich | Z168696 | Holding tissues during pancreas removal |
| Isoflurane | Piramal | B13B16A | To anaesthetize mice prior surgery |
| 100 mm petri dishes | VWR | 30-2041 | Used for islet culture |
| 30 G. ½ inch needle | BD | 305106 | For penetration of Ampulla of vater to deliver Collagenase P - this guage is used as it fits well in most CBDs |
| 50ml tube | VWR | 89039-658 | Holding digested pancreatic tissue, collagenase P, and purified islets |
| Absorbent pads with waterproof moisture barrier | VWR | 82020-845 | To absorb blood from syurgical procesdudes |
| Centrifuge 5810R with swing bucket and deceleration capability | Eppendorf | 5811FJ478114 | Use for pelleting tissues, pellet is formed at bottom of conical tube - swing bucket centrifuge is needed. Also the decelaration feature is important to form the gradient layers. |
| Collagenase P- 1g | Roche Diagnostics | 11249002001 | For digestion of exocrine pancreas |
| Curved surgical scissors | Fisher-Scientific | 13-804-21 | For cutting open mouse abdomen |
| Dissection microscope | Olympus | SZX16 | Used for identification of key anatomical structures to accurately deliver collagenase into pancreas |
| Hank's Balanced Salt Solution 10x | Corning | 20-023-CV | Washing cells |
| Histopaque-1077 | Sigma | RNBF5100 | For gradient formation |
| Light source | Leeds | LR92240 | Enhancing visibility of microscope |
| RNaseZap | Fisher-Scientific | AM9780 | For removing RNase |
| RPMI-1640 Media w/o L-Glutamine | Corning | 15-040-CV | Culturing Islets |
| Schwartz micro serrefines (Microvascular clamp) | Fine Science Tools | 18052-01 | Clamping common bile duct and hepatic artery |
| Shaking waterbath | Boekel/Grant | 8R0534008 | Important for mechanical digestion of exocrine tissue |
| Small surgical scissors | VWR | 82027-578 | Cuttitng tissue that atached to pancreas |
References
- Carter, J. D., Dula, S. B., Corbin, K. L., Wu, R., Nunemaker, C. S. A practical guide to rodent islet isolation and assessment. Biological Procedures Online. 11, 3-31 (2009).
- Gotoh, M., Maki, T., Kiyoizumi, T., Satomi, S., Monaco, A. An improved method for isolation of mouse pancreatic islets. Transplantation. 40 (4), 437-438 (1985).
- O'Dowd, J. F. The isolation and purification of rodent pancreatic islets of Langerhans. Methods in Molecular Biology. 560, 37-42 (2009).
- Do, O. H., Low, J. T., Thorn, P. Lepr(db) mouse model of type 2 diabetes: pancreatic islet isolation and live-cell 2-photon imaging of intact islets. Journal of Visualized Experiments : JoVE. (99), e52632(2015).
- Stull, N. D., Breite, A., McCarthy, R., Tersey, S. A., Mirmira, R. G. Mouse islet of Langerhans isolation using a combination of purified collagenase and neutral protease. Journal of Visualized Experiments : JoVE. (67), (2012).
- Wang, X. Regional Differences in Islet Distribution in the Human Pancreas - Preferential Beta-Cell Loss in the Head Region in Patients with Type 2 Diabetes. PLOS ONE. 8, (2013).
- Li, D. S., Yuan, Y. H., Tu, H. J., Liang, Q. L., Dai, L. J. A protocol for islet isolation from mouse pancreas. Nature Protocols. 4 (11), 1649-1652 (2009).
- Neuman, J. C., Truchan, N. A., Joseph, J. W., Kimple, M. E. A method for mouse pancreatic islet isolation and intracellular cAMP determination. Journal of Visualized Experiments : JoVE. (88), e50374(2014).
- Scharp, D. W., Lacy, P. E., Finke, E., Olack, B. Low-temperature culture of human islets isolated by the distention method and purified with Ficoll or Percoll gradients. Surgery. 107 (5), e50374(1987).
- Salvalaggio, P. R. Islet filtration: a simple and rapid new purification procedure that avoids ficoll and improves islet mass and function. Transplantation. 74 (66), 877-879 (2002).
- Saliba, Y., Bakhos, J. J., Itani, T., Fares, N. An optimized protocol for purification of functional islets of Langerhans. Laboratory Investigation. 97 (1), 70-83 (2017).
- Pradhan, G., et al. Obestatin stimulates glucose-induced insulin secretion through ghrelin receptor GHS-R. Scientific Reports. 7 (1), 979(2017).
- Shapiro, A. M. J., Hao, E., Rajotte, R. V., Kneteman, N. M. High yield of rodent islets with intraductal collagenase and stationary digestion--a comparison with standard technique. Cell Transplantation. 5 (6), 631-638 (1996).
Reprints and Permissions