Immunocytochemistry and immunohistochemistry are staining methods for a protein of interest in cultured cells and tissues, respectively. The basic principle of both related techniques involves using specific antibodies tagged with a detection system to identify and visualize the protein and determine its location within the cells and tissues, as well as the relative levels. The process in either experiment begins with sample preparation.
For immunocyctochemistry, which specifically visualizes protein or antigen locations in cells, this involves three steps. The first step is plating, which entails culturing the cells in growth media on a cover slip or slide, typically, in the wells of a culture plate. This is followed by fixation, where a precipitating or crosslinking agent like paraformaldehyde is added to the cells to preserve the structural integrity of the proteins and prevent enzyme activity from degrading them. The last step is permeabilization, which involves adding a detergent to make the cell membranes permeable for the staining.
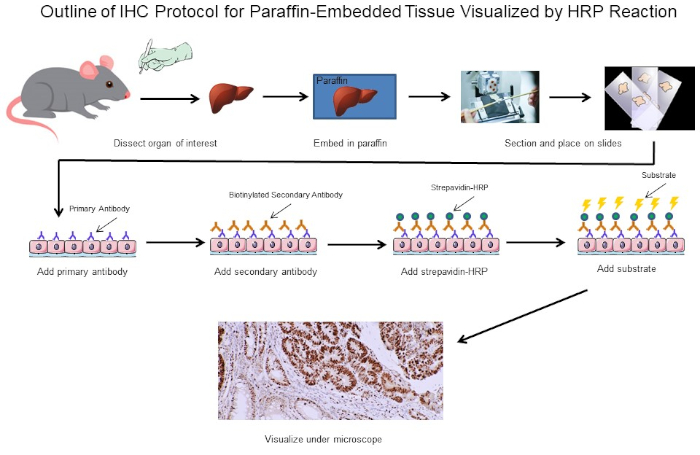
In the counterpart method, immunohistochemistry, proteins or antigens are visualized in tissues and sample preparation has five steps. First, the whole tissue is subjected to fixation, usually with paraformaldehyde. This is followed by embedding of the tissue in a block of paraffin, and then sectioning of this block using a machine called a microtome to cut the tissue into thin slices which can be placed onto slides. Next, the slides are subjected to deparaffinization, or removal of the paraffin from around the tissue slice. Then, an optional antigen retrieval step can be performed. This can either be done using heat or enzymes to unmask epitopes that were cross-linked during fixation making them available for antibody binding. After the appropriate sample preparation, a target-specific primary antibody is added to the cell or tissue sample. This primary antibody should bind to the protein of interest. Next, a secondary antibody is added, which detects and binds to the primary antibody. This secondary antibody is conjugated to, or can bind to, an enzyme called HRP. When its specific substrate, DAB, is added, HRP converts this to an insoluble, brown precipitate. This brown stain marks the location of the target protein. The slides are also stained with hematoxylin, which labels the nuclei in blue and provides a spatial reference point for determining subcellular localization. After that, mounting media is added to the slide, followed by a cover slip in order to seal and preserve the stained sample. Finally, the slides can be imaged on a light microscope.
In this video, you will observe the sample preparation technique for plated cells and tissue sections, followed by immunostaining of the tissue sections.
First, the cells of interest need to be seated onto coverslips. To do this, working in a tissue culture hood, place individual coverslips into the wells of a 24-well plate. Then, close the sash and turn on the UV light to sterilize the coverslips for at least 15 minutes. Next, turn off the UV light. To lift the cells of interest from a confluent 10-centimeter dish, aspirate the media, wash briefly with PBS, and add trypsin to the cells for 2 minutes. Then, tap the side of the plate to ensure the cells have detached and neutralize the trypsin with media. Next, add 0. 5 mL of the cell suspension into each well, making sure to cover the coverslips. Place the plate into a humidified CO2 incubator and allow the cells to grow at 37 degrees celsius until they are 50-70% confluent.
Once the cells reach the optimal confluency, aspirate the culture medium from each well, and then fix the cells by incubating them in . 5 mL of 4% paraformaldehyde diluted in 1X PBS for 20 minutes at room temperature. After removing the fixative, rinse the cells be adding 1 mL of 1X PBS over each coverslip. Immediately aspirate the PBS, then repeat the rinse 2 more times for a total of 3 washes.
Now, permeablize the cells by adding 0.5 mL of 0.1% Triton X-100 in 1X PBS to each well. Leave the plate at room temperature for 15 minutes. Aspirate off the permeabilization buffer and then rinse the cells by adding 1 mL of 1X PBS into each well. Immediately aspirate off the PBS and repeat the rinse 2 more times for a total of 3 washes. Now that the cells on the coverslips are fixed and permeabilized, proceed to the staining procedure demonstrated for the following immunohistochemistry example with the exception that the incubations should be performed within the wells of the 24-well plate rather than directly on a tissue section slide.
To begin, obtain prepared, formalin-fixed, paraffin-embedded tissue sections. Deparaffinize the slides by placing them into a slide rack and then completely immersing them into 250 mL of 100% xylene. Allow the slides to incubate for 5 minutes in the xylene. Then, remove the slides from the container, wipe them off with a paper towel, and place them into a new xylene bath in a fresh container for a further 5 minutes.
Next, rehydrate the sections in a series of graded ethanol solutions starting with 100% ethanol for 3 minutes. Wipe off the slide rack with a paper towel and transfer the slides to a new container of 100% ethanol for another 3 minutes. Continue this cycle of washing, drying with a paper towel, and transferring the slides to a new bath following the indicated concentrations of ethanol for the specified time. After the final ethanol wash, wipe off the rack with a paper towel and incubate the slides in 100 mL of .3% hydrogen peroxide for 30 minutes at room temperature in order to block any endogenous peroxidase activity. Wash the slides in 250 mL of 1X PBS for 5 minutes. Repeat this wash in a container of fresh 1X PBS for an additional 5 minutes.
Next, perform antigen retrieval by immersing the slides in 250 mL of IHC citrate buffer at pH 6.0 and boiling them for 20 minutes. Then, proceed to the staining protocol.
To begin the staining process for IHC, circle the sections with a hydrophobic pen to identify the minimal area that the buffer needs to cover. Then, use a pipette to place 100 microliters of blocking buffer, which in this experiment is horse serum diluted in 1X PBS, over the section. Incubate the slides for 1 hour at room temperature. Following this, remove the blocking buffer using a pipette.
Next, dilute the primary antibody and blocking buffer at a 1:100 dilution by adding 990 microliters of horse serum diluted in 1X PBS into a 1. 5 mL Eppendorf tube, followed by 10 microliters of the primary antibody. Add 100 microliters of the diluted primary antibody to each section, and incubate the slides for 30 minutes at room temperature. When the timer sounds, drain the primary antibody off each slide, and then wash them in 250 mL of 1X PBS for 5 minutes. Repeat this wash once more using fresh 1X PBS.
While the slides are washing in 1X PBS, dilute the secondary antibody to a 1:200 dilution by adding 995 microliters of blocking buffer to a 1.5 mL tube followed by 5 microliters of the secondary antibody, which in this case is biotinylated horse anti-mouse IGG. Add 100 microliters of the diluted secondary antibody to each section, and then incubate the slides for 30 minutes at room temperature. After 30 minutes, remove the secondary antibody by draining it off the sections, then wash the slides in 250 mL of 1X PBS for 5 minutes. Repeat this wash using fresh 1X PBS.
Now, add 100 microliters of avidin-biotin complex reagent, and incubate the sections in the dark for 30 minutes at room temperature. Next, wash the slides by immersing them in 250 mL of 1X PBS for 5 minutes. Similar to previous wash steps, repeat this wash one more time using fresh 1X PBS. Next, develop the slides by incubating the sections in 100 microliters of DAB for up to 5 minutes. Stop the development by immersing the sections in 250 mL of distilled water for 5 minutes.
Now, slides can be counterstained, if desired. To do this, briefly dip the slides in 250 mL of Harris Hematoxylin Solution. Rinse off the counterstain by washing the slides in 250 mL of distilled water for 5 minutes. Repeat this wash 1 more time using fresh distilled water. Next, dehydrate the sections. To do this, first incubate the slides in 95% ethanol for 5 minutes. Blot the slides on a paper towel, and transfer them to a new container of fresh 95% ethanol for another 5 minutes. Continue the cycle of washing, blotting with a paper towel, and transferring the slides to a new bath, following the indicated solutions for 5 minutes each.
After the final incubation, blot the slides with a paper towel, then add a drop of mounting media, such as Organo-Limonene Mount, to the slides. Now, place a coverslip over the sections, taking care not to trap air bubbles. The slides are now ready to be observed under a microscope for analysis.
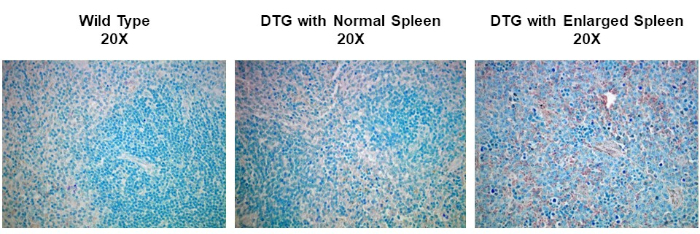
To observe the stained sections, use a standard light microscope to visualize the stain, and a digital camera to capture the image. In this particular example of IHC, spleen tissues from wild type and spontaneous, double-transgenic, or DTG mice, are compared for studying Dyclin D1 expression in lymphoma. The tissues were paraffin-embedded, sectioned, and stained with anticyclin D1 antibody, and imaged at 20X magnification. Cyclin D1 expressing cells are indicated by the reddish-brown color against the blue tissue background. Comparing the staining intensities among the images from the various mice, the non-enlarged spleens have relatively low amounts of Cyclin D1 expression irrespective of the mouse genotype. In contrast, the enlarged spleen from the DTG mouse, shows increased reddish-brown staining indicating a correlation between cancer development and Cyclin D1 expression in this mouse model.