A subscription to JoVE is required to view this content.  Sign in or start your free trial.
Immunohistochemistry and Immunocytochemistry: Tissue Imaging via Light Microscopy
  • 00:01Concepts
  • 03:39Preparation of Cells for Immunocytochemistry
  • 06:20Preparation of Formalin-Fixed Paraffin-Embedded Sections for Staining
  • 08:11Staining
  • 12:11Results

Immunhistochemie und Immunzytochemie: Gewebebildgebung mittels Lichtmikroskopie

English

Share

Overview

Quelle: Michael S. Lee1 und Tonya J. Webb1
1 Department of Microbiology and Immunology, University of Maryland School of Medicine and the Marlene and Stewart Greenebaum Comprehensive Cancer Center, Baltimore, Maryland 21201

Immunhistochemie (IHC) und Immunzytochemie (ICC) sind Techniken, die verwendet werden, um die Expression und Lokalisierung spezifischer Antigene mit Antikörpern zu visualisieren. Die erste veröffentlichte Anwendung von IHC war 1941, als Albert Coons die Technik benutzte, um das Vorhandensein von Pneumokokken-Antigen in Gewebeabschnitten von Mäusen zu visualisieren, die mit Pneumokokken infiziert waren (1). Der Name, Immunhistochemie, leitet sich von den Wurzeln “immuno-” in Bezug auf Antikörper und “Histo-” in Bezug auf die gewebeabschnitte ab, die in IHC verwendet werden. Die Wurzel “Cyto-” in der Immunzytochemie unterstreicht den entscheidenden Unterschied zwischen ICC und IHC. Während IHC Teile des gesamten Gewebes verwendet, verwendet ICC Zellen, die aus Gewebe isoliert oder in Kultur gewachsen sind. Der Unterschied in den verwendeten Proben bedeutet, dass die Probenvorbereitung technisch zwischen IHC und ICC unterschiedlich ist, aber ansonsten sind die Protokolle für ICC und IHC identisch und man wird feststellen, dass die Begriffe häufig austauschbar verwendet werden.

Sowohl bei IHC als auch bei ICC werden Antikörper mit chemischen oder fluoreszierenden Tags, wie Peroxidase bzw. Rhodalin, verwendet, um die Verteilung jedes Antigens von Interesse durch spezifische Bindung des markierten Antikörpers an das Antigen zu visualisieren. Im Falle von IHC werden dünne Gewebescheiben auf einem Dia immobilisiert, um die Struktur des Gewebes zu erhalten, bevor es gebeizt wird, was die Visualisierung von Antigenen im Kontext ganzer Gewebe ermöglicht (Abbildung 1). Im Falle von ICC werden Zellen gleichmäßig auf einem Dia verteilt, bevor sie gefärbt werden, was die Visualisierung der Antigenverteilung innerhalb einzelner Zellen ermöglicht, aber nicht innerhalb der Struktur eines bestimmten Gewebes. Aufgrund der Ähnlichkeiten zwischen den beiden Protokollen wird sich dieses Protokoll auf IHC konzentrieren, um die zusätzlichen Komplexitäten der Probenvorbereitung im Zusammenhang mit IHC zu beheben.

Figure 1
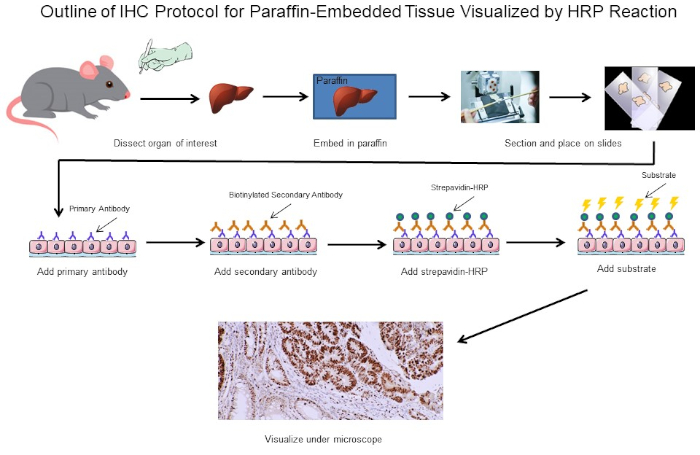
Abbildung 1: Gliederung des IHC-Protokolls. Visuelle Umriss eines IHC-Protokolls für paraffinintegriertes Gewebe, das von einer Maus seziert wurde. Dieses Protokoll verwendet einen biotinylierten Sekundärantikörper und Strepavidin-HRP, um die Position der Antikörperbindung zu visualisieren. Andere Optionen, wie fluoreszierend markierte Antikörper, sind ebenfalls möglich. Bitte klicken Sie hier, um eine größere Version dieser Abbildung anzuzeigen.

Die erste wichtige Entscheidung bei der Durchführung von IHC ist, wie die Gewebeabschnitte vorbereitet werden, um die Struktur des Gewebes während des gesamten Färbeprozesses zu erhalten. Die beiden wichtigsten Optionen sind formalin-feste Abschnitte von Paraffin-eingebettetem Gewebe oder frische Abschnitte von gefrorenem Gewebe. Es gibt keine einfache Antwort darauf, welche Methode verwendet werden soll, da es davon abhängt, welche nachgelagerte Analyse durchgeführt wird. Formalin-Fixierung von Paraffin eingebetteten Geweben wird im Allgemeinen gedacht, um Gewebemorphologie für eine optimale Bildgebung besser zu erhalten, während das Einfrieren von frischem Gewebe die Proteinfunktion für nachfolgende Assays außerhalb von IHC erhalten kann. Darüber hinaus haben sich frisch gefrorene Gewebeabschnitte als besser für die Genexpressionsanalyse geeignet erwiesen (2). Eine dritte Überlegung ist, ob die Antikörper für Ihr Antigen von Interesse für feste oder gefrorene Gewebeabschnitte geeignet sind, da einige Antikörper nur für eine bestimmte Art von Abschnitt optimiert wurden und möglicherweise nicht für andere arbeiten. Schließlich muss auch festgestellt werden, wie lange sie die Gewebeabschnitte lagern müssen, da frische gefrorene Proben bei -80°C aufbewahrt werden müssen und nicht länger als ein Jahr dauern dürfen, während feste Abschnitte viel länger bei Raumtemperatur gelagert werden können. Dies sind einige der wichtigsten Überlegungen, um zu bestimmen, ob formalin-feste Abschnitte von Paraffin-eingebettetem Gewebe oder frische Abschnitte von gefrorenem Gewebe verwendet werden sollen. Letztlich, wenn man genug Gewebe hat, kann es am besten sein, nur einige von beiden zu haben.

In diesem Experiment machten wir uns daran, festzustellen, ob die Cyclin-D1-Expression in vergrößerten Milz aus einem spontanen Mausmodell der Lymphomentwicklung erhöht wurde. Splenic-Gewebeproben wurden zuerst entweder von Wildtyp-Mäusen, transgenen Mäusen ohne Lymphom oder transgenen Mäusen, die spontan Lymphom entwickelt haben, isoliert. Die Milzgewebeproben wurden in Paraformaldehyd fixiert, in Paraffin eingebettet, geschnitten, mit einem Maus-Anti-Cyclin-D1-Primärantikörper, gefolgt von einem Pferde-Anti-Maus-Sekundärantikörper, gebeizt und mit 3,3-Diaminobenzidin (DAB) entwickelt. Die Abschnitte wurden dann in Harris Hematoxylin Solution gegenstainiert und dann wurden die Abschnitte bei 20-facher Vergrößerung abgebildet.

Reagenzien

Paraffin-Eingebettete Abschnitte

  1. 4% Paraformaldehyd (PFA)
  2. Ethanol (wasserfrei denaturiert, histologische Grade 100%, 95%, 80%, 75% und 50%). Verdünnung aus 100% Lagerbestand mit doppelt destilliertem Wasser (ddH2O)
  3. Xylol
  4. IHC-kompatible Glasrutsche, um sicherzustellen, dass der Gewebeabschnitt während des gesamten Verfahrens befestigt bleibt. IHC-kompatible Glasschieber haben eine spezielle Beschichtung und sind bei mehreren Händlern erhältlich. Wenn Sie ICC ausführen, verwenden Sie eine kammergekammerte Folie. Kammerrutschen ermöglichen es, Zellen in den Kammern auszusäen und in den Inkubator zu legen, bis zellennahe an der Rutsche befestigt sind und die richtige Konfluenz erreichen, an der die Kammern entfernt werden können und die Färbung auf die gleiche Weise wie IHC verlaufen kann.
  5. paraffin
  6. 0,3% Wasserstoffperoxid (H2O2)/Methanol: Zur Zubereitung 1 ml 30% H2O2 bis 99 ml Methanol hinzufügen. Bei -20°C lagern
  7. Antigen-Abrufpuffer: IHC-Citratpuffer pH 6,0

Frische gefrorene Abschnitte

  1. Optimale Schnitttemperatur (OCT) Einbettverbindung
  2. Optimale Fixierung: 4% PFA oder Aceton, das auf -20°C abgekühlt wurde

Färbung

  1. Sperrpuffer: Sollte vom Benutzer bestimmt werden. Ein Beispiel ist Pferdeserum in 1X PBS verdünnt
  2. Verdünnter Primärantikörper: siehe Herstellerspezifikationen
  3. Verdünnter biotinylatierter Sekundärantikörper: siehe Herstellerspezifikationen
  4. Verdünnte Avidin-Horseradish Peroxidase (HRP): Nur zur Peroxidase-Visualisierung. Siehe Herstellerspezifikationen.
  5. DAB oder ein anderes kompatibles Substrat
  6. Counterstain (optional)
  7. Ethanol (wasserfrei denaturiert, histologische Qualität 100% und 95%)
  8. Xylol
  9. Organo/Limonene Mount

Procedure

1. Präparation von Zellen für die Immunzytochemie Saatzellen von Interesse auf kammerförmigen Dias oder kammerförmigen Decklippen durch Zugabe von 0,5 ml Zellsuspension zu den Brunnen einer 24 Brunnenkulturplatte.Hinweis: Einige Zellen können Wachstum auf behandelten Coverlips erfordern, wie z. B. Mit Polylysin behandelte Abdeckungen. Die optimalen Behandlungsbedingungen sollten vom Anwender in Abhängigkeit vom verwendeten Zelltyp bestimmt werden. …

Results

IHC and ICC have a vast range of applications. For example, one use of IHC is to examine the expression of oncogenes in spontaneous mouse models of tumor development. In Figure 2, we set out to determine if cyclin D1 expression was increased in enlarged spleens in a spontaneous mouse model of lymphoma development. Splenic tissue samples were fixed in paraformaldehyde, embedded in paraffin, sectioned, stained using an anti-cyclin D1 antibody (diluted 1:200 in blocking buffer), and then the sections were imaged at 20X magnification. Cyclin D1 expressing cells are indicated by the reddish-brown color against the blue tissue background. These results suggest that cyclin D1 expression was increased in enlarged spleens, indicating a correlation between cancer development and cyclin D1 expression in this model.

Figure 2
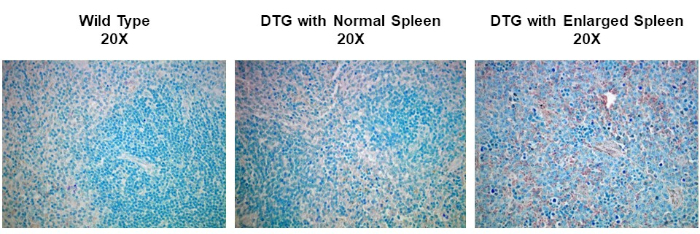
Figure 2: Splenic Cyclin D1 Expression in a Spontaneous Double Transgenic (DTG) Mouse Model of Lymphoma. An image of splenic tissue stained with an anti-Cyclin D1 primary antibody, counterstained with methyl green, and visualized using a biotinylated secondary antibody and ABC reagent activated with DAB substrate. The reddish-brown color represents locations where the antibody has bound indicating the presence of Cyclin D1 expressing tumor cells within the structure of splenic tissue that has been counterstained blue. Please click here to view a larger version of this figure.

Applications and Summary

Immunohistochemistry (IHC) and immunocytochemistry (ICC) are techniques used to visualize the expression and localization of specific antigens using antibodies. Tissues are first cut into thin sections that maintain the tissue morphology and placed on a slide. The antibodies are then added and will bind the antigen of interest and are equipped with a specific tag that allows them to be visualized under a microscope. Thus, through this basic concept, the distribution of antigens in the context of tissue structure can be visualized and studied. However, while the overarching concept is basic, there are multiple different approaches and variations that have been developed that increase both the complexity and usefulness of these techniques. This paper has covered the basic concept of IHC and ICC, the main decisions that need to be considered when using these techniques, and a detailed step-by-step protocol. The images produced by IHC and ICC are generally the final product and can be published as is to highlight obvious differences in amounts or distribution of staining between different conditions.

References

  1. Coons, A. H. Creech, H. J., Jones, N. and Berliner, E. The Demonstration of Pneumococcal Antigen in Tissues by the Use of Fluorescent Antibody, The Journal of Immunology, 45 (3), 159-170 (1942).
  2. Ripoli, F. L., Mohr, A., Hammer, S. C., Willenbrock, S., Hewicker-Trautwein, M., Hennecke, S., Escobar, H. M. and Nolte, I. A comparison of fresh frozen vs. Formalin-fixed, paraffin-embedded specimens of canine mammary tumors via branched-DNA assay. International Journal of Molecular Sciences, 17 (5) (2016).

Transcript

Immunocytochemistry and immunohistochemistry are staining methods for a protein of interest in cultured cells and tissues, respectively. The basic principle of both related techniques involves using specific antibodies tagged with a detection system to identify and visualize the protein and determine its location within the cells and tissues, as well as the relative levels. The process in either experiment begins with sample preparation.

For immunocyctochemistry, which specifically visualizes protein or antigen locations in cells, this involves three steps. The first step is plating, which entails culturing the cells in growth media on a cover slip or slide, typically, in the wells of a culture plate. This is followed by fixation, where a precipitating or crosslinking agent like paraformaldehyde is added to the cells to preserve the structural integrity of the proteins and prevent enzyme activity from degrading them. The last step is permeabilization, which involves adding a detergent to make the cell membranes permeable for the staining.

In the counterpart method, immunohistochemistry, proteins or antigens are visualized in tissues and sample preparation has five steps. First, the whole tissue is subjected to fixation, usually with paraformaldehyde. This is followed by embedding of the tissue in a block of paraffin, and then sectioning of this block using a machine called a microtome to cut the tissue into thin slices which can be placed onto slides. Next, the slides are subjected to deparaffinization, or removal of the paraffin from around the tissue slice. Then, an optional antigen retrieval step can be performed. This can either be done using heat or enzymes to unmask epitopes that were cross-linked during fixation making them available for antibody binding. After the appropriate sample preparation, a target-specific primary antibody is added to the cell or tissue sample. This primary antibody should bind to the protein of interest. Next, a secondary antibody is added, which detects and binds to the primary antibody. This secondary antibody is conjugated to, or can bind to, an enzyme called HRP. When its specific substrate, DAB, is added, HRP converts this to an insoluble, brown precipitate. This brown stain marks the location of the target protein. The slides are also stained with hematoxylin, which labels the nuclei in blue and provides a spatial reference point for determining subcellular localization. After that, mounting media is added to the slide, followed by a cover slip in order to seal and preserve the stained sample. Finally, the slides can be imaged on a light microscope.

In this video, you will observe the sample preparation technique for plated cells and tissue sections, followed by immunostaining of the tissue sections.

First, the cells of interest need to be seated onto coverslips. To do this, working in a tissue culture hood, place individual coverslips into the wells of a 24-well plate. Then, close the sash and turn on the UV light to sterilize the coverslips for at least 15 minutes. Next, turn off the UV light. To lift the cells of interest from a confluent 10-centimeter dish, aspirate the media, wash briefly with PBS, and add trypsin to the cells for 2 minutes. Then, tap the side of the plate to ensure the cells have detached and neutralize the trypsin with media. Next, add 0. 5 mL of the cell suspension into each well, making sure to cover the coverslips. Place the plate into a humidified CO2 incubator and allow the cells to grow at 37 degrees celsius until they are 50-70% confluent.

Once the cells reach the optimal confluency, aspirate the culture medium from each well, and then fix the cells by incubating them in . 5 mL of 4% paraformaldehyde diluted in 1X PBS for 20 minutes at room temperature. After removing the fixative, rinse the cells be adding 1 mL of 1X PBS over each coverslip. Immediately aspirate the PBS, then repeat the rinse 2 more times for a total of 3 washes.

Now, permeablize the cells by adding 0.5 mL of 0.1% Triton X-100 in 1X PBS to each well. Leave the plate at room temperature for 15 minutes. Aspirate off the permeabilization buffer and then rinse the cells by adding 1 mL of 1X PBS into each well. Immediately aspirate off the PBS and repeat the rinse 2 more times for a total of 3 washes. Now that the cells on the coverslips are fixed and permeabilized, proceed to the staining procedure demonstrated for the following immunohistochemistry example with the exception that the incubations should be performed within the wells of the 24-well plate rather than directly on a tissue section slide.

To begin, obtain prepared, formalin-fixed, paraffin-embedded tissue sections. Deparaffinize the slides by placing them into a slide rack and then completely immersing them into 250 mL of 100% xylene. Allow the slides to incubate for 5 minutes in the xylene. Then, remove the slides from the container, wipe them off with a paper towel, and place them into a new xylene bath in a fresh container for a further 5 minutes.

Next, rehydrate the sections in a series of graded ethanol solutions starting with 100% ethanol for 3 minutes. Wipe off the slide rack with a paper towel and transfer the slides to a new container of 100% ethanol for another 3 minutes. Continue this cycle of washing, drying with a paper towel, and transferring the slides to a new bath following the indicated concentrations of ethanol for the specified time. After the final ethanol wash, wipe off the rack with a paper towel and incubate the slides in 100 mL of .3% hydrogen peroxide for 30 minutes at room temperature in order to block any endogenous peroxidase activity. Wash the slides in 250 mL of 1X PBS for 5 minutes. Repeat this wash in a container of fresh 1X PBS for an additional 5 minutes.

Next, perform antigen retrieval by immersing the slides in 250 mL of IHC citrate buffer at pH 6.0 and boiling them for 20 minutes. Then, proceed to the staining protocol.

To begin the staining process for IHC, circle the sections with a hydrophobic pen to identify the minimal area that the buffer needs to cover. Then, use a pipette to place 100 microliters of blocking buffer, which in this experiment is horse serum diluted in 1X PBS, over the section. Incubate the slides for 1 hour at room temperature. Following this, remove the blocking buffer using a pipette.

Next, dilute the primary antibody and blocking buffer at a 1:100 dilution by adding 990 microliters of horse serum diluted in 1X PBS into a 1. 5 mL Eppendorf tube, followed by 10 microliters of the primary antibody. Add 100 microliters of the diluted primary antibody to each section, and incubate the slides for 30 minutes at room temperature. When the timer sounds, drain the primary antibody off each slide, and then wash them in 250 mL of 1X PBS for 5 minutes. Repeat this wash once more using fresh 1X PBS.

While the slides are washing in 1X PBS, dilute the secondary antibody to a 1:200 dilution by adding 995 microliters of blocking buffer to a 1.5 mL tube followed by 5 microliters of the secondary antibody, which in this case is biotinylated horse anti-mouse IGG. Add 100 microliters of the diluted secondary antibody to each section, and then incubate the slides for 30 minutes at room temperature. After 30 minutes, remove the secondary antibody by draining it off the sections, then wash the slides in 250 mL of 1X PBS for 5 minutes. Repeat this wash using fresh 1X PBS.

Now, add 100 microliters of avidin-biotin complex reagent, and incubate the sections in the dark for 30 minutes at room temperature. Next, wash the slides by immersing them in 250 mL of 1X PBS for 5 minutes. Similar to previous wash steps, repeat this wash one more time using fresh 1X PBS. Next, develop the slides by incubating the sections in 100 microliters of DAB for up to 5 minutes. Stop the development by immersing the sections in 250 mL of distilled water for 5 minutes.

Now, slides can be counterstained, if desired. To do this, briefly dip the slides in 250 mL of Harris Hematoxylin Solution. Rinse off the counterstain by washing the slides in 250 mL of distilled water for 5 minutes. Repeat this wash 1 more time using fresh distilled water. Next, dehydrate the sections. To do this, first incubate the slides in 95% ethanol for 5 minutes. Blot the slides on a paper towel, and transfer them to a new container of fresh 95% ethanol for another 5 minutes. Continue the cycle of washing, blotting with a paper towel, and transferring the slides to a new bath, following the indicated solutions for 5 minutes each.

After the final incubation, blot the slides with a paper towel, then add a drop of mounting media, such as Organo-Limonene Mount, to the slides. Now, place a coverslip over the sections, taking care not to trap air bubbles. The slides are now ready to be observed under a microscope for analysis.

To observe the stained sections, use a standard light microscope to visualize the stain, and a digital camera to capture the image. In this particular example of IHC, spleen tissues from wild type and spontaneous, double-transgenic, or DTG mice, are compared for studying Dyclin D1 expression in lymphoma. The tissues were paraffin-embedded, sectioned, and stained with anticyclin D1 antibody, and imaged at 20X magnification. Cyclin D1 expressing cells are indicated by the reddish-brown color against the blue tissue background. Comparing the staining intensities among the images from the various mice, the non-enlarged spleens have relatively low amounts of Cyclin D1 expression irrespective of the mouse genotype. In contrast, the enlarged spleen from the DTG mouse, shows increased reddish-brown staining indicating a correlation between cancer development and Cyclin D1 expression in this mouse model.

Tags

Cite This
JoVE Science Education Database. JoVE Science Education. Immunohistochemistry and Immunocytochemistry: Tissue Imaging via Light Microscopy. JoVE, Cambridge, MA, (2023).