A subscription to JoVE is required to view this content.  Sign in or start your free trial.
Immunoprecipitation-Based Techniques: Purification of Endogenous Proteins Using Agarose Beads
  • 00:01Concepts
  • 03:25Immunoprecipitation Using Protein A/G Plus Agarose Beads
  • 08:18IP Verification Through Western Blot Analysis
  • 12:36Results

Techniques basées sur l'immunoprécipitation : purification des protéines endogènes à l'aide de billes d'agarose

English

Share

Overview

Source: Susannah C. Shissler1, Tonya J. Webb1
1 Département de microbiologie et d’immunologie, Université du Maryland, Baltimore, MD 21201

L’immunoprécipitation (IP, également connue sous le nom d’un «pull-down» d’essais) est une technique largement utilisée qui a des applications dans une variété de domaines. Conçu pour la première fois en 1984, il a été affiné en 1988 (1, 2). L’objectif fondamental de la propriété intellectuelle est la purification et l’isolement d’une protéine spécifique à l’aide d’un anticorps contre cette protéine. Le mot «immuno» fait référence à l’utilisation d’un anticorps tandis que le mot «précipitation» fait référence à l’arrêt d’une substance spécifique d’une solution. La protéine cible peut être endogène ou recombinante. La plupart des protéines recombinantes ont une étiquette d’épitope (c.-à-d. myc ou drapeau) attachée à elles pour simplifier la purification suivante. Typiquement, il est plus facile d’optimiser la protéine recombinante IP parce que les anticorps contre les étiquettes d’épitope recombinant sont très forts et efficaces. Les anticorps contre les protéines endogènes ont une efficacité extrêmement variable – ce qui rend beaucoup plus difficile d’optimiser ces adresses IP. Une étape nécessaire après l’immunoprécipitation est la vérification de la purification. La protéine isolée est résolue à l’aide de SDS-PAGE et par la suite sondée pour la pureté par les taches occidentales (figure 1). Un contrôle important est l’utilisation d’un anticorps différent pendant la tache occidentale pour vérifier tirer vers le bas de la protéine correcte. La combinaison de la propriété intellectuelle avec les techniques suivantes est un outil d’analyse puissant. L’objectif après la purification peut être la caractérisation de la protéine elle-même par la RMN, la spectrométrie de masse et les essais in vitro, ou l’analyse des partenaires interagissant de la protéine (c.-à-d. protéine, ADN, ARN) (3, 4, 5).

Figure 1
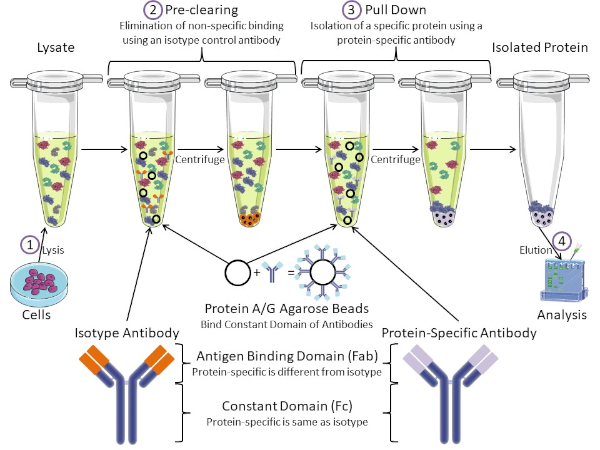
Figure 1 : Aperçu de la procédure d’immunoprécipitation. L’immunoprécipitation est l’isolement d’une protéine spécifique à l’aide d’un anticorps. Après la production de lysate à partir de cellules, il y a deux étapes principales- pré-dédouanement et tirer vers le bas. Pendant l’étape de pré-dédouanement, les lysates cellulaires sont pré-dédouanés des protéines qui se lient aux anticorps non spécifiquement à l’aide d’un anticorps anti-isotype. Dans l’étape de traction vers le bas, la protéine cible est tirée vers le bas à l’aide d’un anticorps protéique spécifique. La protéine isolée est ensuite analysée par Western blot. Les anticorps isotypes et les anticorps protéiques spécifiques ont le même domaine constant, mais différents domaines de liaison d’antigène. Un composant clé de ce protocole est protein A/G perles d’agarose qui lient le domaine constant des anticorps- permettant l’immunoprécipitation de la protéine cible. Veuillez cliquer ici pour voir une version plus grande de ce chiffre.

Les anticorps sont la composante clé d’une immunoprécipitation qui la différencie des autres formes de purification des protéines (c.-à-d. la purification de la colonne d’affinité au nickel). Les anticorps sont des molécules fabriquées par des cellules B qui peuvent reconnaître des épitopes protéiques spécifiques. Les anticorps ont deux domaines : constante (Fc) et liaison antigène (Fab) (figure 1). Le domaine constant identifie le type d’anticorps et dicte la fonction in vivo. Habituellement, les domaines constants des anticorps utilisés pour la propriété intellectuelle sont la souris, le rat ou le lapin IgG. La partie de liaison d’antigène de l’anticorps reconnaît un épitope spécifique d’une protéine spécifique. Les anticorps peuvent reconnaître les épitopes sur les protéines pliées qui peuvent ne pas exister lorsque la protéine est dénaturée et vice versa. Par conséquent, la disponibilité de l’épitope dépend du pliage des protéines – identifier un facteur important à considérer lors du choix des anticorps et des conditions pour la propriété intellectuelle.

Les systèmes procaryotes et eucaryotes ont des protéines liant les anticorps. Dans les systèmes eucaryotes, le but est la protection immunitaire contre les bactéries tandis que dans les systèmes procaryotes, le but est la protection contre le système immunitaire. Les protéines liant les anticorps affectent la méthodologie de la propriété intellectuelle de deux façons. Tout d’abord, il y a une étape nécessaire de pré-dédouanement (figure 1) pour débarrasser le lysate des protéines qui lient les anticorps – réduisant ainsi la liaison non spécifique dans le produit final. Cette étape utilise un anticorps isotype qui a le même domaine constant que, mais un domaine de liaison d’anticorps différent de votre anticorps spécifique aux protéines. Les protéines bactériennes liant les anticorps sont le deuxième composant clé de cette méthode. Après que l’anticorps protéique-spécifique lie la protéine cible, l’anticorps : complexe de protéine doit être tiré vers le bas (figure 1). Les protéines A, G et L sont des protéines bactériennes qui lient le domaine constant des anticorps. Alors que les bactéries l’utilisent pour subvertir le système immunitaire, les chercheurs ont coopté ce système pour la purification facile des anticorps, et il est utilisé à la fois pendant les étapes de pré-dédouanement et de traction. Ces protéines ont des affinités de liaison différentes pour différentes espèces et différents sous-types de domaine constants – un autre facteur à considérer lors du choix des conditions pour la propriété intellectuelle. De nombreuses entreprises vendent des perles d’agarose étiquetées Protéines A/G (figure 1), des colonnes de spin préfabriquées ou des résines pour fabriquer des colonnes. En général, les perles et les colonnes de spin sont utilisées pour de plus petites tailles d’échantillon tandis que les résines sont utilisées pour la purification en vrac.

Dans cet exercice de laboratoire, nous démontrons comment purifier la protéine endogène c-myc, des thymocytes murines primaires, utilisant la protéine A/G Plus agarose perles basées sur la technique d’immunoprécipitation de base. Le protocole commence à partir de la préparation du lysate cellulaire et se termine par la vérification de la protéine réussie tirer vers le bas en utilisant l’analyse de tache occidentale.

Procedure

1. Immunoprécipitation utilisant des perles d’agarose de protéine A/G PLUS Préparation de lysate cellulaire Centrifuger 108 thymocytes dans un microcentrifugeà 13 000 tr/min pendant 3 min et retirer le supernatant.Note: Le nombre de cellules varie en fonction des niveaux d’expression de la protéine désirée et du type de cellule choisi. Re-suspendre les cellules dans 500 ‘L tampon de lyse RIPA…

Results

The results of the procedure detailed above are shown in Figure 2. From left to right, the lanes contain the control group (isotype), the test group (c-myc), the pre-cleared lysate (lysate), and the molecular weight ladder (ladder). The 25 and 75 kDa ladder bands are marked. The two prominent bands at ~25 kDa and 50 kDa are the light and heavy chain of the binding antibody, respectively and are non-specific to the IP or the samples. c-myc protein which runs around 67kDa on Western blots and is usually visible just below the 75 kDa ladder band. In this blot, the c-myc band is visible in the second lane, but absent in the first lane, indicating that the IP antibody successfully pulled down c-myc. There is no visible band in the pre-cleared lysate lane, suggesting that this protein has low endogenous expression levels.

Figure 2
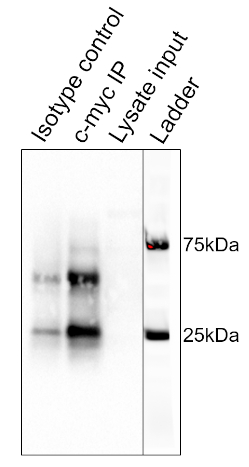
Figure 2: Results of a Western Blot Analysis, used to assess the purification of c-myc by immunoprecipitation. A band at 67 kDa, corresponding to c-myc, is visible in the anti-c-myc lane, but not the isotype control lane. Note that c-myc levels were not high enough to be visualized in the lysate lane. Please click here to view a larger version of this figure.

Applications and Summary

In short, immunoprecipitation is the isolation of a specific protein using an antibody. In this example, the results of the immunoprecipitation were analyzed by Western blot to assess the purity. The isolated protein could be used in a number of applications afterwards including: NMR for protein structure, Mass Spectrometry for amino acid sequence, or in vitro assays for enzymatic characterization. IPs can also characterize the interacting partners of proteins. For instance, following isolation, DNA or RNA could be isolated for sequencing. Co-immunoprecipitations assess protein-protein interactions. When the target protein is pulled down during an IP, interacting proteins can also be pulled down. These interacting partners can be assessed by mass spectrometry and Western blot. Immunoprecipitation is a powerful technique for studying protein biology.

References

  1. Olliver, C. L. and Boyd, C. D. (1984). Immunoprecipitation of In Vitro Translation Products with Protein A Bound to Sepharose. In J. M. Walker (eds), Nucleic Acids. Methods in Molecular Biology (pp. 157-160). New Jersey: Humana Press.
  2. Thurston, C. F. and Henley, L. F. (1988). Direct Immunoprecipitation of Protein. In J. M. Walker (eds), New Protein Techniques. Methods in Molecular Biology (pp. 149-158). New Jersey: Humana Press.
  3. Anderson, N. G. (1998). Co-immunoprecipitation: Identification of Interacting Proteins. In R. A. Clegg (eds), Protein Targeting Protocols.Methods in Molecular Biology (pp. 35-45). New Jersey: Humana Press.
  4. Jackson, D. I. and Dickson, C. (1999). Protein Techniques: Immunoprecipitation, In Vitro Kinase Assays, and Western Blotting. In P.T. Sharpe and I. Mason (eds), Molecular Embryology. Methods in Molecular Biology (pp. 699-708). New Jersey: Humana Press.
  5. Trieu, E. P. and Targoff, I. N. (2015). Immunoprecipitation: Western Blot for Proteins of Low Abundance. In B. Kurien and R. Scofield (eds), Western Blotting. Methods in Molecular Biology (pp. 327-342). New York, NY: Humana Press.

Transcript

Immunoprecipitation, or IP, is a widely used technique to isolate a protein of interest from a cell or tissue lysate or a body fluid for protein characterization or to investigate protein-protein interactions.

The process begins with an antibody, which has a high affinity and specificity for the target protein. This antibody is mixed with the sample, allowing antibody-target complexes to form. Any protein bound to the target protein also gets indirectly attached to the antibody in the process. Next, the solution is incubated with agarose beads, conjugated to a bacterial protein, which has a strong affinity for the constant region of antibodies. The bacterial protein binds to the antibody and connects the antibody- target complexes to the beads. Then, the solution is centrifuged to precipitate the beads, thereby extracting the entire complex containing the binding antibody, the target protein, and any interacting proteins. Finally, the bound proteins are extracted from the beads and released from each other and are used for further analysis by techniques such as Western blotting.

Several variations of different parts of this technique are commonly used, like pre-clearing, using peptide tags or magnetic beads, or analyzing other non-protein binding partners. IP can be preceeded by a pre-clearing step, to remove non-specific antibody-binding proteins in the sample and minimize background. This involves first incubating the sample with isotype control antibodies, allowing them to bind to these proteins, and then using agarose beads to precipitate the complexes. The sample is then ready to proceed to the actual IP.

Peptide tags are useful if a specific antibody is not available for IP. Here, the target protein can be genetically modified to contain a peptide epitope tag and an antibody against the tag is able to pull out the protein of interest. Magnetic beads are often used instead of agarose to precipitate the target. After binding to the antibody-target complex, the sample tube is placed in a strong magnetic field, which extracts the beads from the solution. This eliminates the need for centrifugation and improves speed and convenience.

Immunoprecipitation is also used for studying DNA or RNA binding proteins and are known as chromatin immunoprecipitation and RNA immunoprecipitation, respectively. These variations are useful for troubleshooting and adapting the method for different experimental applications. In this video, you will observe how to pre-clear a cell lysate and perform immunoprecipitation to extract a protein of interest, followed by Western blot analysis to validate the experiment.

To begin, place the pre-collected cells in a microcentrifuge and spin at 13 thousand rpm for three minutes. Following the spin, remove the supernatant and then resuspend the cells in 500 microliters of lysis buffer RIPA with PMSF. Now, disrupt the cells using a few quick pulses with a vortex and then aspirate the lysate a few times with a 25 gauge needle attached to a syringe, taking care to avoid creating bubbles. Place the cells on ice for 15 minutes. After incubating the samples on ice, centrifuge the lysate for 15 minutes at four degrees celsius.

Label a new 1.5 milliliter microcentrifuge tube. Following the spin, transfer the supernatant to the freshly labeled tube and discard the pellet. Next, pre-clear the lysate of contaminants that bind non-specifically to either the agarose beads or the primary antibody by adding 20 microliters of the Protein A/G PLUS-agarose beads and one microgram of an isotype control antibody to the lysate, which in this example is a mouse IgG1 isotype control. Incubate the tube on a rotator in a cold room for 30 minutes. After rotating the lysate in the cold room for 30 minutes, centrifuge the sample at 3200 rpm for 30 seconds at four degrees celsius. Remove the tube from the centrifuge and transfer the pre-cleared supernatant to a fresh labeled 1.5 milliliter microcentrifuge tube. Discard the pellet.

Now, determine the protein concentration of the cell lysate by performing a Bradford assay. Label seven 1. 5-milliliter microcentrifuge tubes one through six and sample and aliquot 1000 microliters of the Bradford reagent into each tube. Six of the tubes will be used to make a standard curve by adding various amounts of known quantities of BSA to each tube. The amounts to add are listed in this table. In the seventh sample tube, add one microliter of the pre-cleared lysate. Place 200 microliters from each of the seven tubes into individual wells of a flat-bottom 96-well plate, repeating each sample in triplicate so that there are three columns of seven samples. Read the plate on a plate reader, using a wavelength of 595 nanometers. After creating a standard curve in Excel, calculate the protein concentration of the pre-cleared lysate.

Next, label two 1.5-milliliter microcentrifuge tubes- one as control and the other as test, which in this example, will be the c-myc antibody. Place 500 micrograms of the pre-cleared lysate into each of these tubes and then bring the total volume for each tube up to 500 microliters using lysis buffer. Next, add two micrograms of the anti-c-myc antibody to the test group tube. For the control, add two micrograms of the mouse IgG1 isotype control antibody. Once the antibodies are added to the tubes, place the samples on a rotator in a cold room and incubate for two hours. Now, add the agarose beads. To do this, it is recommended to cut off the end of a pipette tip and then, using this modified tip, add 200 microliters of the Protein A/G PLUS-agarose beads to each tube. Incubate the tubes on a rotator in the cold room overnight.

Following the incubation, remove the tubes from the rotator and spin the lysates in the microcentrifuge to pull down the beads. After the spin is complete, remove the tubes from the centrifuge and aspirate the supernatant from each tube. Next, wash the beads using 500 microliters of 1X Dulbecco’s PBS. Place the tubes in a microcentrifuge and spin down for 30 seconds at four degrees celsius. Following this, remove the supernatant. Repeat the wash and centrifuge steps one more time for a total of two times. Remove the tubes from the microcentrifuge and aspirate the buffer from each tube. Using gel loading tips, remove any left over buffer from the beads, keeping the beads on ice to elute the bound protein.

In this example, the protein is eluted into SDS-PAGE running buffer by boiling for Western blot analysis. To do this, resuspend the beads in 20 microliters of SDS-PAGE loading dye containing beta-mercaptoethanol, or BME. Boil the samples at 95 degrees celsius for five minutes to dissociate the immunocomplexes from the beads. Then, centrifuge the beads at maximum speed for 10 seconds at room temperature. Remove the tubes from the microcentrifuge and hold them in a rack at room temperature. Using gel loading tips, carefully pipette the samples from the beads and load them into wells of a 4 to 15% gradient SDS-PAGE gel. In addition to the samples, load a lane with a protein ladder as well as a lane with the pre-cleared lysate to serve as a loading control. Once the gel is loaded, run the gel at 100 volts.

After the dye front has reached the bottom of the gel, which should take approximately one hour, stop the gel and make a Western blot sandwich, ensuring that the PVDF membrane is between the gel and the cathode. Place the Western blot sandwich in the transfer apparatus and transfer the proteins on the gel to the membrane for one hour at 100 volts. After the transfer is complete, place the membrane in five milliliters of block to prevent the antibodies from binding non-specifically to the membrane. Rock at a low setting for an hour at room temperature. When the timer sounds, remove the blocking buffer. Add five milliliters of the blocking buffer with the detection antibody to the membrane. Here, an anti-c-myc antibody, that is different than the one used for the pull down, is used.

Incubate the blot over night, at four degrees celsius on a rocker at a low setting. Following the incubation, remove the antibody and blocking buffer. Wash the blot, using five milliliters of TBST for five minutes at room temperature, on a rocker at a low setting. This wash step should be repeated two to five times for a total of three to six washes, using fresh TBST for each wash. Add five milliliters of one to 1000 secondary antibody and blocking buffer to the blot. In this case, the secondary antibody is HRP-tagged anti-rabbit light chain. Incubate the blot on a rocker at a low setting for one our at room temperature. Next, remove the buffer and wash the blot with five milliliters of TBST. Incubate this wash on a rocker at a low setting for five minutes at room temperature. Repeat this wash for a total of six to 12 washes, each with a fresh five milliliters of TBST. Remove the final wash by first pouring the liquid off of the blot. Then, using tweezers, dab the edge of the blot on a laboratory wipe to remove any excess liquid and then place the blot in a fresh container. Next, cover the blot with 1X Chemiluminescent Detection Reagent and incubate for one minute.

Working quickly, dab the edge of the blot on a laboratory wipe to remove any excess detection reagent and then place the blot on the imaging surface of the Imager tray. Image using the Chemiluminescent program to capture multiple time points from 10 to 30 seconds. After the blot is imaged, choose an image with optimal band visibility and then export that image. Prior to moving the blot, use the Imager to take a picture of the blot to capture the location of the ladder. Then, export that image also. Finally, using a slide preparation software, such as PowerPoint, align the bands and ladder images to form one image.

This image shows the Western blot result for immunoprecipitation of the protein c-myc from thymocyte cells. From left to right, the lanes represent the isotype control, the c-myc IP, and the pre-cleared lysate input. The lane on the extreme right is a merged image of the molecular weight ladder. The strong band, at around 25 kilodaltons is from the light chain and the one at 50 kilodaltons is from the heavy chain of the binding antibody and are non-specific to the IP or the samples. C-myc runs around 67 kilodaltons on Western blots and is usually visible just below the 75 kilodalton ladder band. In this blot, the c-myc band is visible in the second lane but absent in the first lane, indicating that the IP antibody successfully pulled down c-myc. There is no visible band in the pre-cleared lysate lane, suggesting that this protein has low endogenous expression levels.

Tags

Cite This
JoVE Science Education Database. JoVE Science Education. Immunoprecipitation-Based Techniques: Purification of Endogenous Proteins Using Agarose Beads. JoVE, Cambridge, MA, (2023).