A subscription to JoVE is required to view this content.  Sign in or start your free trial.
Immunoprecipitation-Based Techniques: Purification of Endogenous Proteins Using Agarose Beads
  • 00:01Concepts
  • 03:25Immunoprecipitation Using Protein A/G Plus Agarose Beads
  • 08:18IP Verification Through Western Blot Analysis
  • 12:36Results

Immunprecipitation-basierte Techniken: Reinigung endogener Proteine mit Agarose-Perlen

English

Share

Overview

Quelle: Susannah C. Shissler1, Tonya J. Webb1
1 Institut für Mikrobiologie und Immunologie, University of Maryland, Baltimore, MD 21201

Immunpräzipitation (IP, auch bekannt als “Pull-down”-Assay) ist eine weit verbreitete Technik, die Anwendungen in einer Vielzahl von Bereichen hat. Erstmals 1984 konzipiert, wurde es 1988 verfeinert (1, 2). Das grundlegende Ziel der IP ist die Reinigung und Isolierung eines bestimmten Proteins mit einem Antikörper gegen dieses Protein. Das Wort “Immuno” bezieht sich auf die Verwendung eines Antikörpers, während das Wort “Ausfällung” sich auf das Abziehen einer bestimmten Substanz aus einer Lösung bezieht. Das Zielprotein kann endogene oder rekombinant ewanant sein. Die meisten rekombinanten Proteine haben ein Epitop-Tag (d. h. myc oder Flag), das an ihnen angebracht ist, um die nachfolgende Reinigung zu vereinfachen. In der Regel ist es einfacher, rekombinante Protein-IP zu optimieren, da die Antikörper gegen rekombinante Epitop-Tags sehr stark und wirksam sind. Antikörper gegen endogene Proteine haben eine extrem variable Wirksamkeit , was es viel schwieriger macht, diese IPs zu optimieren. Ein notwendiger Schritt nach der Immunpräzipitation ist die Überprüfung der Reinigung. Das isolierte Protein wird mit SDS-PAGE aufgelöst und anschließend durch westliche Flecken auf Reinheit untersucht (Abbildung 1). Eine wichtige Kontrolle ist die Verwendung eines anderen Antikörpers während des Western Blot, um den Abziehdes des richtigen Proteins zu überprüfen. Die Kombination von IP mit nachfolgenden Techniken ist ein leistungsstarkes Analysetool. Das Ziel nach der Reinigung kann die Charakterisierung des Proteins selbst durch NMR, Massenspektrometrie und In-vitro-Assays oder die Analyse der interagierenden Partner des Proteins (z. B. Protein, DNA, RNA) (3, 4, 5) sein.

Figure 1
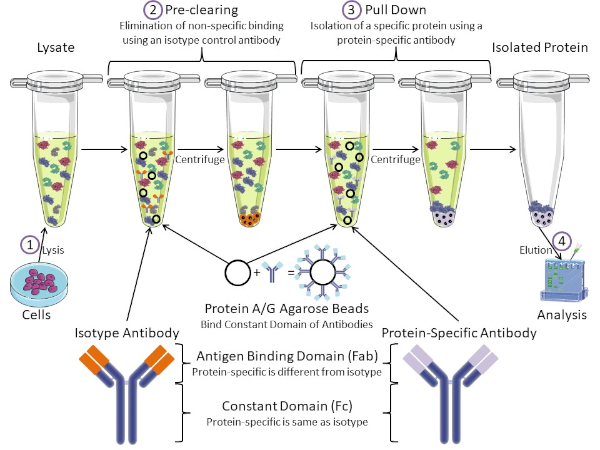
Abbildung 1: Überblick über das Immunpräzipitungsverfahren. Immunpräzipitation ist die Isolierung eines bestimmten Proteins mit einem Antikörper. Nach der Produktion von Lysat aus Zellen, gibt es zwei wichtige Schritte – Vor-Clearing und ziehen nach unten. Während des Vorklärungsschritts werden die Zelllysate von Proteinen vorgereinigt, die sich nicht spezifisch mit einem Isotyp-Kontrollantikörper an Antikörper binden. Im Pull-Down-Schritt wird das Zielprotein mit einem proteinspezifischen Antikörper nach unten gezogen. Das isolierte Protein wird dann durch Western Blot analysiert. Isotyp-Antikörper und proteinspezifische Antikörper haben die gleiche konstante Domäne, aber unterschiedliche Antigen-Bindungsdomänen. Ein wichtiger Bestandteil dieses Protokolls sind Protein-A/G-Agarose-Perlen, die die konstante Domäne von Antikörpern binden und eine Immunpräzipation des Zielproteins ermöglichen. Bitte klicken Sie hier, um eine größere Version dieser Abbildung anzuzeigen.

Antikörper sind der Schlüsselbestandteil einer Immunpräzipitation, die sie von anderen Formen der Proteinreinigung (d. h. Nickelaffinitätssäulenreinigung) unterscheidet. Antikörper sind Moleküle von B-Zellen, die bestimmte Proteinepitope erkennen können. Antikörper haben zwei Domänen: Konstante (Fc) und Antigenbindung (Fab) (Abbildung 1). Die konstante Domäne identifiziert den Typ des Antikörpers und diktiert die Funktion in vivo. In der Regel sind die konstanten Domänen von Antikörpern, die für IP verwendet werden, Maus, Ratte oder Kaninchen IgG. Der Antigenbindungsanteil des Antikörpers erkennt ein spezifisches Epitop eines bestimmten Proteins. Antikörper können Epitope an gefalteten Proteinen erkennen, die möglicherweise nicht existieren, wenn das Protein denaturiert ist und umgekehrt. Daher hängt die Verfügbarkeit des Epitops von der Proteinfaltung ab – die Identifizierung eines wichtigen Faktors, der bei der Wahl von Antikörpern und Bedingungen für IP zu berücksichtigen ist.

Sowohl prokaryotische als auch eukaryotische Systeme haben Antikörper-bindende Proteine. In eukaryotischen Systemen, der Zweck ist Immunschutz vor Bakterien, während in prokaryotischen Systemen, der Zweck ist der Schutz vor dem Immunsystem. Antikörperbindende Proteine beeinflussen die IP-Methodik auf zwei Arten. Erstens gibt es einen notwendigen Vorklärungsschritt (Abbildung 1), um das Lysat von Proteinen zu befreien, die Antikörper binden – wodurch die unspezifische Bindung im Endprodukt reduziert wird. In diesem Schritt wird ein Isotyp-Antikörper verwendet, der die gleiche konstante Domäne wie eine andere Antikörperbindungsdomäne als Ihr proteinspezifischer Antikörper hat. Bakterielle Antikörper-bindende Proteine sind die zweite Schlüsselkomponente dieser Methode. Nachdem der proteinspezifische Antikörper das Zielprotein bindet, muss der Antikörper: Proteinkomplex heruntergezogen werden (Abbildung 1). Proteine A, G und L sind bakterielle Proteine, die die konstante Domäne von Antikörpern binden. Während Bakterien dies verwenden, um das Immunsystem zu untergraben, Forscher haben dieses System für eine einfache Antikörperreinigung kooptiert, und es wird sowohl während der Vor-Clearing-und Pull-down-Schritte verwendet. Diese Proteine haben unterschiedliche Bindungsaffinitäten für verschiedene Arten und verschiedene konstante Domänensubtypen – ein weiterer Faktor, der bei der Auswahl der Bedingungen für IP zu berücksichtigen ist. Viele Unternehmen verkaufen Protein A/G-markierte Agaroseperlen (Abbildung 1), vorgefertigte Spinsäulen oder Harze, um Säulen herzustellen. Im Allgemeinen werden Perlen und Spinsäulen für kleinere Probengrößen verwendet, während Harze für die Massenreinigung verwendet werden.

In dieser Übungsübung zeigen wir, wie das endogene Protein c-myc aus primären murinen Thymosyten mit Protein A/G Plus Agaroseperlen auf basisiger Immunpräzipitationstechnik gereinigt werden kann. Das Protokoll beginnt mit der Zelllysatzubereitung und endet mit der Überprüfung des erfolgreichen Protein-Pull-Downs mittels Western-Blot-Analyse.

Procedure

1. Immunpräzipitation mit Protein A/G PLUS Agarose Perlen Zelllysat-Vorbereitung Zentrifugieren Sie 108 Thymose in einer Mikrozentrifuge bei 13.000 U/min für 3 min und entfernen Sie den Überstand.Hinweis: Die Zellzahl variiert je nach Expressionsniveau des gewünschten Proteins und dem gewählten Zelltyp. Setzen Sie die Zellen in 500 L Lysepuffer RIPA mit PMSF wieder aus. Unterbrechen S…

Results

The results of the procedure detailed above are shown in Figure 2. From left to right, the lanes contain the control group (isotype), the test group (c-myc), the pre-cleared lysate (lysate), and the molecular weight ladder (ladder). The 25 and 75 kDa ladder bands are marked. The two prominent bands at ~25 kDa and 50 kDa are the light and heavy chain of the binding antibody, respectively and are non-specific to the IP or the samples. c-myc protein which runs around 67kDa on Western blots and is usually visible just below the 75 kDa ladder band. In this blot, the c-myc band is visible in the second lane, but absent in the first lane, indicating that the IP antibody successfully pulled down c-myc. There is no visible band in the pre-cleared lysate lane, suggesting that this protein has low endogenous expression levels.

Figure 2
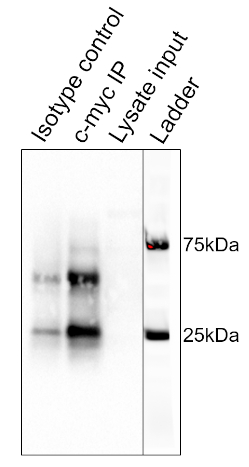
Figure 2: Results of a Western Blot Analysis, used to assess the purification of c-myc by immunoprecipitation. A band at 67 kDa, corresponding to c-myc, is visible in the anti-c-myc lane, but not the isotype control lane. Note that c-myc levels were not high enough to be visualized in the lysate lane. Please click here to view a larger version of this figure.

Applications and Summary

In short, immunoprecipitation is the isolation of a specific protein using an antibody. In this example, the results of the immunoprecipitation were analyzed by Western blot to assess the purity. The isolated protein could be used in a number of applications afterwards including: NMR for protein structure, Mass Spectrometry for amino acid sequence, or in vitro assays for enzymatic characterization. IPs can also characterize the interacting partners of proteins. For instance, following isolation, DNA or RNA could be isolated for sequencing. Co-immunoprecipitations assess protein-protein interactions. When the target protein is pulled down during an IP, interacting proteins can also be pulled down. These interacting partners can be assessed by mass spectrometry and Western blot. Immunoprecipitation is a powerful technique for studying protein biology.

References

  1. Olliver, C. L. and Boyd, C. D. (1984). Immunoprecipitation of In Vitro Translation Products with Protein A Bound to Sepharose. In J. M. Walker (eds), Nucleic Acids. Methods in Molecular Biology (pp. 157-160). New Jersey: Humana Press.
  2. Thurston, C. F. and Henley, L. F. (1988). Direct Immunoprecipitation of Protein. In J. M. Walker (eds), New Protein Techniques. Methods in Molecular Biology (pp. 149-158). New Jersey: Humana Press.
  3. Anderson, N. G. (1998). Co-immunoprecipitation: Identification of Interacting Proteins. In R. A. Clegg (eds), Protein Targeting Protocols.Methods in Molecular Biology (pp. 35-45). New Jersey: Humana Press.
  4. Jackson, D. I. and Dickson, C. (1999). Protein Techniques: Immunoprecipitation, In Vitro Kinase Assays, and Western Blotting. In P.T. Sharpe and I. Mason (eds), Molecular Embryology. Methods in Molecular Biology (pp. 699-708). New Jersey: Humana Press.
  5. Trieu, E. P. and Targoff, I. N. (2015). Immunoprecipitation: Western Blot for Proteins of Low Abundance. In B. Kurien and R. Scofield (eds), Western Blotting. Methods in Molecular Biology (pp. 327-342). New York, NY: Humana Press.

Transcript

Immunoprecipitation, or IP, is a widely used technique to isolate a protein of interest from a cell or tissue lysate or a body fluid for protein characterization or to investigate protein-protein interactions.

The process begins with an antibody, which has a high affinity and specificity for the target protein. This antibody is mixed with the sample, allowing antibody-target complexes to form. Any protein bound to the target protein also gets indirectly attached to the antibody in the process. Next, the solution is incubated with agarose beads, conjugated to a bacterial protein, which has a strong affinity for the constant region of antibodies. The bacterial protein binds to the antibody and connects the antibody- target complexes to the beads. Then, the solution is centrifuged to precipitate the beads, thereby extracting the entire complex containing the binding antibody, the target protein, and any interacting proteins. Finally, the bound proteins are extracted from the beads and released from each other and are used for further analysis by techniques such as Western blotting.

Several variations of different parts of this technique are commonly used, like pre-clearing, using peptide tags or magnetic beads, or analyzing other non-protein binding partners. IP can be preceeded by a pre-clearing step, to remove non-specific antibody-binding proteins in the sample and minimize background. This involves first incubating the sample with isotype control antibodies, allowing them to bind to these proteins, and then using agarose beads to precipitate the complexes. The sample is then ready to proceed to the actual IP.

Peptide tags are useful if a specific antibody is not available for IP. Here, the target protein can be genetically modified to contain a peptide epitope tag and an antibody against the tag is able to pull out the protein of interest. Magnetic beads are often used instead of agarose to precipitate the target. After binding to the antibody-target complex, the sample tube is placed in a strong magnetic field, which extracts the beads from the solution. This eliminates the need for centrifugation and improves speed and convenience.

Immunoprecipitation is also used for studying DNA or RNA binding proteins and are known as chromatin immunoprecipitation and RNA immunoprecipitation, respectively. These variations are useful for troubleshooting and adapting the method for different experimental applications. In this video, you will observe how to pre-clear a cell lysate and perform immunoprecipitation to extract a protein of interest, followed by Western blot analysis to validate the experiment.

To begin, place the pre-collected cells in a microcentrifuge and spin at 13 thousand rpm for three minutes. Following the spin, remove the supernatant and then resuspend the cells in 500 microliters of lysis buffer RIPA with PMSF. Now, disrupt the cells using a few quick pulses with a vortex and then aspirate the lysate a few times with a 25 gauge needle attached to a syringe, taking care to avoid creating bubbles. Place the cells on ice for 15 minutes. After incubating the samples on ice, centrifuge the lysate for 15 minutes at four degrees celsius.

Label a new 1.5 milliliter microcentrifuge tube. Following the spin, transfer the supernatant to the freshly labeled tube and discard the pellet. Next, pre-clear the lysate of contaminants that bind non-specifically to either the agarose beads or the primary antibody by adding 20 microliters of the Protein A/G PLUS-agarose beads and one microgram of an isotype control antibody to the lysate, which in this example is a mouse IgG1 isotype control. Incubate the tube on a rotator in a cold room for 30 minutes. After rotating the lysate in the cold room for 30 minutes, centrifuge the sample at 3200 rpm for 30 seconds at four degrees celsius. Remove the tube from the centrifuge and transfer the pre-cleared supernatant to a fresh labeled 1.5 milliliter microcentrifuge tube. Discard the pellet.

Now, determine the protein concentration of the cell lysate by performing a Bradford assay. Label seven 1. 5-milliliter microcentrifuge tubes one through six and sample and aliquot 1000 microliters of the Bradford reagent into each tube. Six of the tubes will be used to make a standard curve by adding various amounts of known quantities of BSA to each tube. The amounts to add are listed in this table. In the seventh sample tube, add one microliter of the pre-cleared lysate. Place 200 microliters from each of the seven tubes into individual wells of a flat-bottom 96-well plate, repeating each sample in triplicate so that there are three columns of seven samples. Read the plate on a plate reader, using a wavelength of 595 nanometers. After creating a standard curve in Excel, calculate the protein concentration of the pre-cleared lysate.

Next, label two 1.5-milliliter microcentrifuge tubes- one as control and the other as test, which in this example, will be the c-myc antibody. Place 500 micrograms of the pre-cleared lysate into each of these tubes and then bring the total volume for each tube up to 500 microliters using lysis buffer. Next, add two micrograms of the anti-c-myc antibody to the test group tube. For the control, add two micrograms of the mouse IgG1 isotype control antibody. Once the antibodies are added to the tubes, place the samples on a rotator in a cold room and incubate for two hours. Now, add the agarose beads. To do this, it is recommended to cut off the end of a pipette tip and then, using this modified tip, add 200 microliters of the Protein A/G PLUS-agarose beads to each tube. Incubate the tubes on a rotator in the cold room overnight.

Following the incubation, remove the tubes from the rotator and spin the lysates in the microcentrifuge to pull down the beads. After the spin is complete, remove the tubes from the centrifuge and aspirate the supernatant from each tube. Next, wash the beads using 500 microliters of 1X Dulbecco’s PBS. Place the tubes in a microcentrifuge and spin down for 30 seconds at four degrees celsius. Following this, remove the supernatant. Repeat the wash and centrifuge steps one more time for a total of two times. Remove the tubes from the microcentrifuge and aspirate the buffer from each tube. Using gel loading tips, remove any left over buffer from the beads, keeping the beads on ice to elute the bound protein.

In this example, the protein is eluted into SDS-PAGE running buffer by boiling for Western blot analysis. To do this, resuspend the beads in 20 microliters of SDS-PAGE loading dye containing beta-mercaptoethanol, or BME. Boil the samples at 95 degrees celsius for five minutes to dissociate the immunocomplexes from the beads. Then, centrifuge the beads at maximum speed for 10 seconds at room temperature. Remove the tubes from the microcentrifuge and hold them in a rack at room temperature. Using gel loading tips, carefully pipette the samples from the beads and load them into wells of a 4 to 15% gradient SDS-PAGE gel. In addition to the samples, load a lane with a protein ladder as well as a lane with the pre-cleared lysate to serve as a loading control. Once the gel is loaded, run the gel at 100 volts.

After the dye front has reached the bottom of the gel, which should take approximately one hour, stop the gel and make a Western blot sandwich, ensuring that the PVDF membrane is between the gel and the cathode. Place the Western blot sandwich in the transfer apparatus and transfer the proteins on the gel to the membrane for one hour at 100 volts. After the transfer is complete, place the membrane in five milliliters of block to prevent the antibodies from binding non-specifically to the membrane. Rock at a low setting for an hour at room temperature. When the timer sounds, remove the blocking buffer. Add five milliliters of the blocking buffer with the detection antibody to the membrane. Here, an anti-c-myc antibody, that is different than the one used for the pull down, is used.

Incubate the blot over night, at four degrees celsius on a rocker at a low setting. Following the incubation, remove the antibody and blocking buffer. Wash the blot, using five milliliters of TBST for five minutes at room temperature, on a rocker at a low setting. This wash step should be repeated two to five times for a total of three to six washes, using fresh TBST for each wash. Add five milliliters of one to 1000 secondary antibody and blocking buffer to the blot. In this case, the secondary antibody is HRP-tagged anti-rabbit light chain. Incubate the blot on a rocker at a low setting for one our at room temperature. Next, remove the buffer and wash the blot with five milliliters of TBST. Incubate this wash on a rocker at a low setting for five minutes at room temperature. Repeat this wash for a total of six to 12 washes, each with a fresh five milliliters of TBST. Remove the final wash by first pouring the liquid off of the blot. Then, using tweezers, dab the edge of the blot on a laboratory wipe to remove any excess liquid and then place the blot in a fresh container. Next, cover the blot with 1X Chemiluminescent Detection Reagent and incubate for one minute.

Working quickly, dab the edge of the blot on a laboratory wipe to remove any excess detection reagent and then place the blot on the imaging surface of the Imager tray. Image using the Chemiluminescent program to capture multiple time points from 10 to 30 seconds. After the blot is imaged, choose an image with optimal band visibility and then export that image. Prior to moving the blot, use the Imager to take a picture of the blot to capture the location of the ladder. Then, export that image also. Finally, using a slide preparation software, such as PowerPoint, align the bands and ladder images to form one image.

This image shows the Western blot result for immunoprecipitation of the protein c-myc from thymocyte cells. From left to right, the lanes represent the isotype control, the c-myc IP, and the pre-cleared lysate input. The lane on the extreme right is a merged image of the molecular weight ladder. The strong band, at around 25 kilodaltons is from the light chain and the one at 50 kilodaltons is from the heavy chain of the binding antibody and are non-specific to the IP or the samples. C-myc runs around 67 kilodaltons on Western blots and is usually visible just below the 75 kilodalton ladder band. In this blot, the c-myc band is visible in the second lane but absent in the first lane, indicating that the IP antibody successfully pulled down c-myc. There is no visible band in the pre-cleared lysate lane, suggesting that this protein has low endogenous expression levels.

Tags

Cite This
JoVE Science Education Database. JoVE Science Education. Immunoprecipitation-Based Techniques: Purification of Endogenous Proteins Using Agarose Beads. JoVE, Cambridge, MA, (2023).