A subscription to JoVE is required to view this content.  Sign in or start your free trial.
Immunoprecipitation-Based Techniques: Purification of Endogenous Proteins Using Agarose Beads
  • 00:01Concepts
  • 03:25Immunoprecipitation Using Protein A/G Plus Agarose Beads
  • 08:18IP Verification Through Western Blot Analysis
  • 12:36Results

Tecniche basate sull'immuno-precipitazione: purificazione di proteine endogene con l'impiego di microsfere di agarosio

English

Share

Overview

Fonte: Susannah C. Shissler1, Tonya J. Webb1
1 Dipartimento di Microbiologia e Immunologia, Università del Maryland, Baltimora, MD 21201

L’immunoprecipitazione (IP, noto anche come test “pull-down”) è una tecnica ampiamente utilizzata che ha applicazioni in una varietà di campi. Concepito per la prima volta nel 1984, è stato perfezionato nel 1988 (1, 2). L’obiettivo fondamentale dell’IP è la purificazione e l’isolamento di una proteina specifica utilizzando un anticorpo contro quella proteina. La parola “immuno” si riferisce all’uso di un anticorpo mentre la parola “precipitazione” si riferisce all’estrazione di una sostanza specifica da una soluzione. La proteina bersaglio potrebbe essere endogena o ricombinante. La maggior parte delle proteine ricombinanti ha un tag epitopo (cioè myc o bandiera) attaccato a loro per semplificare la successiva purificazione. In genere, è più facile ottimizzare la proteina IP ricombinante perché gli anticorpi contro i tag epitopi ricombinanti sono molto forti ed efficaci. Gli anticorpi contro le proteine endogene hanno un’efficacia estremamente variabile, rendendo molto più difficile ottimizzare queste IP. Un passo necessario dopo l’immunoprecipitazione è la verifica della purificazione. La proteina isolata viene risolta utilizzando SDS-PAGE e successivamente sonde per la purezza da western blots (Figura 1). Un controllo importante è l’uso di un anticorpo diverso durante il Western blot per verificare il pull down della proteina corretta. La combinazione di IP con tecniche successive è un potente strumento di analisi. L’obiettivo dopo la purificazione può essere la caratterizzazione della proteina stessa mediante NMR, spettrometria di massa e saggi in vitro, o l’analisi dei partner interagenti della proteina (cioè proteine, DNA, RNA) (3, 4, 5).

Figure 1
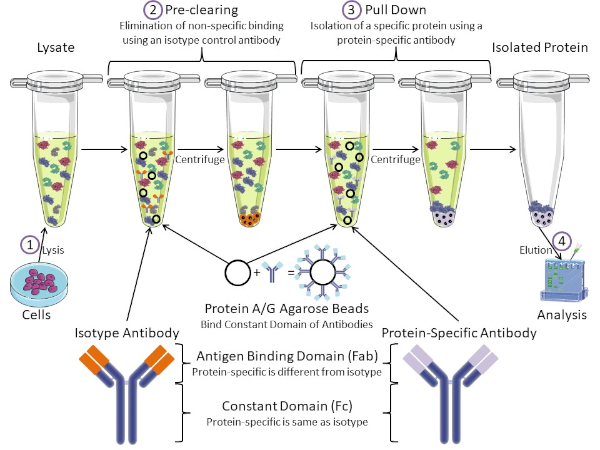
Figura 1: Panoramica della procedura di immunoprecipitazione. L’immunoprecipitazione è l’isolamento di una proteina specifica utilizzando un anticorpo. Dopo la produzione di lisi dalle cellule, ci sono due passaggi principali: pre-pulizia e pull down. Durante la fase di pre-clearing, i lasati cellulari viene pre-eliminata dalle proteine che si legano agli anticorpi in modo non specifico utilizzando un anticorpo di controllo dell’isotipo. Nella fase di pull down, la proteina bersaglio viene tirata verso il basso usando un anticorpo specifico della proteina. La proteina isolata viene quindi analizzata da Western blot. Gli anticorpi isotipia e gli anticorpi specifici della proteina hanno lo stesso dominio costante, ma domini di legame dell’antigene diversi. Un componente chiave di questo protocollo sono le perle di agarose della proteina A / G che legano il dominio costante degli anticorpi, consentendo l’immunoprecipitazione della proteina bersaglio. Fare clic qui per visualizzare una versione più grande di questa figura.

Gli anticorpi sono il componente chiave di un’immunoprecipitazione che la differenziano da altre forme di purificazione delle proteine (cioè la purificazione della colonna di affinità del nichel). Gli anticorpi sono molecole prodotte da cellule B in grado di riconoscere specifici epitopi proteici. Gli anticorpi hanno due domini: costante (Fc) e legame con l’antigene (Fab) (Figura 1). Il dominio costante identifica il tipo di anticorpo e detta la funzione in vivo. Di solito, i domini costanti degli anticorpi utilizzati per l’IP sono IgG di topo, ratto o coniglio. La porzione di legame con l’antigene dell’anticorpo riconosce un epitopo specifico di una proteina specifica. Gli anticorpi possono riconoscere gli epitopi su proteine ripiegate che potrebbero non esistere quando la proteina è denaturata e viceversa. Pertanto, la disponibilità dell’epitopo dipende dal ripiegamento delle proteine, identificando un fattore importante da considerare quando si scelgono anticorpi e condizioni per l’IP.

Sia il sistema procariotico che eucariotico hanno proteine leganti gli anticorpi. Nei sistemi eucariotici, lo scopo è la protezione immunitaria dai batteri mentre nei sistemi procariotici, lo scopo è la protezione dal sistema immunitario. Le proteine leganti gli anticorpi influenzano la metodologia IP in due modi. In primo luogo, c’è una fase di pre-clearing necessaria (Figura 1) per liberare il lisiato dalle proteine che legano gli anticorpi, riducendo così il legame non specifico nel prodotto finale. Questo passaggio utilizza un anticorpo isotipo che ha lo stesso dominio costante ma un dominio di legame anticorpale diverso rispetto all’anticorpo specifico della proteina. Le proteine che legano gli anticorpi batterici sono il secondo componente chiave di questo metodo. Dopo che l’anticorpo proteina-specifica lega la proteina bersaglio, il complesso anticorpo: proteina deve essere tirato verso il basso (Figura 1). Le proteine A, G e L sono proteine batteriche che legano il dominio costante degli anticorpi. Mentre i batteri usano questo per sovvertire il sistema immunitario, i ricercatori hanno cooptato questo sistema per una facile purificazione degli anticorpi, e viene utilizzato sia durante le fasi di pre-clearing che di pull-down. Queste proteine hanno diverse affinità di legame per diverse specie e diversi sottotipi di dominio costante – un altro fattore da considerare quando si scelgono le condizioni per IP. Molte aziende vendono perle di agarose marcate Protein A / G (Figura 1), colonne di spin prefabbricate o resine per realizzare colonne. In generale, le pere e le colonne di spin vengono utilizzate per campioni di dimensioni inferiori, mentre le resine vengono utilizzate per la purificazione alla rinfusa.

In questo esercizio di laboratorio, dimostriamo come purificare la proteina endogena c-myc, dai timociti murini primari, utilizzando la tecnica di immunoprecipitazione di base basata sulle perle di agarose Protein A / G Plus. Il protocollo inizia dalla preparazione del lizzata cellulare e termina con la verifica del successo del pull down proteico utilizzando l’analisi Western blot.

Procedure

1. Immunoprecipitazione con pere di agarose della proteina A/G PLUS Preparazione del losato cellulare Centrifugare 108 timociti in una microcentrifuga a 13.000 giri/min per 3 minuti e rimuovere il surnatante.Nota: Il numero di cellule varierà a seconda dei livelli di espressione della proteina desiderata e del tipo di cellula scelto. Sospendere di ricaspendere le cellule nel tampone di lisi da 500 …

Results

The results of the procedure detailed above are shown in Figure 2. From left to right, the lanes contain the control group (isotype), the test group (c-myc), the pre-cleared lysate (lysate), and the molecular weight ladder (ladder). The 25 and 75 kDa ladder bands are marked. The two prominent bands at ~25 kDa and 50 kDa are the light and heavy chain of the binding antibody, respectively and are non-specific to the IP or the samples. c-myc protein which runs around 67kDa on Western blots and is usually visible just below the 75 kDa ladder band. In this blot, the c-myc band is visible in the second lane, but absent in the first lane, indicating that the IP antibody successfully pulled down c-myc. There is no visible band in the pre-cleared lysate lane, suggesting that this protein has low endogenous expression levels.

Figure 2
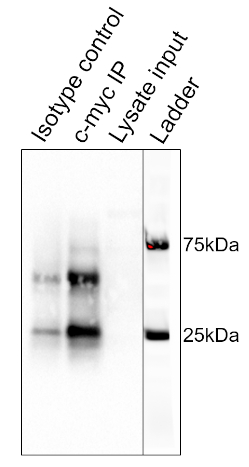
Figure 2: Results of a Western Blot Analysis, used to assess the purification of c-myc by immunoprecipitation. A band at 67 kDa, corresponding to c-myc, is visible in the anti-c-myc lane, but not the isotype control lane. Note that c-myc levels were not high enough to be visualized in the lysate lane. Please click here to view a larger version of this figure.

Applications and Summary

In short, immunoprecipitation is the isolation of a specific protein using an antibody. In this example, the results of the immunoprecipitation were analyzed by Western blot to assess the purity. The isolated protein could be used in a number of applications afterwards including: NMR for protein structure, Mass Spectrometry for amino acid sequence, or in vitro assays for enzymatic characterization. IPs can also characterize the interacting partners of proteins. For instance, following isolation, DNA or RNA could be isolated for sequencing. Co-immunoprecipitations assess protein-protein interactions. When the target protein is pulled down during an IP, interacting proteins can also be pulled down. These interacting partners can be assessed by mass spectrometry and Western blot. Immunoprecipitation is a powerful technique for studying protein biology.

References

  1. Olliver, C. L. and Boyd, C. D. (1984). Immunoprecipitation of In Vitro Translation Products with Protein A Bound to Sepharose. In J. M. Walker (eds), Nucleic Acids. Methods in Molecular Biology (pp. 157-160). New Jersey: Humana Press.
  2. Thurston, C. F. and Henley, L. F. (1988). Direct Immunoprecipitation of Protein. In J. M. Walker (eds), New Protein Techniques. Methods in Molecular Biology (pp. 149-158). New Jersey: Humana Press.
  3. Anderson, N. G. (1998). Co-immunoprecipitation: Identification of Interacting Proteins. In R. A. Clegg (eds), Protein Targeting Protocols.Methods in Molecular Biology (pp. 35-45). New Jersey: Humana Press.
  4. Jackson, D. I. and Dickson, C. (1999). Protein Techniques: Immunoprecipitation, In Vitro Kinase Assays, and Western Blotting. In P.T. Sharpe and I. Mason (eds), Molecular Embryology. Methods in Molecular Biology (pp. 699-708). New Jersey: Humana Press.
  5. Trieu, E. P. and Targoff, I. N. (2015). Immunoprecipitation: Western Blot for Proteins of Low Abundance. In B. Kurien and R. Scofield (eds), Western Blotting. Methods in Molecular Biology (pp. 327-342). New York, NY: Humana Press.

Transcript

Immunoprecipitation, or IP, is a widely used technique to isolate a protein of interest from a cell or tissue lysate or a body fluid for protein characterization or to investigate protein-protein interactions.

The process begins with an antibody, which has a high affinity and specificity for the target protein. This antibody is mixed with the sample, allowing antibody-target complexes to form. Any protein bound to the target protein also gets indirectly attached to the antibody in the process. Next, the solution is incubated with agarose beads, conjugated to a bacterial protein, which has a strong affinity for the constant region of antibodies. The bacterial protein binds to the antibody and connects the antibody- target complexes to the beads. Then, the solution is centrifuged to precipitate the beads, thereby extracting the entire complex containing the binding antibody, the target protein, and any interacting proteins. Finally, the bound proteins are extracted from the beads and released from each other and are used for further analysis by techniques such as Western blotting.

Several variations of different parts of this technique are commonly used, like pre-clearing, using peptide tags or magnetic beads, or analyzing other non-protein binding partners. IP can be preceeded by a pre-clearing step, to remove non-specific antibody-binding proteins in the sample and minimize background. This involves first incubating the sample with isotype control antibodies, allowing them to bind to these proteins, and then using agarose beads to precipitate the complexes. The sample is then ready to proceed to the actual IP.

Peptide tags are useful if a specific antibody is not available for IP. Here, the target protein can be genetically modified to contain a peptide epitope tag and an antibody against the tag is able to pull out the protein of interest. Magnetic beads are often used instead of agarose to precipitate the target. After binding to the antibody-target complex, the sample tube is placed in a strong magnetic field, which extracts the beads from the solution. This eliminates the need for centrifugation and improves speed and convenience.

Immunoprecipitation is also used for studying DNA or RNA binding proteins and are known as chromatin immunoprecipitation and RNA immunoprecipitation, respectively. These variations are useful for troubleshooting and adapting the method for different experimental applications. In this video, you will observe how to pre-clear a cell lysate and perform immunoprecipitation to extract a protein of interest, followed by Western blot analysis to validate the experiment.

To begin, place the pre-collected cells in a microcentrifuge and spin at 13 thousand rpm for three minutes. Following the spin, remove the supernatant and then resuspend the cells in 500 microliters of lysis buffer RIPA with PMSF. Now, disrupt the cells using a few quick pulses with a vortex and then aspirate the lysate a few times with a 25 gauge needle attached to a syringe, taking care to avoid creating bubbles. Place the cells on ice for 15 minutes. After incubating the samples on ice, centrifuge the lysate for 15 minutes at four degrees celsius.

Label a new 1.5 milliliter microcentrifuge tube. Following the spin, transfer the supernatant to the freshly labeled tube and discard the pellet. Next, pre-clear the lysate of contaminants that bind non-specifically to either the agarose beads or the primary antibody by adding 20 microliters of the Protein A/G PLUS-agarose beads and one microgram of an isotype control antibody to the lysate, which in this example is a mouse IgG1 isotype control. Incubate the tube on a rotator in a cold room for 30 minutes. After rotating the lysate in the cold room for 30 minutes, centrifuge the sample at 3200 rpm for 30 seconds at four degrees celsius. Remove the tube from the centrifuge and transfer the pre-cleared supernatant to a fresh labeled 1.5 milliliter microcentrifuge tube. Discard the pellet.

Now, determine the protein concentration of the cell lysate by performing a Bradford assay. Label seven 1. 5-milliliter microcentrifuge tubes one through six and sample and aliquot 1000 microliters of the Bradford reagent into each tube. Six of the tubes will be used to make a standard curve by adding various amounts of known quantities of BSA to each tube. The amounts to add are listed in this table. In the seventh sample tube, add one microliter of the pre-cleared lysate. Place 200 microliters from each of the seven tubes into individual wells of a flat-bottom 96-well plate, repeating each sample in triplicate so that there are three columns of seven samples. Read the plate on a plate reader, using a wavelength of 595 nanometers. After creating a standard curve in Excel, calculate the protein concentration of the pre-cleared lysate.

Next, label two 1.5-milliliter microcentrifuge tubes- one as control and the other as test, which in this example, will be the c-myc antibody. Place 500 micrograms of the pre-cleared lysate into each of these tubes and then bring the total volume for each tube up to 500 microliters using lysis buffer. Next, add two micrograms of the anti-c-myc antibody to the test group tube. For the control, add two micrograms of the mouse IgG1 isotype control antibody. Once the antibodies are added to the tubes, place the samples on a rotator in a cold room and incubate for two hours. Now, add the agarose beads. To do this, it is recommended to cut off the end of a pipette tip and then, using this modified tip, add 200 microliters of the Protein A/G PLUS-agarose beads to each tube. Incubate the tubes on a rotator in the cold room overnight.

Following the incubation, remove the tubes from the rotator and spin the lysates in the microcentrifuge to pull down the beads. After the spin is complete, remove the tubes from the centrifuge and aspirate the supernatant from each tube. Next, wash the beads using 500 microliters of 1X Dulbecco’s PBS. Place the tubes in a microcentrifuge and spin down for 30 seconds at four degrees celsius. Following this, remove the supernatant. Repeat the wash and centrifuge steps one more time for a total of two times. Remove the tubes from the microcentrifuge and aspirate the buffer from each tube. Using gel loading tips, remove any left over buffer from the beads, keeping the beads on ice to elute the bound protein.

In this example, the protein is eluted into SDS-PAGE running buffer by boiling for Western blot analysis. To do this, resuspend the beads in 20 microliters of SDS-PAGE loading dye containing beta-mercaptoethanol, or BME. Boil the samples at 95 degrees celsius for five minutes to dissociate the immunocomplexes from the beads. Then, centrifuge the beads at maximum speed for 10 seconds at room temperature. Remove the tubes from the microcentrifuge and hold them in a rack at room temperature. Using gel loading tips, carefully pipette the samples from the beads and load them into wells of a 4 to 15% gradient SDS-PAGE gel. In addition to the samples, load a lane with a protein ladder as well as a lane with the pre-cleared lysate to serve as a loading control. Once the gel is loaded, run the gel at 100 volts.

After the dye front has reached the bottom of the gel, which should take approximately one hour, stop the gel and make a Western blot sandwich, ensuring that the PVDF membrane is between the gel and the cathode. Place the Western blot sandwich in the transfer apparatus and transfer the proteins on the gel to the membrane for one hour at 100 volts. After the transfer is complete, place the membrane in five milliliters of block to prevent the antibodies from binding non-specifically to the membrane. Rock at a low setting for an hour at room temperature. When the timer sounds, remove the blocking buffer. Add five milliliters of the blocking buffer with the detection antibody to the membrane. Here, an anti-c-myc antibody, that is different than the one used for the pull down, is used.

Incubate the blot over night, at four degrees celsius on a rocker at a low setting. Following the incubation, remove the antibody and blocking buffer. Wash the blot, using five milliliters of TBST for five minutes at room temperature, on a rocker at a low setting. This wash step should be repeated two to five times for a total of three to six washes, using fresh TBST for each wash. Add five milliliters of one to 1000 secondary antibody and blocking buffer to the blot. In this case, the secondary antibody is HRP-tagged anti-rabbit light chain. Incubate the blot on a rocker at a low setting for one our at room temperature. Next, remove the buffer and wash the blot with five milliliters of TBST. Incubate this wash on a rocker at a low setting for five minutes at room temperature. Repeat this wash for a total of six to 12 washes, each with a fresh five milliliters of TBST. Remove the final wash by first pouring the liquid off of the blot. Then, using tweezers, dab the edge of the blot on a laboratory wipe to remove any excess liquid and then place the blot in a fresh container. Next, cover the blot with 1X Chemiluminescent Detection Reagent and incubate for one minute.

Working quickly, dab the edge of the blot on a laboratory wipe to remove any excess detection reagent and then place the blot on the imaging surface of the Imager tray. Image using the Chemiluminescent program to capture multiple time points from 10 to 30 seconds. After the blot is imaged, choose an image with optimal band visibility and then export that image. Prior to moving the blot, use the Imager to take a picture of the blot to capture the location of the ladder. Then, export that image also. Finally, using a slide preparation software, such as PowerPoint, align the bands and ladder images to form one image.

This image shows the Western blot result for immunoprecipitation of the protein c-myc from thymocyte cells. From left to right, the lanes represent the isotype control, the c-myc IP, and the pre-cleared lysate input. The lane on the extreme right is a merged image of the molecular weight ladder. The strong band, at around 25 kilodaltons is from the light chain and the one at 50 kilodaltons is from the heavy chain of the binding antibody and are non-specific to the IP or the samples. C-myc runs around 67 kilodaltons on Western blots and is usually visible just below the 75 kilodalton ladder band. In this blot, the c-myc band is visible in the second lane but absent in the first lane, indicating that the IP antibody successfully pulled down c-myc. There is no visible band in the pre-cleared lysate lane, suggesting that this protein has low endogenous expression levels.

Tags

Cite This
JoVE Science Education Database. JoVE Science Education. Immunoprecipitation-Based Techniques: Purification of Endogenous Proteins Using Agarose Beads. JoVE, Cambridge, MA, (2023).